
Table of Contents
Introduction
Summary: Buying a new manufactured home is one of the biggest purchases you will ever make. Today’s homes offer high build quality and great value. However, rushing into a purchase contract without checking details can lead to huge financial losses. This guide breaks down dealer tricks, hidden site prep costs, HUD building rules, and pre-delivery checks in plain, simple English. Protect your savings by learning what to check before you sign any paper. Note: Local labor rates for buying a new manufactured home change constantly. See our full regional cost table below.
Affiliate Disclosure: MobileHomeFriend.com is reader-supported. When you buy through links on our site, we may earn an affiliate commission at zero extra cost to you. We only recommend tools and gear that pass our direct testing standards.
Video Guide Overview
The Short Answer
Here is the bottom line: never sign a purchase contract until every single delivery fee, site prep cost, utility connection, and warranty item is written out in plain numbers. Sales agents on dealer lots make big verbal promises every day. Once you sign the paper and the transport truck pulls away, those verbal promises mean nothing. Modern manufactured homes are built with strong engineering. But the purchase contracts are written to protect the dealer, not you. If you sign early without written setup guarantees and full site checks, you take on 100% of the financial risk. Take control of the contract before you hand over any deposit money.
Part 1: Before You Shop
Treat buying a home like an engineering project. Do not make choices based on emotion. Before you visit a sales lot, build a clear financial plan. If you shop without firm rules, a trained salesperson will control your wallet.
1. Know Your Real Budget
The biggest mistake new buyers make is looking only at the sticker price on the home. The price tag on a display unit is just a small part of your real cost. Your total housing cost breaks down into five clear parts:
- Base Home Sticker Price: The cost for the factory structure itself.
- Land Purchase or Lot Rent: Buying your land parcel or paying monthly park lot rent.
- Site Preparation Work: Clearing trees, grading dirt, digging foundations, and setting up drainage.
- Utility Hookup Connections: Water meters, power poles, septic systems, and gas lines.
- Monthly Holding Costs: Property taxes, hazard insurance, loan interest, and repair funds.
Calculate your full monthly housing cost before talking to lenders. Get pre-approved for a mortgage before you pick a floor plan. If you want to see how monthly home costs fit into your long-term retirement budget, read our helpful guide over at Mobile Home Friend.
2. Research Manufacturing Quality
Not all factories build homes to the same standard. Every unit must meet federal Department of Housing and Urban Development (HUD) safety codes. But factories use different wall framing, floor thickness, and insulation levels.
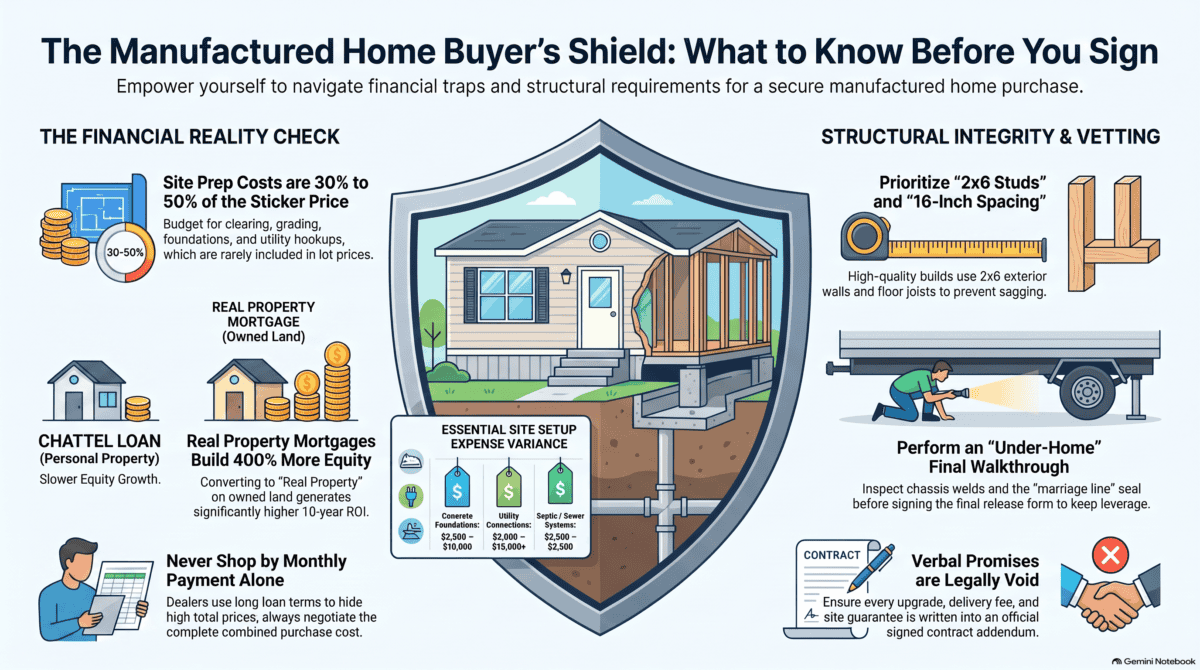
Look past fancy paint colors and kitchen counters. Ask for the factory spec sheet. Check the wall stud size (2×6 studs versus 2×4 studs). Look at floor joist spacing (16 inches on center versus 24 inches). Check the roof truss weight capacity and the thermal insulation R-values in the floor, walls, and roof.
3. Pick the Right Retail Dealer
The retail dealer is not the factory owner. The dealer is an independent store. They handle sales, hire setup workers, coordinate transport, and take initial warranty calls. A great factory cannot fix a lazy or cheap dealer.
Check dealer records carefully. Look at how many years they have operated in your county. Check their business license and bonding records. Read customer reviews that mention post-sale repair service. Ask if they use their own trained setup crew or hire third-party contractors.
Technical Deep Dive 1: HUD Code Structural, Electrical, and Energy Standards
The HUD Code is the nationwide building standard for manufactured housing. Federal law set these rules in 1976 and updated them in 2000. Unlike regular site-built houses that follow local city codes, manufactured homes are built inside indoor plants to federal rules. Knowing these rules helps you spot top-tier home builds.
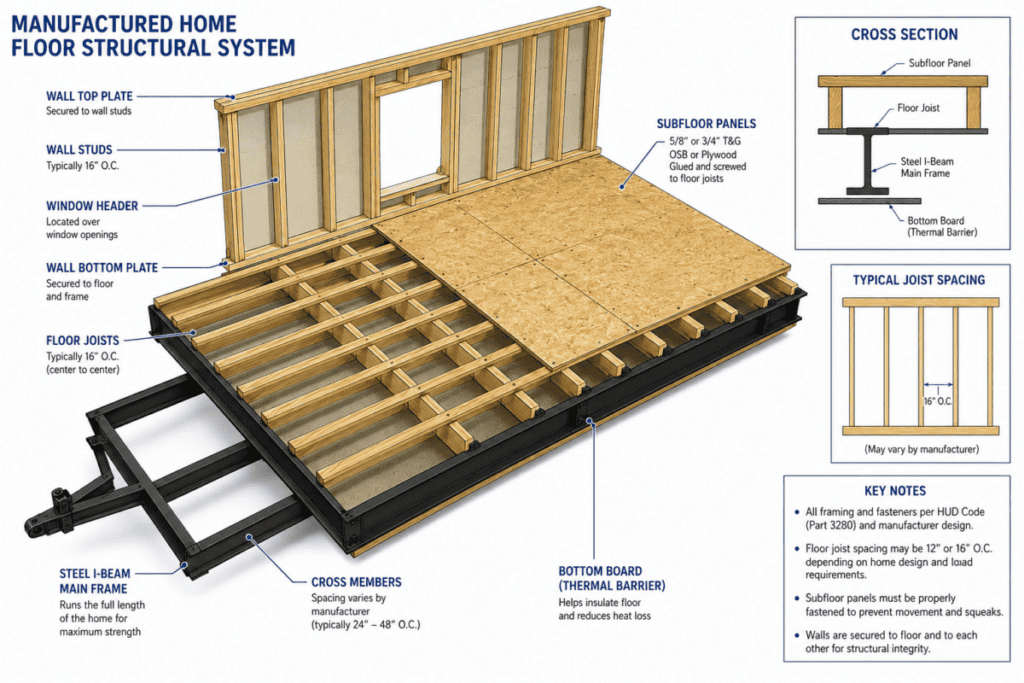
Every home sits on a heavy steel I-beam chassis. These main steel beams run under the home and range from 10 inches to 12 inches deep. Wood floor joists attach directly to these steel beams. Good structural builds use 2×8 floor joists placed 16 inches apart on center. Cheap builds use 2×6 floor joists spaced 24 inches apart. Spacing joists 24 inches apart creates floor bounce and sagging over time.
Subfloor material is critical for long-term strength. Top builders use 3/4-inch tongue-and-groove Oriented Strand Board (OSB) or real exterior plywood. Cheap builders use particleboard. Particleboard soaks up moisture, swells, and falls apart when hit with minor plumbing leaks.
Exterior walls must stand up to transport shaking and strong winds. The HUD code creates three distinct wind zones:
- Wind Zone I: Standard inland areas with basic wind speeds.
- Wind Zone II: Coastal areas built for 100 mph wind gusts.
- Wind Zone III: High-risk coastlines built for 110 mph winds.
Choose 2×6 exterior wall studs set 16 inches apart over basic 2×4 studs. The deeper 2×6 wall cavity holds thick R-21 insulation batts. In cold regions, order a thermal package with R-22 floor insulation, R-19 wall insulation, and R-38 ceiling insulation. This cuts winter heating bills by hundreds of dollars each year.
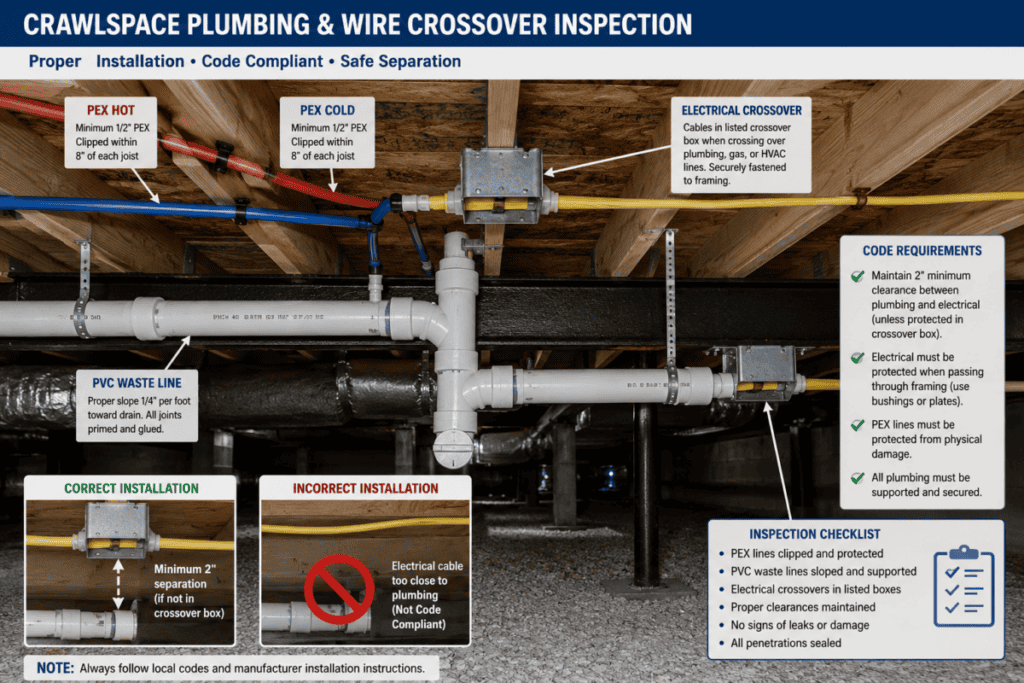
Electrical wiring must follow Article 550 of the National Electrical Code (NEC). Main breaker boxes need solid copper bus bars rated for 100-amp to 200-amp power supply. Crossover cables linking double-wide sections must join inside weatherproof metal or PVC junction boxes. Fresh water supply lines should use freeze-resistant PEX tubing, while drain lines use Schedule 40 PVC pipe.
Part 2: The Do’s
Smart buyers stick to a clear process. Following these steps keeps you in command and forces the dealer to treat you fairly.
1. Do Compare Multiple Homes in Person
Never buy a home after touring just one sales lot or looking at photos online. Walk through homes built by at least three different companies. Check door frames to see if they are square. Inspect cabinet box construction. Solid plywood boxes last decades, while stapled particleboard boxes break under heavy dishes. Touch window seals and siding joints to see how well parts fit together.

2. Do Ask What Is Included in the Base Price
Base price numbers on dealer signs hide massive costs. Get a written price sheet that lists every single item line by line. Verify if the price includes:
- Factory freight charges and fuel fees.
- Unloading, blocking, leveling, and section bolting.
- City permit fees and local inspection costs.
- Poured concrete runner pads or block pier systems.
- A/C compressor unit, copper line sets, and air duct hookups.
- Vinyl or concrete block skirting materials and labor.
- Code-approved steps, landings, and handrails.
- Water, sewer, and electric tie-ins.
3. Do Get Every Promise in Writing
If a sales agent promises free entry steps, upgraded kitchen tools, custom decks, or free dirt grading, put it in the contract. Write every single promise on an official contract addendum. Signed contract pages hold up in court; verbal lot promises do not.
4. Do Understand Your Warranty Rights
Manufactured home warranties break down into four separate parts. You need to know who covers what:
- Factory Structural Warranty: Covers steel chassis welds, wall framing, and roof trusses (1 to 5 years).
- Dealer Setup Warranty: Covers pier leveling, marriage line seals, and exterior trim work (90 days to 1 year).
- Appliance Warranties: Separate coverage from appliance makers for stoves, water heaters, and furnaces.
- Transport Insurance: Coverage that pays for repairs if the home cracks or breaks while being towed on the highway.
5. Do Inspect Before Accepting Delivery
Never sign the final setup release form or hand over final cash until you walk through the fully connected home. Open every cabinet. Turn on every water tap. Check drywall for shipping cracks. Crawl under the floor to check ground plastic and tie-down straps.
6. Do Keep Copies of Everything
Set up a sturdy paper folder and a cloud folder on your computer. Save every document from day one: price quotes, signed sales sheets, soil test reports, factory spec sheets, warranty pages, receipts, and emails. If a repair dispute happens later, these documents prove what was agreed upon.
Technical Deep Dive 2: Pre-Delivery Mechanical and Structural Inspection Protocol
Your final walkthrough is your top point of leverage. Once you sign the final release form and the dealer receives full payment, getting repair crews back to your lot takes weeks or months. Use this direct checklist before signing final acceptance sheets:
1. Chassis and Marriage Line Check: Put on work clothes and crawl under the home. Look at the long steel I-beams. Check for bends, broken welds, or gouges caused by highway towing. Check where the two halves of a double-wide join together (the marriage line). Look for thick steel bolts or lag screws spaced 24 inches apart along the wood rim boards. Make sure the thick foam gasket along the joint is squeezed tight to stop cold air and rain leaks.
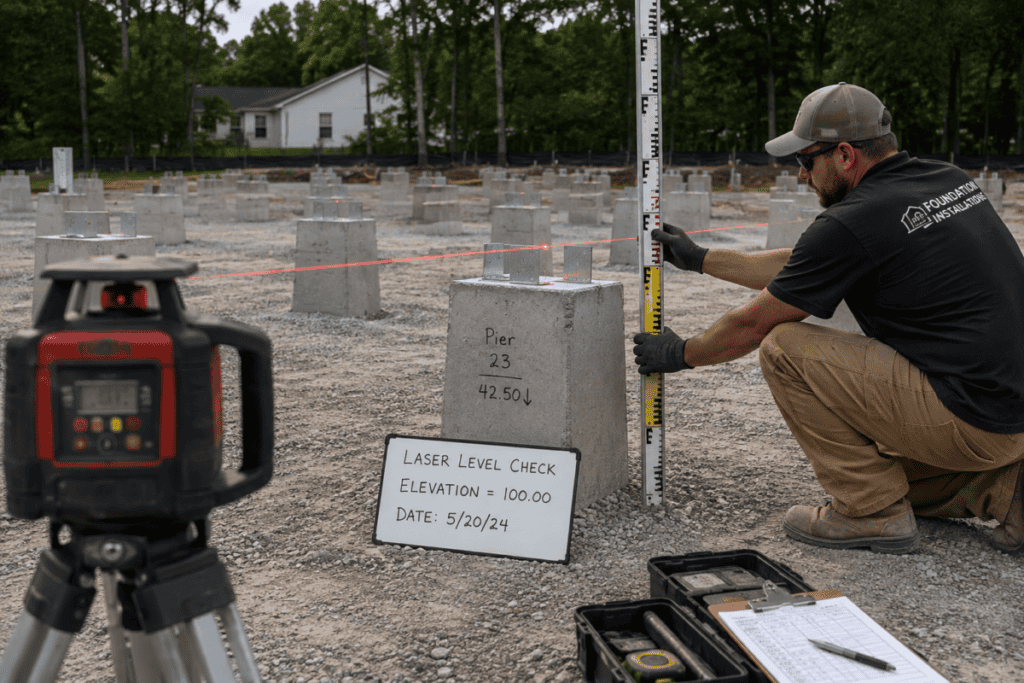
2. Piers and Anchor Straps: Check the concrete block piers under the main steel beams. Make sure the piers sit flat on poured concrete footings. Wood shims placed on top of piers must be solid hardwood, less than 1 inch thick, and placed in flat pairs. Use a digital angle gauge to check steel tie-down straps. Straps must be pulled tight without sag and bolted to steel ground augers driven deep into solid dirt.
3. Breaker Box and Crossover Wiring: Open the electric panel cover. Check circuit breaker labels against wire thickness. Use 15-amp breakers for 14-gauge copper wire and 20-amp breakers for 12-gauge copper wire. Test GFCI safety breakers for kitchen and bath outlets. Check the main power crossover line under the floor. It must run inside a waterproof junction box fastened high off the dirt ground.
4. Plumbing Water Pressure Test: Connect a water line to the home supply intake. Turn on water pressure to 80 PSI and watch the gauge for 15 minutes. If the pressure drops, a hidden pipe is leaking inside a wall. Fill all bathtubs and sinks with water, then pull the plugs at the same time. Check all black PVC sewer pipes under the floor for drips, loose hangers, or poor slope (pipes must slope down at least 1/4 inch per foot).
5. Roof and Attic Checks: Look at the exterior roof ridge cap shingles. Check for lifted shingle edges, open nail holes, or loose flashing around plumbing vent pipes. Inside rooms, check ceiling corners for water stains or missing insulation spots using a low-cost thermal camera. ***
Part 3: The Don’ts
Stopping costly mistakes is just as vital as picking the right floor plan. Sales lots count on buyers making quick emotional choices.
1. Don’t Shop by Monthly Payment Alone
Looking only at monthly payment numbers is a fast way to get cheated. Dealer finance managers tweak loan terms to make payments look small while hiding massive total prices. Stretching a loan from 15 years out to 23 or 30 years lowers the monthly payment, but it doubles the total interest cash you pay over time. Negotiate using the complete total purchase price of the home, site setup, and loan fees combined.
2. Don’t Rush Because of “Limited-Time” Pressure
Sales agents love artificial deadlines. They claim lot prices jump tomorrow or say another buyer is filling out papers on the model you like. Recognize this simple sales pressure trick. Factories build homes every single day. Taking three extra days to review contracts will not lose you a good home. Rushing into a bad contract will cost you thousands of dollars.
3. Don’t Skip Reading Contract Small Print
Never sign a purchase paper, deposit receipt, or change order without reading every single sentence. Pay sharp attention to four clear clauses:
- Non-Refundable Deposit Rules: Conditions that let the dealer keep your deposit cash if you back out.
- Delivery Date Terms: Loose delivery windows that protect the dealer from delays while holding your money.
- Price Rise Clauses: Terms that allow factories to raise final prices after you sign due to steel or wood cost hikes.
- Mandatory Arbitration: Clauses that strip away your legal right to sue the dealer in court for breach of contract.
4. Don’t Assume Upgrades Add Real Value
Factory option catalogs list hundreds of add-ons. Separate structural upgrades from cosmetic add-ons that offer zero long-term resale value. Put upgrade cash into heavy wall framing, high-grade roof shingles, thick insulation, and double-pane low-E windows. Skip overpriced factory curtains, cheap pressboard furniture, or plastic light fixtures. You can buy better home fixtures later for far less money.
5. Don’t Forget Major Site Costs
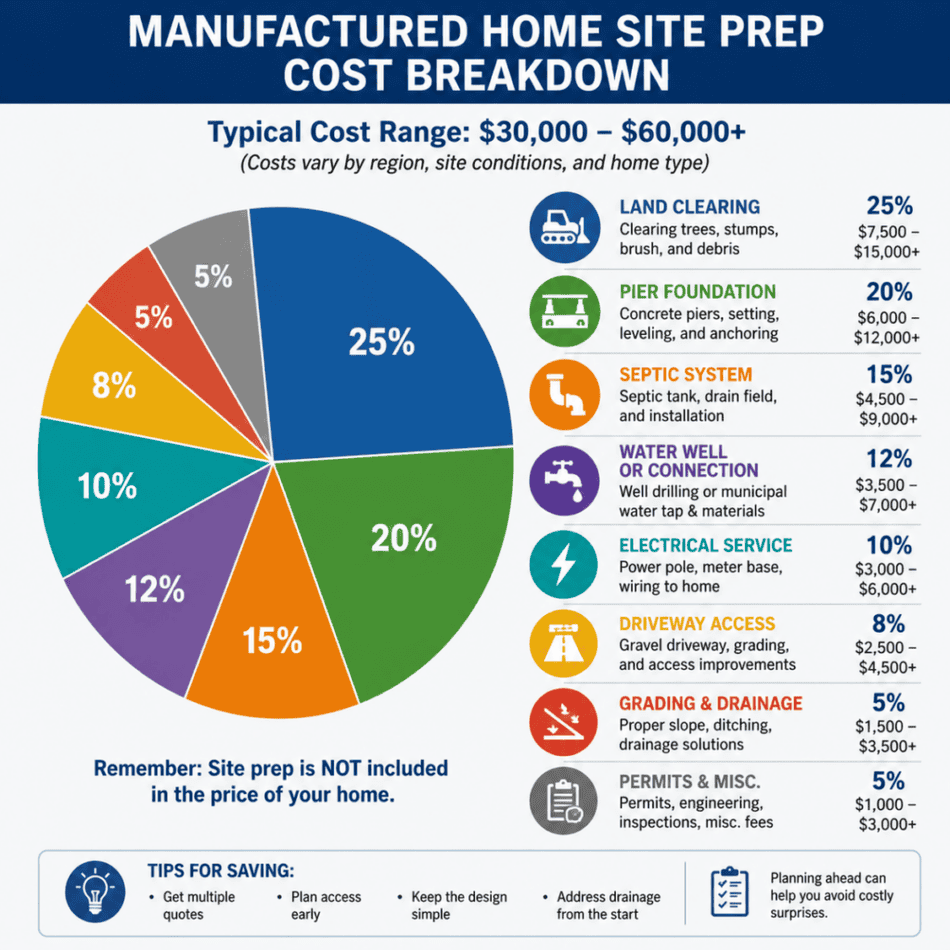
Installing a home takes serious dirt work and utility labor. Buyers who pick a home model before getting written dirt prep quotes run out of cash fast. Tree clearing, driveway gravel, septic tanks, water meters, and concrete foundations often equal 30% to 50% of the home sticker price.
Technical Deep Dive 3: Site Prep, Soil Mechanics, and Foundation Engineering
A manufactured home is only as stable as the soil under it. Floor un-leveling, sticky doors, and drywall cracks are caused by poor soil prep and bad foundation footings, not factory defects.
Check soil strength before setting up a home pad. Engineers measure soil bearing capacity in pounds per square foot (PSF). Standard pier footings assume solid dirt rated for 1,500 PSF to 2,000 PSF. Loose wet soil, clay dirt, or uncompacted fill dirt offers low strength and requires special concrete pads.
Follow a strict engineering process for site prep:
1. Clearing and Topsoil Removal: Strip away all grass, tree roots, and soft topsoil down to hard mineral dirt. Decomposing plants rot underground, leaving empty gaps that cause concrete pier footings to sink.
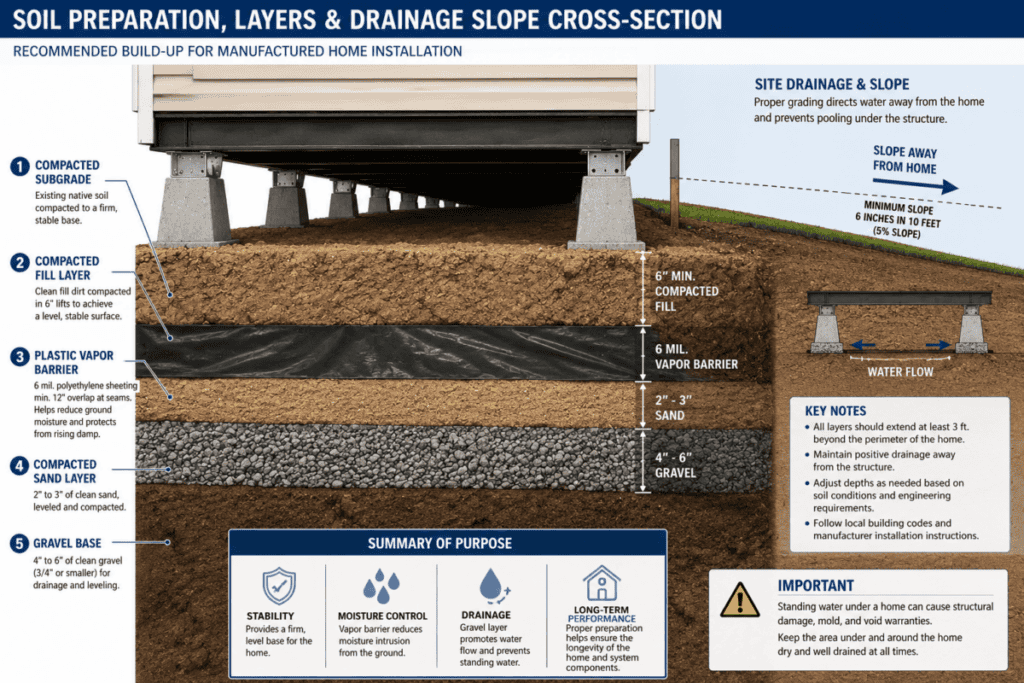
2. Dirt Grading and Slope Angles: The ground under the home pad must slope away from the structure. Build a continuous 6-inch dirt slope drop across the first 10 feet around the perimeter. Water that pools under a home destroys concrete piers, rusts steel frames, rots subfloor wood, and breeds mold.
3. Foundation Types: Match foundation choices to your local soil and building code rules:
- Poured Concrete Runners: Thick concrete strips poured directly under the main steel frame beams. Runners must contain steel rebar rods and sit below your local winter frost line depth.
- Full Poured Concrete Slab: A continuous steel-reinforced flat concrete pad under the whole home. Offers top load support across soft soils.
- Engineered Pier Blocks: Pre-cast concrete pads or poured footings placed at calculated weight points. Concrete block piers stack on footings to hold steel chassis beams.
- Full Basement Walls: Poured concrete perimeter walls that support exterior home edges, turning the unit into permanent real estate.
4. Ground Moisture Plastic Barriers: Cover 100% of the ground under the crawlspace with a heavy 6-mil thick black plastic vapor sheet. Overlap all plastic sheet edges by 12 inches and seal seams with waterproof tape. This blocks ground moisture from rising up into subfloor boards. ***
Part 4: Hidden Costs Many Buyers Miss
Surprise site costs ruin budgets quickly. Regional labor rates, permit fees, and dirt slopes vary widely across regions. The cost transparency table below shows realistic price ranges for core site work.
| Expense Category | Basic / DIY Range | Pro / Premium Range | Cost Drivers and Technical Variables |
|---|---|---|---|
| Factory Delivery & Highway Transport | $1,500 – $3,500 | $4,500 – $12,000+ | Highway mileage, pilot cars, wide-load state permits, narrow dirt road access. |
| Site Excavation & Dirt Grading | $1,200 – $3,000 | $3,500 – $9,500 | Steep slope angles, tree stump removal, rock blasting, soil compaction work. |
| Concrete Foundation System | $2,500 – $5,000 | $6,000 – $18,000 | Concrete runner pads versus full poured slab, frost line digging depths. |
| Utility Connections & Trenching | $2,000 – $4,500 | $5,000 – $15,000+ | Distance to main utility poles, trench digging, municipal hookup tap fees. |
| Perimeter Skirting Material | $800 – $1,800 | $2,200 – $6,500 | Basic vinyl panels versus insulated brick panels or real concrete block work. |
| Entry Steps, Landings & Decks | $600 – $1,500 | $2,500 – $10,000+ | Simple pre-cast concrete steps versus large pressure-treated wooden decks. |
| Driveway & Parking Space | $1,000 – $2,500 | $3,000 – $8,500 | Crushed rock stone gravel versus poured concrete or asphalt paving. |
| Septic System / Sewer Line | $3,500 – $6,500 | $7,000 – $22,000 | Standard gravity tank system versus complex aerobic mound septic systems. |
| City Permits & Impact Fees | $500 – $1,500 | $2,000 – $7,500 | County zoning permits, septic health permits, school district development fees. |
Essential Buyer Inspection Equipment
Inspecting a home requires proper diagnostic gear. Never guess; use basic tools to verify build tolerances before signing release papers.
| Recommended Inspection Tool | Primary Diagnostic Use | Buyer Value Rating |
|---|---|---|
| Klein Tools Digital Angle Level | Measures steel frame pitch, foundation pad slope, and tie-down strap angles instantly. | Essential High-Value Tool |
| FLIR Thermal Camera Attachment | Spots missing wall insulation, window air leaks, and marriage line cold drafts. | Essential High-Value Tool |
| Sperry Instruments GFCI Tester | Tests home outlets for proper wiring, safety grounds, and GFCI breaker trips. | Standard Must-Have Tool |

Part 5: 20 Questions Every Buyer Should Ask
Do not sign a sales deal until your dealer provides clear written answers to these twenty direct questions:
- Is the price quote fully itemized line by line? Demand clear prices for home, shipping, setup, and permits.
- Who handles warranty repair service calls? Find out if dealer technicians handle repairs or if they hand calls off to the factory.
- Is transport and setup cash included in the base price? Check the exact delivery mileage distance limit in your contract.
- Who installs the home on my pad? Get company names, state license numbers, and insurance certificates for setup workers.
- Are setup crews fully licensed and insured? Confirm workers compensation and liability insurance proof.
- Can I inspect the home before final cash clearance? Ensure this walkthrough right is written into the contract body.
- What costs are excluded from this sales quote? Uncover missing utility connection fees or step charges.
- Who pays if the home breaks during highway transport? Get written transit insurance details before towing starts.
- What permits are needed, and who pulls them? Clarify who deals with county zoning and health offices.
- How many work days will setup take on site? Set clear timeline targets for blocking, leveling, and utility work.
- When does my factory warranty start? Check if coverage begins on factory build day or move-in day.
- What foundation design keeps my warranty valid? Check foundation rules against factory requirements.
- What soil strength rating was used for the footing estimate? Make sure dirt estimates match actual lot soil.
- How do crew members seal the marriage line on multi-section homes? Ask what foam gaskets and seal bolts are used.
- What is the exact wind and snow load capacity rating? Confirm ratings meet or beat local weather codes.
- Does the price cover full A/C compressor installation? Make sure copper lines and refrigerant charging are included.
- What happens if factory shipping is late? Request daily credit fees if long delays increase your holding costs.
- Who handles appliance repairs? Ask how stove, fridge, and furnace repair calls are processed.
- Is my deposit cash returned if local zoning permits are denied? Add clear permit contingency clauses to protect earnest cash.
- Can I inspect the home on the sales lot before transport? Catch build defects before the unit hitches to a truck.
Part 6: Critical Red Flags
Protecting your money requires spotting bad dealer habits early. If a dealer shows any of these eight warning signs, step back immediately.
1. Unusually Low Sticker Prices: Suspiciously low prices mean the home is missing delivery, setup, or A/C units that will be added back via expensive change orders later.
2. High-Pressure Closing Tactics: Sales agents demanding that you sign today to lock in pricing are using pressure to stop you from doing basic checks.
3. Refusal to Itemize Price Quotes: Dealers providing one single lump-sum cost number are hiding high sales markups and extra fees.
4. Evasive Answers on Delivery Dates: Vague shipping timelines mean the dealer faces factory backlogs or lacks reliable transport drivers.
5. Large Non-Refundable Cash Deposits: Earnest cash deposits should stay under 3% to 5% of the base price and remain held in escrow.
6. Unresponsive Post-Sale Customer Service: Slow communication during initial sales means total abandonment when you call for warranty repairs later.
7. No In-House Repair Technicians: Dealers without repair staff rely on outside subcontractors who dislike doing warranty work.
8. Refusal to Explain Contract Clauses: Anger or deflection when you ask contract questions means the contract contains one-sided legal terms.
Technical Deep Dive 4: Financing Models and 10-Year Net Worth ROI Trajectories
How you finance a manufactured home controls your long-term net worth. Manufactured homes are financed using two different loan tools: Chattel Loans (personal property loans) and Real Property Mortgages (standard home mortgages secured by land and home together).
A Chattel Loan finances the home structure alone. This loan type is used on leased park lots or unattached private land. Chattel loans carry high interest rates (usually 2% to 4% higher than standard mortgages), short payback terms (15 to 20 years), and high bank fees. Crucially, a home financed as chattel personal property depreciates like an old car, stripping away wealth.
Converting a manufactured home into Real Property builds equity over time. To qualify for conventional, FHA, or VA real estate mortgages, your setup must meet three hard rules:
- The home must attach permanently to an engineered concrete foundation meeting HUD guidelines.
- The steel towing hitch, steel axles, and transport wheels must be unbolted and removed completely.
- The personal vehicle title must be surrendered, merging home and land into one real estate property deed.
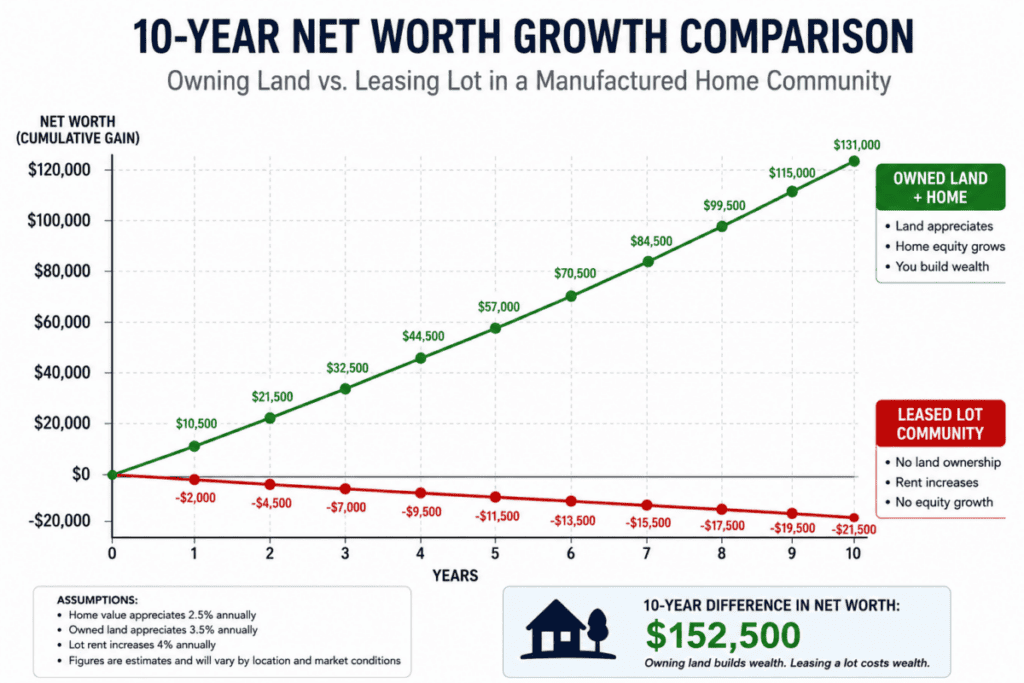
The financial impact over 10 years is huge. Let us compare a $120,000 home financed via chattel loan on a leased lot versus the same home installed as real property on a $50,000 land parcel:
- Scenario A (Chattel Loan / Park Leased Lot): Base home price: $120,000. Loan interest rate: 9.5% over 20 years. Starting lot rent: $550 monthly (rising 4% each year). Total lot rent paid over 10 years equals $79,235. The home depreciates like personal property. Net owner equity at Year 10: roughly $18,000 to $25,000.
- Scenario B (Real Property Mortgage / Owned Land): Total home and land package cost: $170,000. Mortgage interest rate: 6.5% over 30 years. The combined land and attached home appreciate at a standard average rate of 3.5% yearly. At Year 10, total asset value rises to $240,140. Net owner equity at Year 10 (loan paydown plus land gain): roughly $92,000 to $105,000.
Financing land and home together as real property creates over 400% higher net worth accumulation across ten years. Older adults planning fixed-income housing choices can learn more wealth protection steps at Mobile Home Friend.
Part 7: Your Pre-Signing Checklist
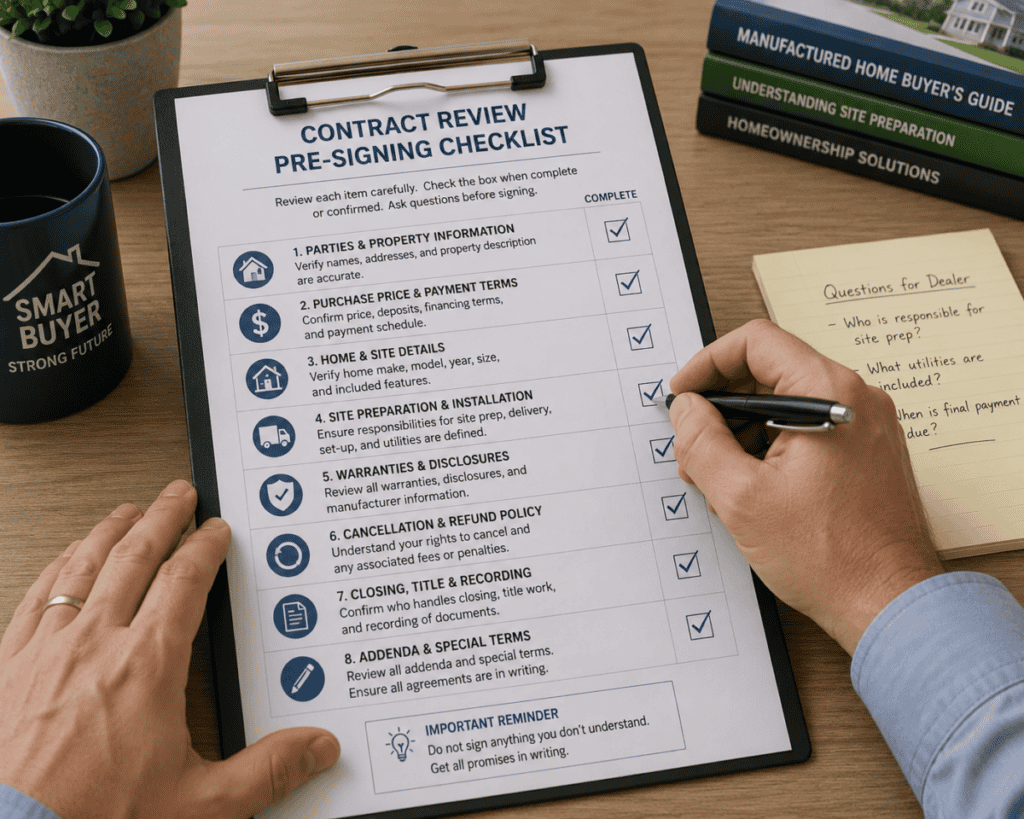
Run through every step on this checklist before signing purchase forms or handing over deposit cash.
Phase 1: Money and Site Due Diligence
- [ ] Mortgage Pre-Approval Letter Secured: Written pre-approval letter in hand covering home cost, site prep, and unexpected buffer cash.
- [ ] County Land Zoning Checked: Written proof from county offices showing manufactured homes are allowed with clear setback limits.
- [ ] Soil Strength Tested: Soil compaction test completed confirming at least 1,500+ PSF soil load strength.
- [ ] Firm Site Prep Quotes Received: Written binding bids collected for dirt clearing, driveway stone, septic tanks, and utility work.
Phase 2: Home Build Specs and Factory Vetting
- [ ] Factory Spec Sheet Verified: Build sheet checked for 2×6 studs, 16-inch joist spacing, R-22/19/38 insulation, and OSB subflooring.
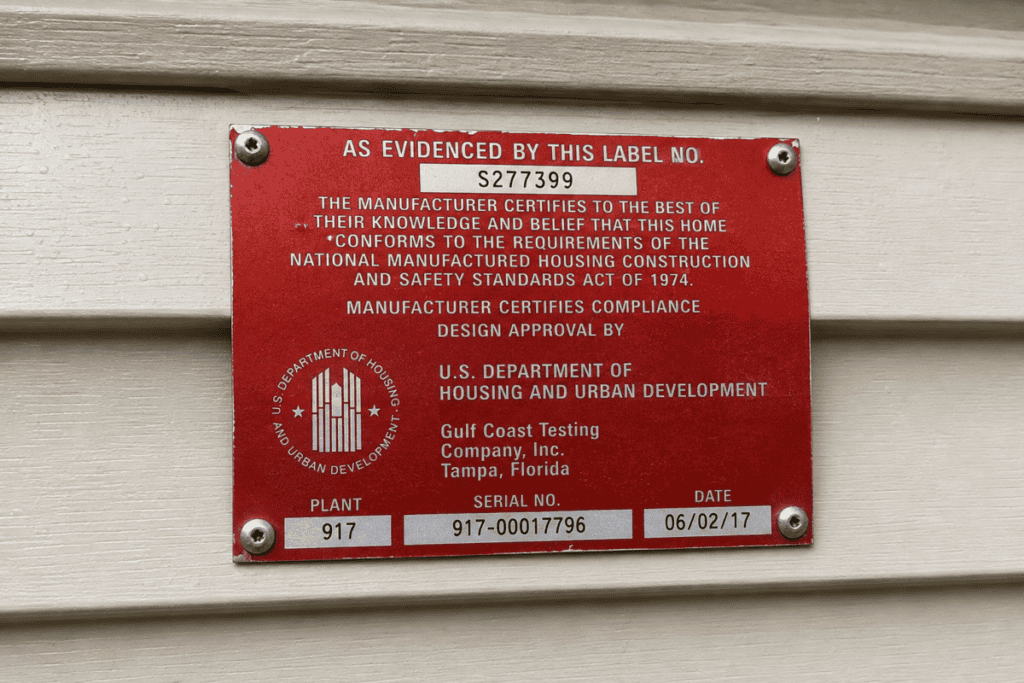
- [ ] Climate Load Zones Confirmed: HUD Data Plate verified to match or beat local wind speed and snow load codes.
- [ ] Warranty Documents Collected: Written warranty sheets collected for factory structure, dealer setup, and appliances.
Phase 3: Contract Text and Price Audit
- [ ] Itemized Price Sheet Audited: Every charge for base structure, shipping, setup, skirting, steps, permits, and A/C itemized separately.
- [ ] Refundable Deposit Terms Added: Earnest money contract edited so cash is 100% refundable if permits or financing fail.
- [ ] Pre-Delivery Walkthrough Included: Contract explicitly preserves your right to perform a complete walkthrough inspection before final cash release.
- [ ] Dealer Promises Attached in Writing: Every verbal promise regarding free upgrades or dirt work added to a signed contract addendum.
Summary
Buying a new manufactured home offers strong utility, modern build quality, and excellent housing value when done carefully. Modern HUD-code homes built with thick framing and good insulation stand up well over time. However, big financial traps exist during contracting and site setup. By demanding line-item price transparency, checking soil mechanics and foundation setup, ignoring high-pressure sales tricks, and performing thorough walkthrough checks before final payment, you protect your money and build true real estate equity. Take your time, demand written clarity on every detail, and hold dealers accountable every step of the way.
Related Questions
1. Can I install a manufactured home on my land by myself?
While landowners can clear trees or dig simple trenches, most states require certified setup technicians to complete steel blocking, leveling, marriage line joins, and tie-down anchors. Doing setup work without licensed crews voids your structural warranty and stops county officers from issuing occupancy permits.
2. How long does a modern manufactured home last?
When set up on a proper concrete foundation with good water drainage and regular roof maintenance, a modern HUD-code home built with 2×6 wall framing lasts 30 to 50+ years, matching standard site-built houses.
3. What is the difference between a manufactured home and a modular home?
Manufactured homes are built to national HUD federal codes on a permanent steel chassis. Modular homes are built in indoor plants to state IRC building codes, look like site-built homes, and sit on standard foundation walls without a steel chassis frame.
About the Author: Charles O’Dell
Charles O’Dell is the founder and publisher of MobileHomeFriend.com. As a professional real estate investor with over 23 years of hands-on experience, Charles has completed over 100 property flips and managed hundreds of mobile home transactions. His articles focus on direct logic, structural transparency, and practical wealth management for real homeowners.
Written by Charles O’Dell, founder of MobileHomeFriend.com, drawing on 23+ years of experience and 100+ successful home flips.