Summary: A sagging mobile home ceiling indicates underlying structural movement, water intrusion, or fastener failure. Ignoring a drooping ceiling leads to roof truss rot, structural collapse, and massive financial losses. This comprehensive guide outlines how to diagnose the root cause, differentiate between cosmetic and structural sagging, deploy temporary bracing, and execute permanent repairs. Complete 2026 material prices and professional labor rates are included to help you budget accurately. Note: Local labor rates for mobile home ceiling repairs change constantly. See our full regional cost table below.
Affiliate Disclosure: This article contains affiliate links to verified tools and repair materials. If you purchase through these links, MobileHomeFriend.com earns a small commission at no extra cost to you, which funds our independent technical teardowns.
Table of Contents
Video Guide Overview
The Short Answer: Why Your Mobile Home Ceiling Is Sagging
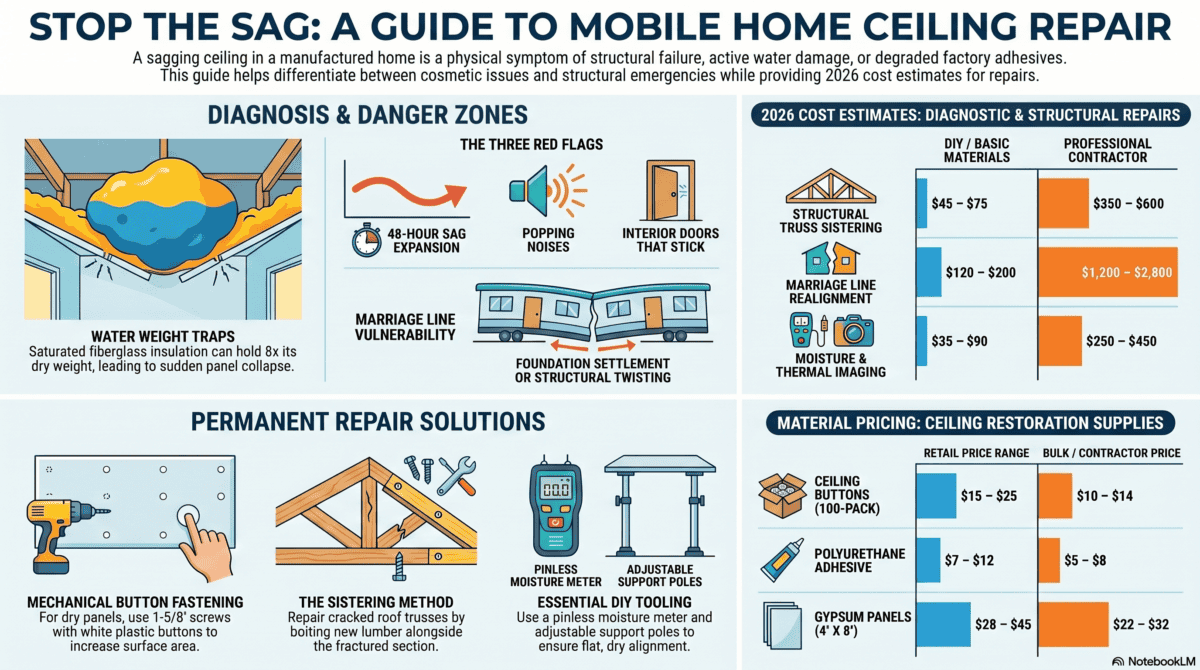
A sagging mobile home ceiling is never self-correcting; it is a physical symptom of structural failure or active water damage. In manufactured housing built before 1976, ceiling panels were routinely attached using heavy construction adhesives that dry out, crystallize, and fail over time. In modern HUD-code homes, sagging is almost exclusively driven by active roof leaks, plumbing failures, or high indoor humidity that weakens the internal gypsum core of the ceiling board. When the material absorbs moisture, it loses its structural rigidity and pulls away from the overhead roof trusses. If the sag is concentrated along the center seam of a double-wide, your marriage line beams are shifting. Do not simply screw the panels back into place without identifying the root cause. If the underlying wood framing is rotted or wet, new fasteners will tear straight through the soft material, wasting your money and masking a hazard that could result in a total ceiling collapse.
What Is a Sagging Mobile Home Ceiling?
A sagging ceiling is a condition where the interior ceiling panels bow, cup, or droop downward away from the structural roof trusses. In manufactured homes, these panels are typically constructed from vinyl-coated gypsum board or thin pre-finished drywall panels. Unlike site-built homes where 1/2-inch drywall is screwed and mudded across joists, mobile homes often utilize 1/3-inch or 1/4-inch interlocking panels designed to minimize weight during transport.
You must understand the difference between cosmetic imperfections and structural failure. A cosmetic issue involves minor seam separation or a slight wave in the vinyl coating caused by normal seasonal temperature swings. A true structural sag involves a measurable downward deflection of the panel core itself, usually accompanied by loose fasteners, gaps at the wall junctions, or soft spots that yield when pushed upward with a broom handle.
Where Sagging Usually Occurs
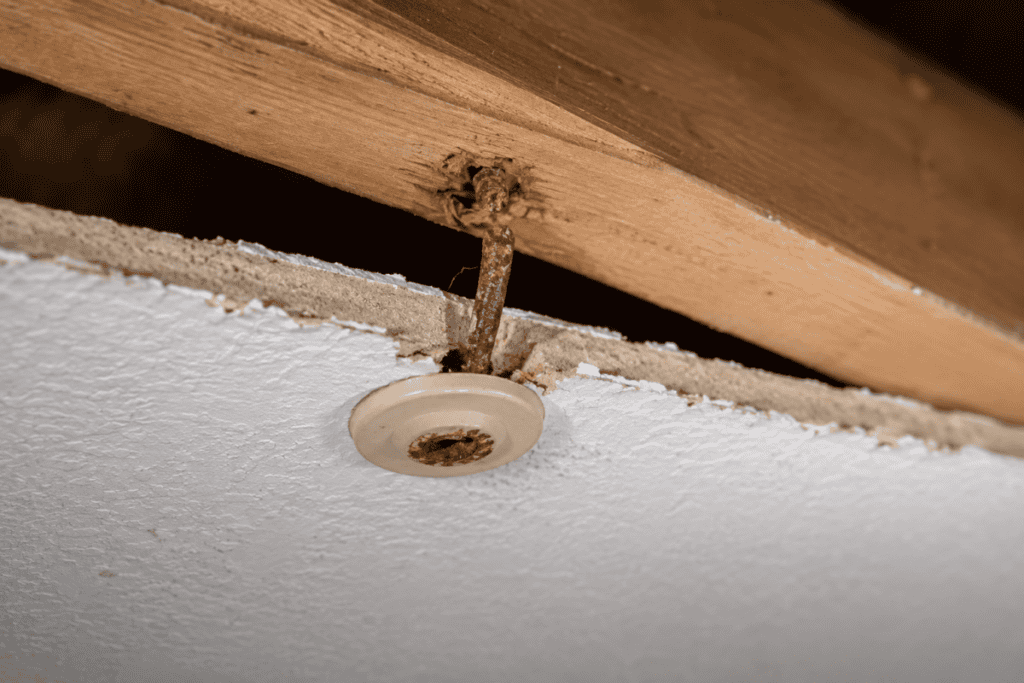
Sagging is rarely uniform across the entire home; it concentrates in specific structural vulnerability zones. The most common site is the center of rooms, where the distance between wall supports is greatest and the ceiling panels rely entirely on the strength of the lower chord of the roof truss. Another high-risk area is directly around light fixtures and ceiling fans. Heavy light fixtures generate constant localized vibration; if a ceiling fan was installed without a dedicated structural junction box anchored directly to a truss, the weight will cause the surrounding panel to bow downward over time.
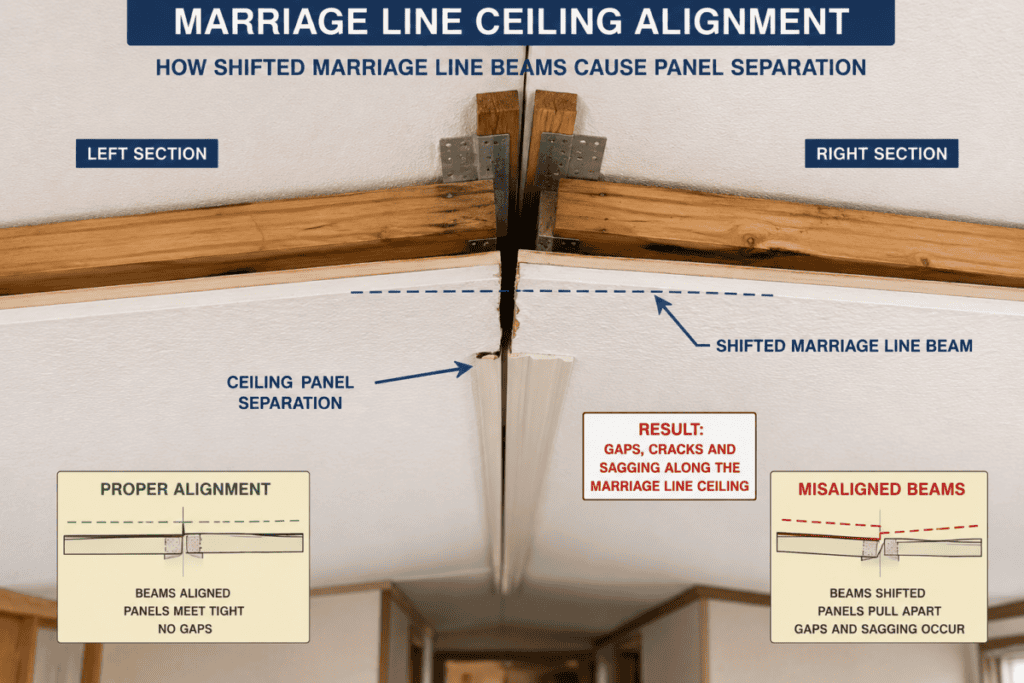
In double-wide manufactured homes, sagging frequently manifests near the marriage lines. The marriage line is the central longitudinal seam where the two halves of the home are bolted together on site. If the concrete pier foundations underneath the marriage line settle unevenly, the two halves of the home will tilt slightly away from each other. This movement exerts tremendous mechanical stress on the ceiling joints, causing the central seam molding to snap, loosen, or drop. Finally, check along the ceiling seams and joints throughout the hallways and bedrooms, as these joints are the first points of failure when factory-applied adhesives degrade.
Is a Sagging Ceiling Dangerous?
The danger level of a sagging ceiling depends entirely on what is happening above the visible panel. If the sag is purely cosmetic, meaning the factory glue has dried out but the wood trusses above are completely dry and intact, there is no immediate safety hazard. However, if the sag is caused by water retention, it poses an immediate, severe risk to life and property.
Water-logged gypsum board can hold several times its weight in moisture before failing. When the material reaches its saturation point, the entire ceiling panel can tear away from its fasteners without warning, dropping hundreds of pounds of wet insulation, saturated drywall, and electrical wiring onto the room below. You must seek immediate professional intervention if you notice any of these three critical red flags: a visible increase in the sagging depth over a 48-hour period, audible popping or cracking noises coming from the ceiling cavity during high winds, or interior doors and windows that suddenly stick or refuse to open, which indicates that the entire roof load is compressing the interior walls.
Technical Deep Dive: Truss Engineering and Deflection Mechanics
To understand why a mobile home ceiling sags, you must examine the engineering of the manufactured home roof truss. Mobile home trusses are lightweight, engineered wood structures typically built from 2×2 or 2×3 lumber in older homes, and 2×4 lumber in modern HUD-compliant homes. These trusses are designed as a unified system where the top chord supports the roof decking and the bottom chord supports the ceiling panels. The entire system relies on tensile and compressive balance to carry snow and wind loads.
When moisture enters the ceiling cavity through a roof leak, it bypasses the top chord and pools directly on top of the ceiling panels and the lower chord of the truss. Wood fiber exhibits a property known as hygroscopic expansion; as it absorbs water, the wood cells swell, and the structural modulus of elasticity drops significantly. Under a constant load, wet lumber experiences mechanical creep, which is permanent, progressive deformation under stress. Even after the wood dries out, the structural sag in the truss lower chord becomes locked into the framing. If the truss deflection exceeds the standard engineering limit of $L/240$ (where $L$ is the span length in inches), the structural integrity of the roof system is compromised, and the truss must be mechanically reinforced or sistered to prevent eventual catastrophic failure under heavy snow or wind loads.
2026 Cost Transparency Table: Diagnostic and Structural Phase
Budgeting for a ceiling repair requires separating simple material replacement from structural correction. The table below outlines real-world 2026 costs for diagnosing and repairing the structural framework behind the ceiling.
| Repair Category | DIY / Basic Materials Cost | Professional / Premium Contractor Cost | |
|---|---|---|---|
| Structural Truss Sistering (Per Truss) | $45 – $75 (Lumber, adhesive, structural screws) | $350 – $600 (Includes attic tight-space labor) | |
| Marriage Line Realignment & Jacking | $120 – $200 (Heavy bottle jacks, hardwood shims) | $1,200 – $2,800 (Full foundation leveling service) | |
| Moisture Testing & Thermal Imaging | $35 – $90 (Pinless moisture meter purchase) | $250 – $450 (Professional home inspection audit) |
Common Causes of a Sagging Mobile Home Ceiling
Water Damage
Water is the single greatest enemy of a mobile home ceiling. Roof leaks caused by cracked metal seams, torn rubber membranes, or degraded flashing around plumbing vents allow rainwater to pour directly into the attic space. Once inside, the water saturates the fiberglass insulation, turning it into a heavy, soggy sponge that presses down directly on the ceiling panel. Plumbing leaks from overhead water lines in double-wides or condensation dripping from uninsulated central air conditioning ducts will create localized sagging zones. Furthermore, indoor condensation issues occur when warm, moist air from cooking or showering escapes into a poorly ventilated attic cavity, hits the cold underside of the metal roof, and rains back down onto the ceiling panels.
Signs of Water Damage
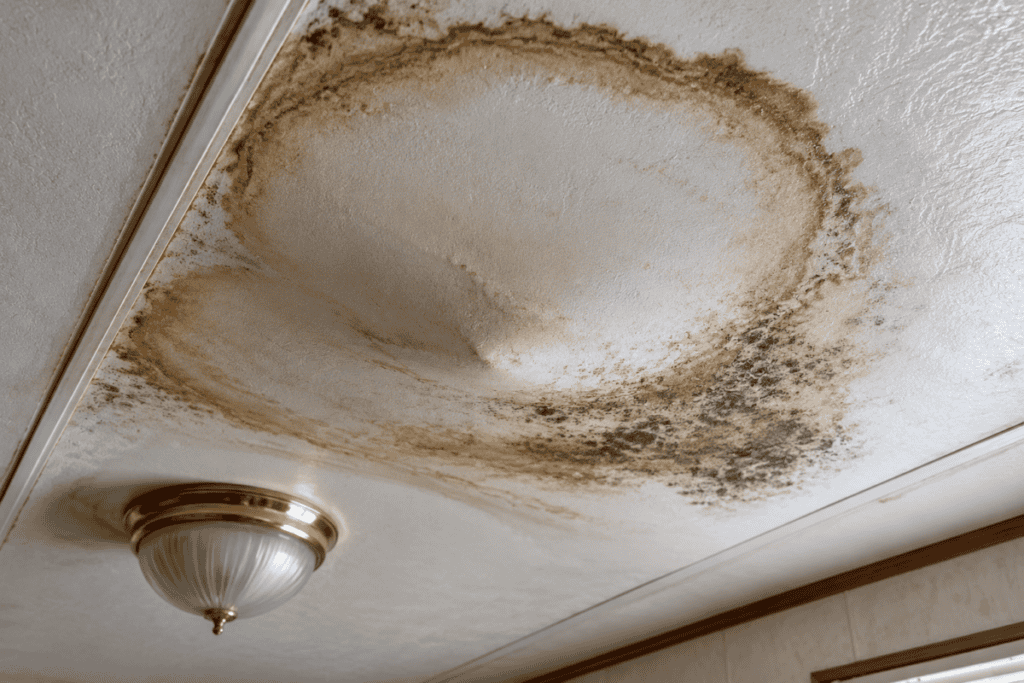
You must know how to read the visual signs of water degradation. The earliest indicator is stains or brown discoloration rings on the vinyl or paint layer; these rings are caused by water dissolving the natural lignin in the structural wood framing and depositing it on the panel face. If you touch the area and encounter soft spots that feel spongy or flex under minimal finger pressure, the structural integrity of the gypsum core is completely gone. Active water damage also manifests as surface mold or mildew growth along the joints, accompanied by a distinct musty odor. In advanced cases, the factory vinyl coating will begin peeling away from the underlying gypsum substrate, creating water-filled blisters that hang down like water balloons.
Failed Ceiling Adhesive
During the manufacturing boom of the 1970s, 1980s, and 1990s, mobile home factories relied heavily on polyurethane or neoprene-based construction adhesives to mount ceiling panels directly to the roof trusses. This method allowed for rapid assembly-line construction without visible screw heads. Over twenty to forty years, these adhesives undergo thermal degradation; the continuous cycling from extreme summer attic heat to winter freezing causes the glue to dry out, become brittle, and lose its chemical bond. When the adhesive fails, the weight of the panel causes it to detach from the truss lower chord and sag, even if no water leak is present.
Loose or Missing Fasteners
Older mobile homes frequently utilized mechanical perimeter fasteners such as thin drywall nails or heavy-gauge staples alongside adhesive. As a mobile home shifts on its foundation due to seasonal ground freezing and thawing cycles, the entire structural frame flexes. This mechanical movement causes nails to pull out or “pop” through the thin ceiling board. In homes built with standard drywall, screws can loosen or tear through the paper backing if the home experience severe transport vibrations or foundation settling, leaving the center of the panel entirely unsupported.
Roof Truss Problems
A sagging ceiling can be a direct reflection of a deformed roof truss. If the home has sustained a severe external impact, such as a fallen tree branch, or has been subjected to historical snow loads that exceeded its factory engineering ratings, the wooden roof framing can crack or snap. When a truss chord splits, it loses its ability to distribute load across the exterior load-bearing walls. The broken framing members drop downward, physically pushing the interior ceiling panels into the living space below.
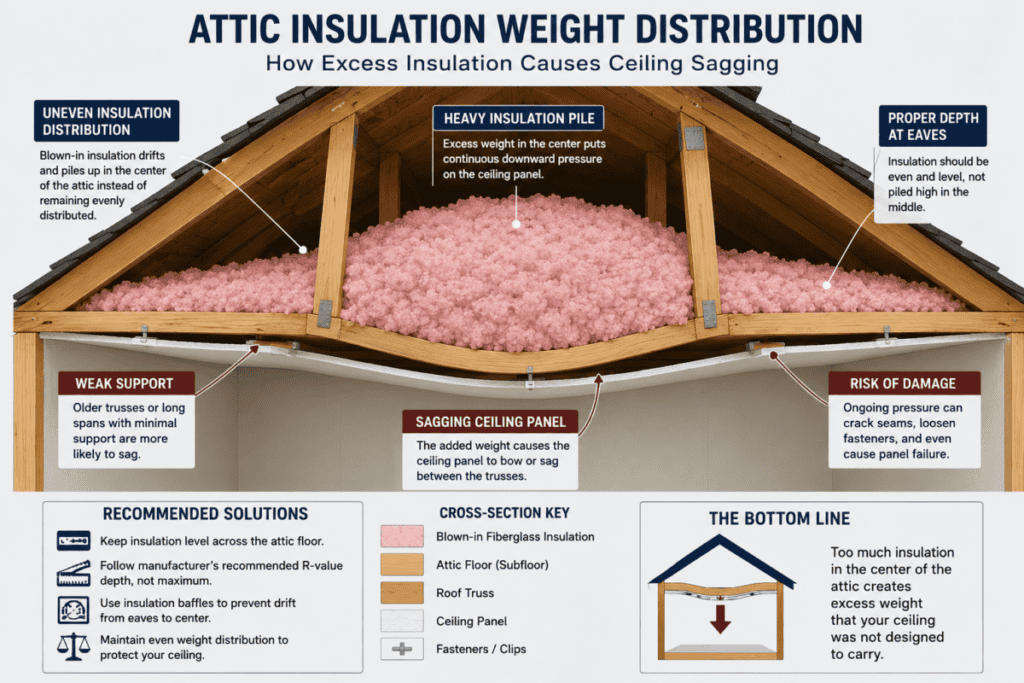
Excessive Weight Above the Ceiling
Ceiling panels are engineered to support their own dead weight and nothing more. A common mistake made by homeowners is adding heavy blown-in cellulose insulation directly over older, thin ceiling panels without upgrading the mechanical fasteners. Additionally, attempting to store seasonal items or storage boxes in the tight attic space of a mobile home will instantly overload the non-load-bearing lower truss chords. Finally, installing multiple layers of reroof-over roofing materials without removing the original metal or asphalt roof can compress the entire truss system, leading to widespread interior ceiling deflection.
Humidity and Age
High relative indoor humidity (above 60%) over extended periods softens the gypsum core of ceiling panels. In coastal regions or high-humidity climates, the continuous absorption of airborne moisture causes long-term material deterioration. Over decades of exposure, the internal structure of the panels degrades, causing them to slowly yield to gravity and sag between the truss attachments, creating a distinct washboard pattern across the room.
Technical Deep Dive: Insulation Weight Dynamics and Material Density
When evaluating a sagging ceiling, you must analyze the weight physics of the insulation material resting inside the roof cavity. The standard factory insulation in most manufactured homes is loose-fill or batted fiberglass, which has a dry density of approximately $0.5$ to $1.0\text{ pounds per cubic foot}$. Under dry conditions, a 6-inch layer of fiberglass exerts a negligible dead load of roughly $0.25\text{ to }0.50\text{ pounds per square foot}$ on the ceiling panel, well within the safety parameters of a 1/3-inch gypsum board.
However, when a roof leak occurs, the physical properties change drastically. Fiberglass insulation is highly porous and acts as a capillary matrix; it can absorb up to **eight times its dry weight** in water before showing active dripping on the surface. When saturated, that same 6-inch layer of insulation can reach a weight density exceeding $4.0\text{ pounds per square foot}$. This sudden, eight-fold increase in dead load completely overpowers the shear strength of the fasteners holding up the ceiling panel. The paper or vinyl backing of the gypsum board yields under the localized stress, causing the core to pull directly over the nail heads or screw threads, resulting in sudden panel failure. If you are planning a senior-friendly housing upgrade or managing an aging property, ensuring proper insulation type and dry weight limits is critical to long-term structural safety.
2026 Cost Transparency Table: Materials and Fastener Phase
The table below lists the current 2026 market pricing for materials required to address adhesive failures, fastener replacement, and panel updates.
| Material / Tool Category | DIY / Retail Price Range | Contractor Supply / Bulk Price |
|---|---|---|
| White Polyethylene Ceiling Buttons (100-pack) | $15 – $25 (Includes matching snap caps) | $10 – $14 (Bulk industrial orders) |
| Heavy-Duty Subfloor / Panel Adhesive (12 oz tube) | $7 – $12 (High-tack polyurethane formula) | $5 – $8 (Case-lot purchasing) |
| Vinyl-Coated Gypsum Ceiling Panels (4′ x 8′) | $28 – $45 (Standard manufactured housing match) | $22 – $32 (Pallet quantity pricing) |
Affiliate Comparison Table: Professional-Grade Repair Equipment
To safely execute ceiling leveling and fastening, specific mechanical tools are required to ensure the panels are pressed flat against the framing before applying screws.
| Product Name & Class | Primary Structural Function | Target Technical Specifications |
|---|---|---|
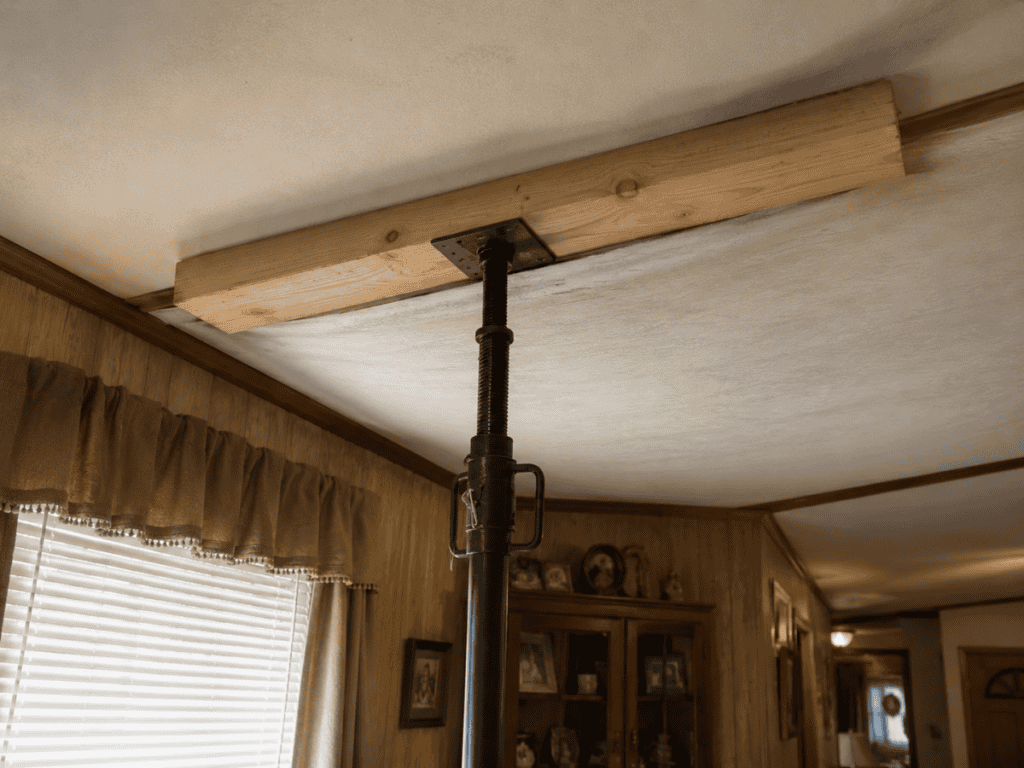
| Maxi-Lift Adjustable Support Pole (Model ML-40) | Provides continuous vertical upward pressure on sagging panels without damaging vinyl finishes. | Heavy-duty steel construction; telescopes from 4 feet 6 inches to 9 feet; maximum static load limit of 150 pounds. |
| Grip-Tight Pinless Moisture Meter (Model PM-200) | Scans through vinyl ceiling coatings to detect hidden attic water accumulation and truss saturation. | Dual-depth electromagnetic sensor; non-marring smooth pad base; reads up to 3/4-inch deep with 0.1% accuracy. |
| Structo-Drive Coated Drywall Screws (1-5/8 inch) | Anchors loose or sagging gypsum board directly into older 2×2 and 2×3 wooden roof truss chords. | Sharp-point coarse threads; phosphate corrosion-resistant coating; oversized bugle head to prevent panel pull-through. |
Warning Signs That the Problem Is Getting Worse
Visual Changes
You must monitor a sagging ceiling closely; change indicates active failure. If the sagging area expands outward into adjacent rooms, the weight load is spreading along the framing. Keep a close eye out for **newly developing visible cracks** in the plaster or vinyl coating, which signal that the gypsum core has snapped under tension. Furthermore, **separated seams or split batten strips** mean the mechanical fasteners have completely detached, and the panel is now unsupported along its perimeter edges.
Structural Indicators
Perform a manual check on your ceiling: if you apply upward pressure with a soft tool and notice significant ceiling movement or shifting, the panel has detached from the truss. Listen for **frequent popping or grinding noises** during high winds or ambient temperature drops; this is the sound of structural wood fasteners rubbing against loose metal staples. If you suddenly notice that **interior passage doors or windows are binding** or becoming difficult to latch, the overhead truss deflection is actively compressing the wall headers below.
Water-Related Red Flags
Water issues escalate rapidly. If you see **new brown water stains** expanding across previously dry areas, the roof leak is growing. **Active dripping water** or water droplets forming on light fixtures requires turning off the main electrical breaker immediately to prevent an electrical fire. Finally, if you notice an escalating **musty or rotten wood odor**, it confirms that wood-decay fungi are actively consuming your structural roof trusses above the ceiling line.
How to Inspect a Sagging Mobile Home Ceiling
Start with a Visual Inspection
Begin your assessment systematically. Take a straight-edge level or a laser level and **measure the maximum depth of the sagging deflection** at the lowest point. Document these measurements with clear, high-contrast photos taken from multiple angles; this creates a historical baseline that allows you to confirm if the sag is stationary or actively dropping over time.
Check for Moisture
You must rule out water intrusion before executing any physical repairs. Use a ladder to safely check around plumbing vents and skylights for active leaks. If you own or purchase a pinless moisture meter, press it flat against the sagging area; any reading above 15% moisture content indicates an **active, unresolved water leak** that must be sealed from the roof side first.
Inspect the Roof
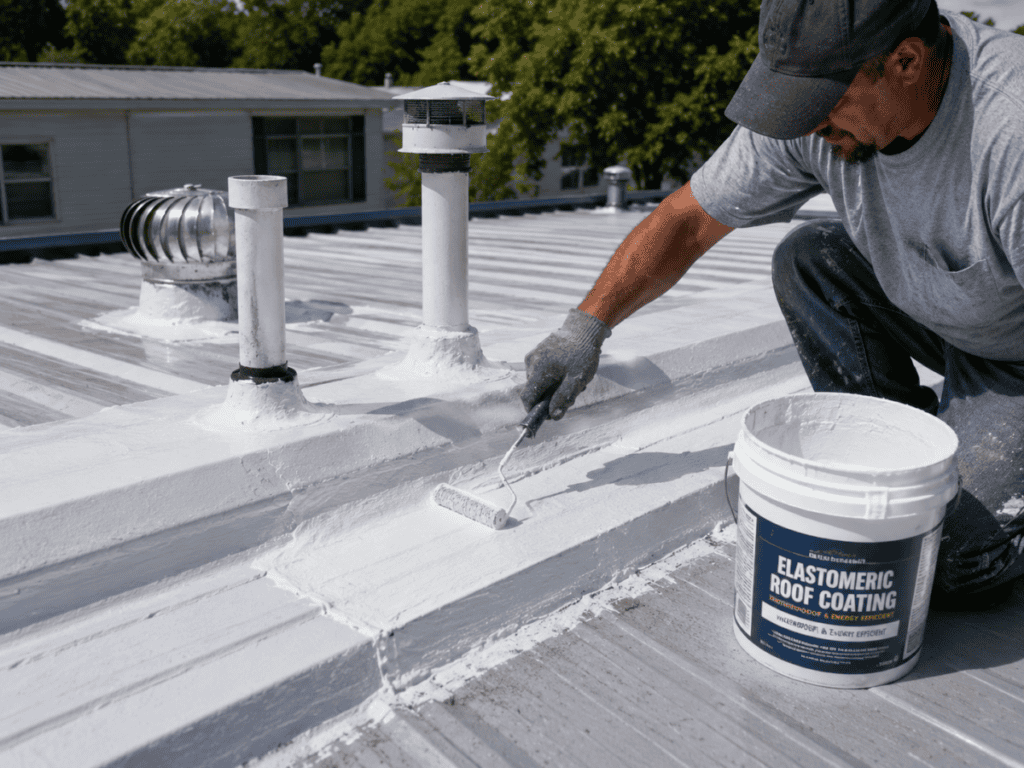
Walk your mobile home roof line (or hire a professional if you cannot safely climb). Look closely for **cracked elastomeric roof coatings**, missing shingles, open metal seams, or split caulking around plumbing penetrations. A sagging ceiling is almost always born on the roof; fixing the interior without sealing the exterior is completely useless.
Examine the Ceiling Material
Identify your exact material type. Traditional mobile homes use **vinyl-coated gypsum board panels**, which are slick, wipeable, and have matching vinyl strips covering the seams. Newer luxury double-wides use standard **taped and textured drywall**. Vinyl panels cannot be easily patched with drywall mud; if they are severely warped or water-stained, the entire panel must be cut out and replaced to match the surrounding ceiling structure.
Determine if the Problem Is Structural
Push gently upward on the truss lines: if the truss itself moves or bounces, you have a **broken or rotted roof truss**. Look closely for evidence of overall **home settlement or pier degradation** under the chassis outriggers. If the entire steel frame of the mobile home is out of level, the interior ceiling will bow under structural twisting forces; this requires a professional leveling crew rather than a cosmetic drywall patch.
Technical Deep Dive: Foundation Settlement and Structural Torsion Mechanics
In many cases, a sagging ceiling along the marriage line of a double-wide mobile home is not caused by a roof failure at all. It is a direct spatial consequence of **foundation settlement and structural torsion**. Manufactured homes are built on a steel longitudinal chassis that rests on concrete blocks or steel piers. The weight distribution relies on the soil bearing capacity remaining uniform across all support points.
When the soil underneath the center of the home softens due to poor perimeter grading or localized drainage failures, the central piers sink faster than the perimeter outrigger piers. This differential settlement creates a condition called structural torsion: the steel frame twists along its long axis. Because the roof trusses are rigid triangles anchored to the exterior walls and pinned together at the marriage line, this twisting forces the top of the marriage line to open up, pulling the ceiling panels apart. If you attempt to fix this sag by simply driving longer screws into the ceiling, you will pull the ceiling panel straight through the truss or snap the wood framing. The solution requires a comprehensive mechanical leveling of the steel chassis under the home using heavy hydraulic jacking systems to restore the factory plane before any interior cosmetic repairs are attempted.
2026 Cost Transparency Table: Repair and Replacement Labor Phase
The table below provides regional 2026 estimates for the physical labor and contracted hours needed to perform ceiling restoration work.
| Labor Operation | DIY Project Cost (Tools Only) | Professional Handyman / Contractor Rate |
|---|---|---|
| Complete Panel Stripping & Removal (Per Room) | $60 (Safety gear, crowbars, disposal bags) | $450 – $800 (Includes hazardous insulation disposal) |
| New Panel Installation & Fastening (Per Room) | $110 (Screw guns, panel lift rental) | $750 – $1,400 (Professional hanging and seam battening) |
| Roof Seam Resealing & Flashing Repair | $80 – $150 (Elastomeric sealant, mesh tape) | $500 – $1,200 (Certified mobile home roofing crew) |
Temporary Fixes for a Sagging Ceiling
If you cannot afford a permanent repair immediately, or if you are waiting for a roofing contractor to arrive, you must deploy temporary stabilization to protect your living area.
- Relieve Immediate Weight Risk: If a ceiling section is actively filled with water, use a small finishing nail or a drill bit to puncture a neat relief hole directly in the center of the sagging point. Keep a 5-gallon bucket underneath to catch the water; draining the trapped water stops the gypsum core from tearing completely out of the joists.
- Install Temporary Mechanical Support Poles: Place a 4×4 wood block or a wide piece of 3/4-inch plywood flat against the sagging area to distribute pressure. Use an adjustable steel support cargo pole or a wood 2×4 cut slightly longer than the ceiling height to wedge the panel back into alignment, bracing the bottom of the pole securely against a floor joist.
- What You Must Avoid: Never drive drywall screws directly into wet, soft ceiling panels; the screw heads will instantly cut through the mushy core, creating larger holes and weakening the panel further. Never cover up an active sag with decorative ceiling tiles or tongue-and-groove wood paneling without diagnosing the framing; hiding structural damage guarantees a massive future failure.
Permanent Repair Options
Refastening Ceiling Panels
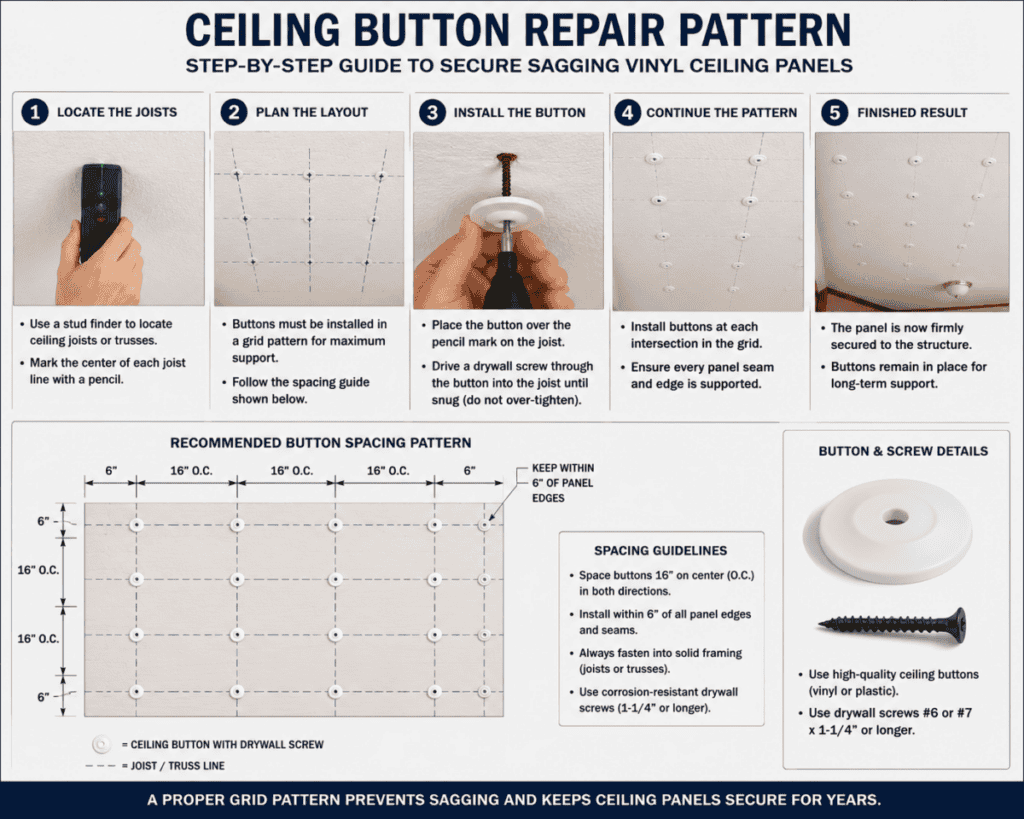
This method is highly effective for **loose ceiling panels that are completely dry** but have dropped due to dried-out factory adhesive. You must use a stud finder or an electronic scanner to locate the exact centers of the wooden roof truss lower chords. Using 1-5/8 inch coarse-thread drywall screws paired with **white plastic ceiling buttons**, drive fasteners every 6 inches along the truss line. The wide plastic button increases the surface surface area of the fastener head, preventing it from pulling through the thin gypsum layer and providing a neat, clean visual appearance that does not require plaster skim coating.
Replacing Damaged Ceiling Panels
When a panel has sustained severe water damage, structural softening, or mold growth, total replacement is your only permanent path. Start by cutting out the damaged section back to the center of the nearest healthy roof truss to ensure your replacement panel has solid wood to anchor to. Wear a high-efficiency particulate respirator mask to protect yourself from falling fiberglass dust and old insulation. Inspect the uncovered framing for rot, apply a heavy bead of construction adhesive to the face of the truss, and screw your new matching **vinyl-coated gypsum panel** into place using a mechanical drywall lift.
Repairing Roof Trusses
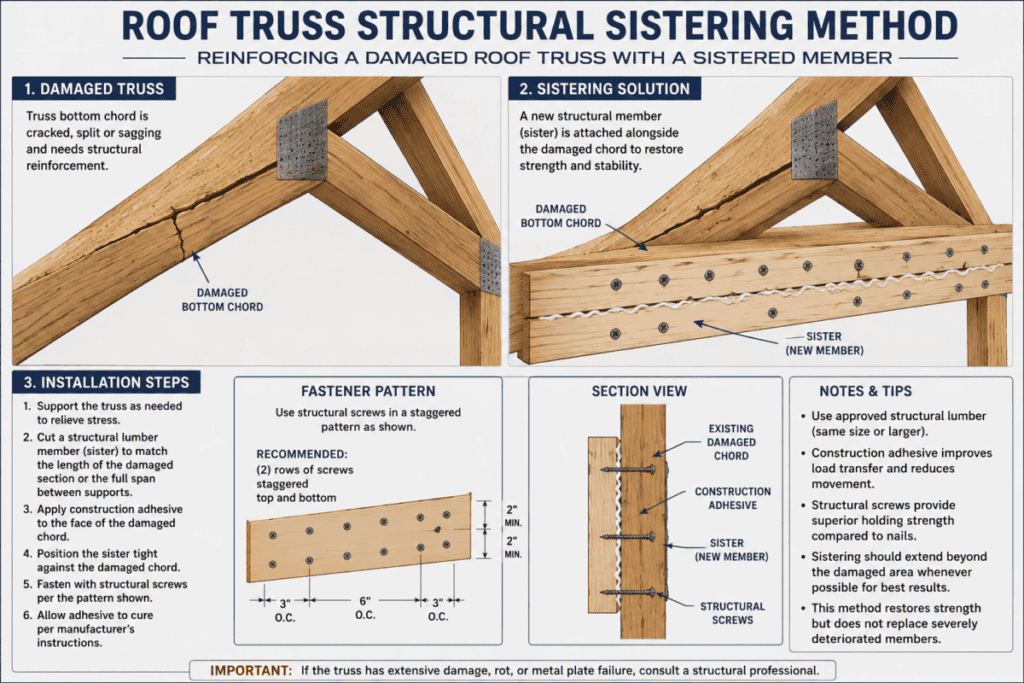
If your inspection reveals that a roof truss is split, cracked, or sagging from structural load failure, you must execute a **structural sistering repair**. This involves cutting away the ceiling panel to expose the entire broken section of the truss framing. Measure and cut a matching piece of structural lumber (typically a 2×4 or a custom plywood gusset plate), apply heavy-duty polyurethane construction adhesive between the old wood and the new wood, and bolt the pieces together using structural framing screws driven every 4 inches. This dual-layer reinforcement transfers the roof load away from the fractured section, leveling the ceiling plane permanently.
Addressing Moisture Problems
No interior repair will hold if your roof is leaking. You must patch all external roof leaks using premium elastomeric sealants or install a complete **mobile home roof-over system**. Additionally, look into your attic ventilation: ensure your roof vents and soffit openings are completely clear of debris. Installing an active attic exhaust fan or running an interior dehumidifier reduces the relative humidity in the living space, ensuring your new ceiling panels remain dry, rigid, and straight for decades.
Can Homeowners Fix a Sagging Ceiling Themselves?
Executing a ceiling repair yourself depends heavily on the extent of the damage. A homeowner is a **good candidate for a DIY fix** if the sagging is minor (less than 1 inch of deflection), the panels are completely dry, and the issue is caused solely by dried-out factory glue or loose nails. Installing ceiling buttons and screws is straightforward and can be completed using basic hand tools over a weekend for under $50 in materials.
However, you must **leave the project to professionals** if the sag covers multiple rooms, if there is extensive active water damage with structural wood rot, or if the sagging panels are bowing around overhead electrical boxes and light fixtures. Working around active 120-volt wiring that has been exposed to water creates a severe electrocution hazard. If the roof trusses are cracked or the home requires full frame leveling at the chassis piers, a specialized manufactured housing contractor possesses the hydraulic machinery and engineering certifications required to execute the fix safely.
Actionable Inspection and Repair Checklist
Follow this strict, logical workflow to safely address your sagging mobile home ceiling panel issue without wasting time or capital resources.
- [ ] Isolate Electrical Hazards: Shut down the main circuit breaker controlling all light fixtures and ceiling fans located in the sagging area before touching any damp materials.
- [ ] Scan for Latent Moisture: Press a pinless electronic moisture meter flat against the sagging gypsum core; record and track any reading that exceeds 15% moisture content.
- [ ] Trace and Seal Exterior Leaks: Access the roof deck and audit all flashing, plumbing boots, and roof seams within a 10-foot radius of the interior sagging location.
- [ ] Drain Trapped Attic Water: Puncture a targeted relief hole using a narrow nail to drain pooled water out of saturated ceiling panels into a bucket.
- [ ] Locate Roof Truss Centerlines: Use a high-density stud finder to locate and mark the exact centerlines of the hidden 2×2 or 2×4 wood roof framing members.
- [ ] Brace with Continuous Vertical Pressure: Set up an adjustable mechanical telescoping support pole with a wide plywood top plate to force the sagging panel flat against the joists.
- [ ] Install Mechanical Ceiling Buttons: Drive 1-5/8 inch coarse-thread structural screws fitted with wide plastic ceiling buttons every 6 inches along the truss line.
- [ ] Clear Debris and Attain Ventilation Balance: Remove heavy drifted insulation from the attic space and verify that your roof ridge vents are completely unobstructed.
Frequently Asked Questions
Can a sagging mobile home ceiling collapse?
Yes. Saturated vinyl-coated gypsum panels or thin drywall boards will lose their internal structural shear strength when wet. When the weight of wet insulation and trapped water exceeds the carrying capacity of the fastener heads, the entire panel can drop into the living area instantly without warning.
How do I know if the sagging is structural?
If the lower chord of the wooden roof truss flexes, bounces, or is physically broken when you apply upward pressure, the failure is structural. If interior doors are sticking or if the sag is concentrated down the central marriage line beam of a double-wide, it indicates structural shifting or foundation pier settlement.
Can I simply screw the ceiling back up?
Only if the ceiling materials and the wood trusses above are completely dry and intact. If the panels are wet or the wood framing is rotted, driving new screws will fail immediately; the screw heads will slice straight through the soft material, expanding the damage.
What causes ceiling panels to separate?
Panel separation is driven by factory construction adhesive drying out over decades, combined with the normal mechanical flexing of the mobile home chassis during seasonal temperature shifts, high winds, or foundation settlement.
How much sagging is considered serious?
Any downward deflection that exceeds 1/2 inch over a 4-foot span requires close inspection. Any sag accompanied by wet brown stains, soft spots, mold growth, or binding interior doors is an emergency that must be addressed immediately.
Will homeowners insurance cover ceiling repairs?
Homeowners insurance generally covers ceiling repairs only if the damage was caused by a sudden, accidental covered peril, such as a tree falling on the roof during a storm or a pipe bursting. Insurance will not cover ceiling repairs caused by long-term roof neglect, old age, or poor attic ventilation maintenance.
Conclusion: The First-Principles Approach to Ceiling Preservation
A sagging mobile home ceiling is a solvable issue, but success depends entirely on structural diagnosis rather than cosmetic concealment. Most sagging panels are caused by moisture accumulation, aging material degradation, or localized fastener failure. Identifying the precise root cause is infinitely more important than simply covering up the visible interior damage with an immediate patch. Early intervention and regular roof audits are far less expensive than waiting for structural truss failure or total panel collapse to develop. Make sure to inspect all exterior roof leaks and verify the condition of your internal wood framing before choosing an interior repair method.
Related Helpful Articles
About the Author: Charles O’Dell
Charles O’Dell is the founder and principal field editor of MobileHomeFriend.com. With over 23 years of professional real estate investing experience, Charles has personally executed more than 100 successful property flips, specializing in manufactured home structural rehabilitation, foundation leveling corrections, and roof-over engineering. He relies strictly on first-principles asset management logic, delivering real-world technical accuracy and cost transparency to homeowners across North America.
Written by Charles O’Dell, a manufactured housing expert with over 23 years of hands-on real estate investing experience and more than 100 successful property flips.
