
Table of Contents
Introduction
Summary: Installing ceramic or porcelain tile in a mobile home is possible, but it requires strict adherence to structural engineering realities. Most aftermarket tile installations fail within 24 months because standard manufactured home joists flex too much for brittle materials. Success depends completely on achieving a deflection rating of L/360 or better through subfloor replacement, joist reinforcement, and proper underlayment selection. Do not attempt to tile directly over factory particleboard or weak framing without expecting immediate grout failure and cracked tiles. Note: Local labor rates for flooring renovations change constantly. See our full regional cost table below.
Video Guide Overview
Affiliate Disclosure: This article contains links to recommended tools and materials. If you purchase through these links, a small commission is earned at no additional cost to you, which supports our independent structural testing and teardowns.
The Short Answer – Can You Install Tile Flooring in a Mobile Home?
Yes: you can absolutely install ceramic or porcelain tile in a mobile home. However: you can only do it safely if you modify the underlying structural framing to eliminate vertical deflection. A standard site-built home is engineered to handle static and dynamic floor loads with minimal bending. In contrast: a manufactured home is designed to be lightweight for factory transportation purposes. This design leaves the floor system highly flexible.
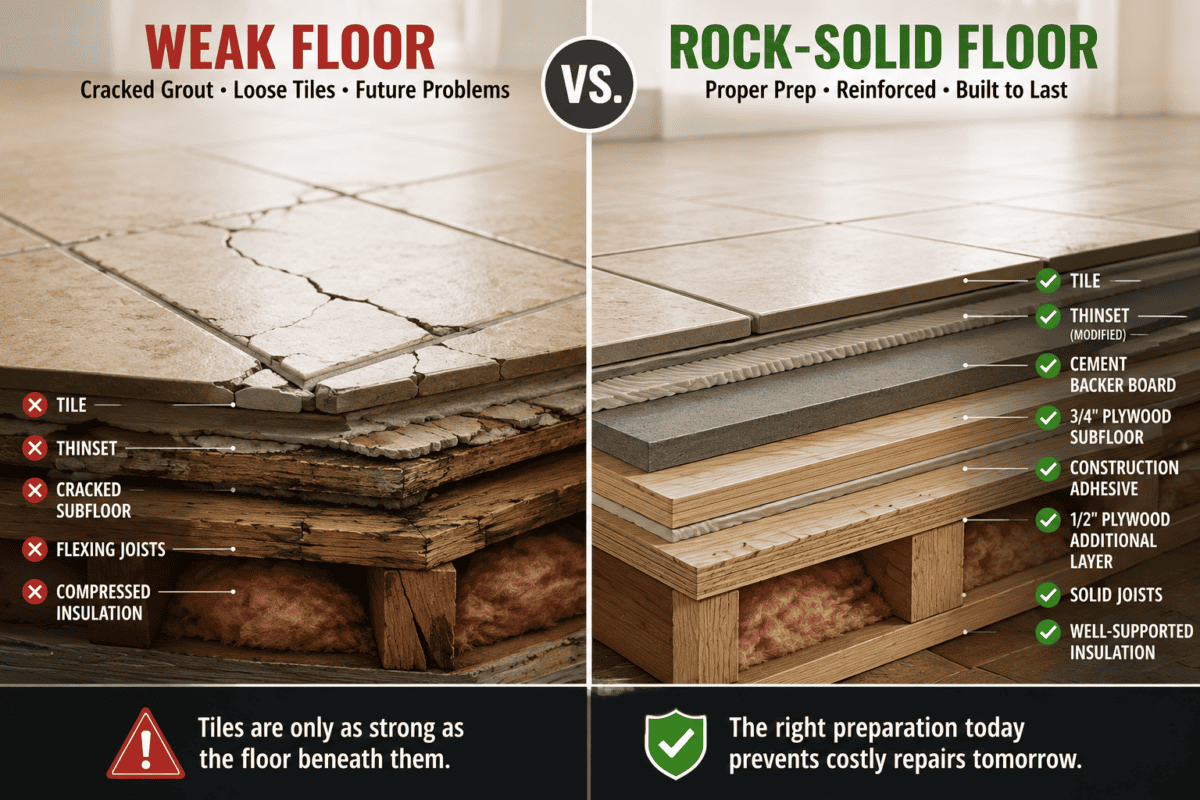
When tile fails in a manufactured housing unit, the material itself is rarely the culprit. The true cause is the movement of the wood structure underneath it. Ceramic, porcelain, and natural stone possess immense compressive strength, but they have zero tensile strength or flexibility. If the subfloor sags even 1/16 of an inch when you walk across the room, the bond between the thinset mortar and the tile will shear. This structural reality means that your primary focus must not be the aesthetic design of the tile: it must be the rigidity of the framing platform.
What Makes Tile Different Than Other Flooring Materials?
Tile operates under completely different physical laws than luxury vinyl plank, laminate, or carpet. Understanding these differences from a first-principles perspective is the only way to avoid a catastrophic installation failure. Tile is highly durable under the right conditions, but it is utterly unforgiving of structural movement.
Tile exhibits exceptional compressive strength: it can withstand thousands of pounds of downward pressure without compressing or denting. It easily resists scratches from pets and heavy furniture, and porcelain variations offer total water resistance. This makes it highly attractive for wet areas. However: the trade-off for this extreme hardness is brittle behavior. Unlike vinyl, which bends and contours to deviations in the floor, tile snaps when subjected to bending stresses.
When a mobile home floor flexes under foot traffic or seasonal shifting, the movement transfers directly into the tile assembly. The weakest link breaks first: this is always the cementitious grout between the tiles. You will notice fine hairline cracks developing in the grout lines within weeks of a bad installation. Once the grout breaks, the movement begins to attack the thinset mortar bed below. The tile becomes unbonded, begins to rock, and eventually cracks under normal foot traffic.
Technical Deep Dive: Calculating Floor Deflection and the L/360 Structural Engineering Standard
To understand why tile cracks, you must understand the concept of deflection. Deflection is the technical term for how much a structural beam bends under a specific load. The international residential building code mandates that floors supporting ceramic tile must not exceed a deflection rating of L/360 under a live load of 40 pounds per square foot. The letter “L” represents the span length of the floor joist in inches. To find the maximum allowable flex, you divide that total span length by 360.
Let us look at a real-world mathematical example. If your mobile home has a joist span of 12 feet between the central steel chassis beam and the outer rim joist, that equals 144 inches. Dividing 144 by 360 gives you exactly 0.40 inches. This means the absolute maximum your floor joist can sag under full load is less than 7/16 of an inch. If you are planning to install heavy natural stone like marble, slate, or travertine, the engineering standard doubles to L/720. This cuts your allowable deflection down to a microscopic 0.20 inches for that same 12-foot span. Standard manufactured homes are built to meet HUD transit standards, which frequently allow for significantly more flex than the strict L/360 tile threshold. If you ignore this calculus, your tile floor will fail.
| Category | DIY / Basic Cost | Pro / Premium Cost |
|---|---|---|
| Ceramic Tile Materials (per sq. ft.) | $1.50 – $3.50 | $5.00 – $9.00 |
| Porcelain Tile Materials (per sq. ft.) | $2.50 – $5.00 | $7.00 – $14.00 |
| Cement Backer Board (4×8 sheet) | $12.00 – $16.00 | $18.00 – $24.00 |
| Modified Thinset Mortar (50 lb bag) | $18.00 – $25.00 | $35.00 – $55.00 |
| Structural Joist Reinforcement (per room) | $150.00 – $300.00 | $600.00 – $1,200.00 |
| Professional Installation Labor (per sq. ft.) | N/A | $8.00 – $18.00 |
Are Mobile Home Floors Strong Enough for Tile?
The short answer is that some are, but many are not without significant alteration. The age, manufacturing standards, and general layout of your home dictate its inherent suitability for a heavy, rigid flooring material. You must evaluate the specific metrics of your structure rather than relying on guesswork.
Suitability is determined by five primary variables: joist spacing, joist size, unsupported span length, subfloor thickness, and the current physical condition of the wood components. Standard site-built homes typically utilize 2×8 or 2×10 floor joists spaced 16 inches on center. Many older mobile homes utilize smaller 2×6 framing members, and some budget-conscious designs stretch the joist spacing out to 24 inches on center. A 2×6 joist spaced 24 inches on center will never meet the L/360 deflection standard on its own: it is simply too flexible to handle tile without severe modifications.
Age plays a massive role in this assessment. Older homes manufactured prior to the implementation of the HUD code in 1976 routinely feature lighter framing materials and inferior subfloor systems like thin particleboard. Newer HUD-compliant manufactured homes frequently feature vastly superior floor structures, occasionally incorporating engineered trusses or 2×8 joists spaced 16 inches on center. Furthermore: double-wide homes generally provide a more stable flooring platform than single-wide units because their individual floor joist spans are shorter between the main steel chassis support beams and the perimeter walls.
Why Mobile Home Floors Flex More Than Site-Built Homes
To properly prepare a mobile home floor for tile, you must understand exactly why these structures move so much more than traditional houses. The differences are found in the underlying engineering philosophy of factory-built structures.
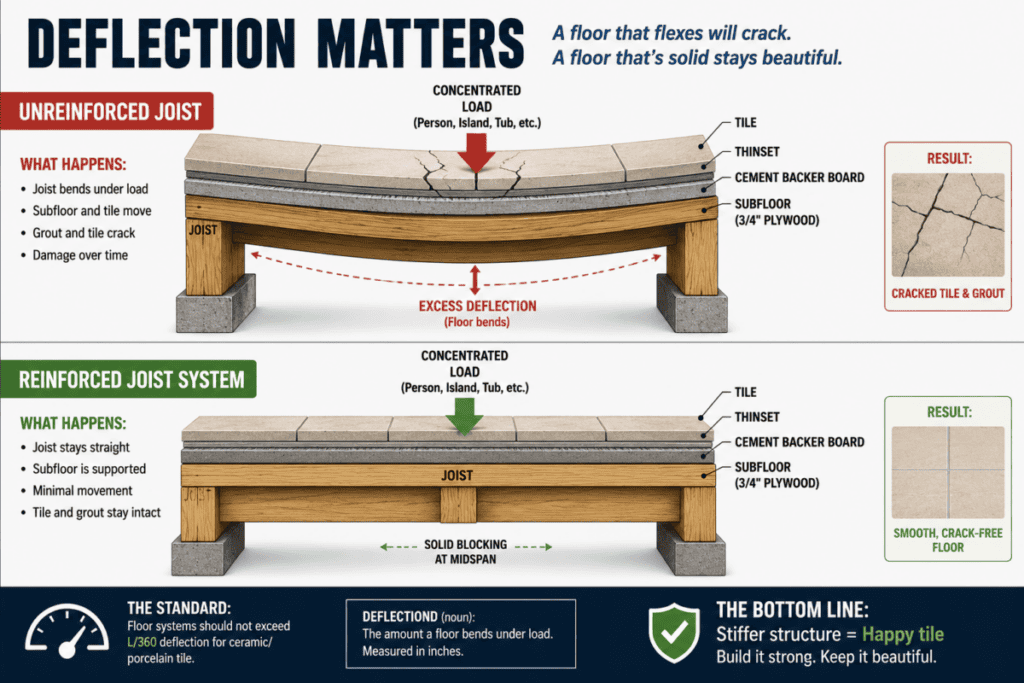
First: manufactured homes are constructed directly on top of a steel chassis frame. This steel frame acts as the foundation of the home. The wooden floor joists run perpendicular or parallel to these massive steel I-beams. While the steel itself is incredibly strong, the wood joists frequently extend past the steel beams to create long cantilevered sections or wide unsupported spans. These long spans introduce significant bouncing and springiness into the floor assembly when walked upon.
Second: the entire home is engineered for transportation. Every component is optimized to save weight so the structure can withstand the high-vibration environment of highway transit without breaking. This focus on weight reduction means that manufacturers do not over-engineer the floor stiffness. They build it to be strong enough to support standard living loads safely, but not rigid enough to handle brittle stone or ceramic components.
Third: wood is a natural material that moves constantly. It expands and contracts based on changes in ambient humidity and temperature. Because mobile homes are elevated off the ground on piers or blocks, their underbelly is exposed to ambient atmospheric conditions. This exposure causes greater seasonal moisture fluctuations in the wood floor joists than you would find in a conditioned basement or crawlspace of a site-built home. This constant shifting creates immense shear stress on any rigid flooring material above.
Technical Deep Dive: The Mechanics of Structural Joist Deflection and Wood Species Grading
To accurately diagnose whether your floor framing needs reinforcement, you must evaluate the specific species and grade of the lumber used in your mobile home joists. Most manufactured home builders utilize Spruce-Pine-Fir (SPF) or Southern Yellow Pine (SYP) lumber. Southern Yellow Pine has a higher Modulus of Elasticity (E-value) than Spruce-Pine-Fir: meaning it is inherently stiffer and resists bending more effectively under identical loads.
For example: a Grade Number 2 SYP 2×6 joist has an E-value of roughly 1,600,000 pounds per square inch, whereas an SPF joist of the same size might only register an E-value of 1,400,000 pounds per square inch. When you combine a lower E-value with a wide 24-inch joist spacing, the structural assembly lacks the mechanical stiffness required to support a non-moving tile assembly. To fix this, you must artificially increase the Moment of Inertia (I-value) of the framing system. This is accomplished either by reducing the joist spacing by sistering additional lumber alongside the original joists, or by installing tight perpendicular solid wood bridging blocks to lock the joists together and distribute point loads across multiple framing members.
| Product Name | Primary Technical Purpose | Key Specification |
|---|---|---|
| MaxBond Polymer Modified Thinset | High-flexibility tile mortar to absorb minor structural vibrations. | ANSI A118.15 Certified |
| TitanBoard 1/2-Inch Cement Underlayment | Moisture-proof bonding surface for secure tile adhesion. | ASTM C1325 Compliant |
| FlexiGuard Anti-Fracture Isolation Membrane | Elastomeric sheet that isolates tile from subfloor lateral shifts. | Up to 1/8-inch shear isolation |
What Types of Tile Can Be Installed Safely?
If you have verified or reinforced your floor structure to meet the L/360 standard, your choice of tile material will dictate the long-term durability of the installation. Not all tiles are created equal: they vary significantly in density, water absorption, and structural requirements.
Ceramic tile is the most common option on the market. It is highly affordable, easy to cut with basic tools, and available in a massive array of styles. It works perfectly fine in low-traffic areas like bathrooms or small kitchens: provided the subfloor is stable. However: ceramic is more porous than porcelain, meaning it can absorb more moisture over time if the grout lines leak, which can weaken the thinset bond underneath.
Porcelain tile is the premium choice and is highly recommended for mobile home installations. Porcelain is fired at much higher temperatures than standard ceramic, making it far denser, harder, and nearly impervious to water absorption. Its water absorption rate is less than 0.5 percent. Because of this extreme density, porcelain handles dynamic loads and thermal expansion much better than ceramic: making it the optimal selection for long-term durability.
Natural stone including marble, slate, travertine, and granite, should generally be avoided in manufactured housing. Natural stone contains inherent geological fault lines, veins, and microscopic fissures that make it highly prone to cracking under minimal stress. Furthermore: stone requires a minimum floor rigidity rating of L/720, which demands an exceptionally heavy and over-engineered wood framing system that is difficult and costly to construct inside a mobile home.
Rooms That Usually Work Well for Tile
The layout and size of the specific room you want to tile will heavily influence your chances of a successful installation. Small, confined spaces are much easier to stabilize than expansive, open areas.
Bathrooms are ideal candidates for tile upgrades. Because these spaces have small overall footprints, the floor joists span much shorter distances before hitting load-bearing exterior walls or rigid interior partition walls. This tight geometry naturally reduces deflection. Additionally: the waterproof characteristics of porcelain tile provide immense protection against the high moisture levels common in bathrooms, safeguarding the subfloor from rot.
Laundry rooms and entryways also work exceptionally well. These are high-abuse areas that frequently deal with wet shoes, mud, and potential appliance leaks. Tiling these spaces provides excellent utility. However: in laundry rooms, you must ensure that the floor directly underneath heavy, vibrating washing machines is completely reinforced with solid wood blocking between the joists to prevent dynamic vibration from shattering the surrounding grout lines.
Rooms Where Tile Can Be More Challenging
Conversely: large rooms present severe engineering challenges for rigid flooring materials. Attempting to tile these spaces without extensive structural modifications is a recipe for expensive failure.
Large living rooms are highly problematic. The expansive open floor area means that the joists have long, unsupported spans that naturally bounce when walked across. As people move through the room, the cumulative deflection across a wide surface area creates massive structural stress points for a rigid tile installation. Long hallways present similar issues: the concentrated foot traffic path down a long, narrow span maximizes the repeated deflection stress along the center line of the floor framing.
The most dangerous area to install tile is anywhere near the marriage line of a double-wide or triple-wide mobile home. The marriage line is the physical seam where the separate factory sections are joined together on site. Even when bolted together securely, these separate chassis sections move independently of one another during seasonal temperature changes and soil settling. If you run tile directly across a marriage line without a specialized, engineered expansion joint, the tiles along that seam will completely fracture within a single season.
Technical Deep Dive: The Thermodynamics of Material Expansion in Mobile Home Structures
Every material expands and contracts when temperatures shift: a physical reality defined as the Coefficient of Linear Thermal Expansion. The conflict in a mobile home arises because the wood framing and the ceramic tile expand at radically different rates. Wood expands primarily based on moisture content, but its thermal expansion is also dynamic. Ceramic tile has an expansion coefficient of roughly 0.000006 per degree Celsius, whereas the steel chassis underneath expands at roughly 0.000012 per degree Celsius.
When sunlight hits a large mobile home window, warming the tile floor while the underbelly remains cool, the resulting differential expansion creates localized thermal stresses. If the tile is locked tightly against the baseboards without an open perimeter relief joint, the expanding tile bed has nowhere to go. The internal pressure builds until the floor undergoes tenting: a structural failure where the tiles buckle upward, tearing away from the thinset bed with a loud popping sound. This risk makes the installation of flexible expansion joints every 12 to 15 linear feet absolutely mandatory.
The Importance of the Subfloor
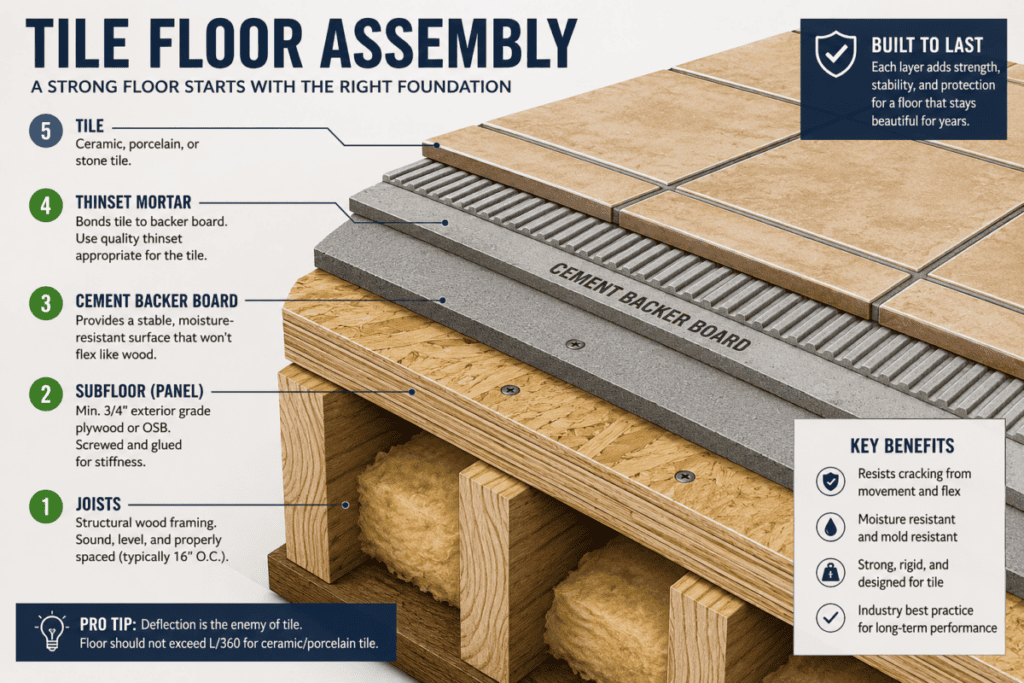
Your finished floor is only as good as the subfloor underneath it. If you attempt to install high-quality tile over a deteriorating, low-grade subfloor material, the installation will fail completely.
Standard manufactured homes utilize three main types of subflooring: Oriented Strand Board (OSB), plywood, or older particleboard. Modern builds typically feature 3/4-inch tongue-and-groove OSB or plywood: both of which provide a strong, structurally stable platform that handles fasteners well and resists minor moisture exposure without losing structural integrity.
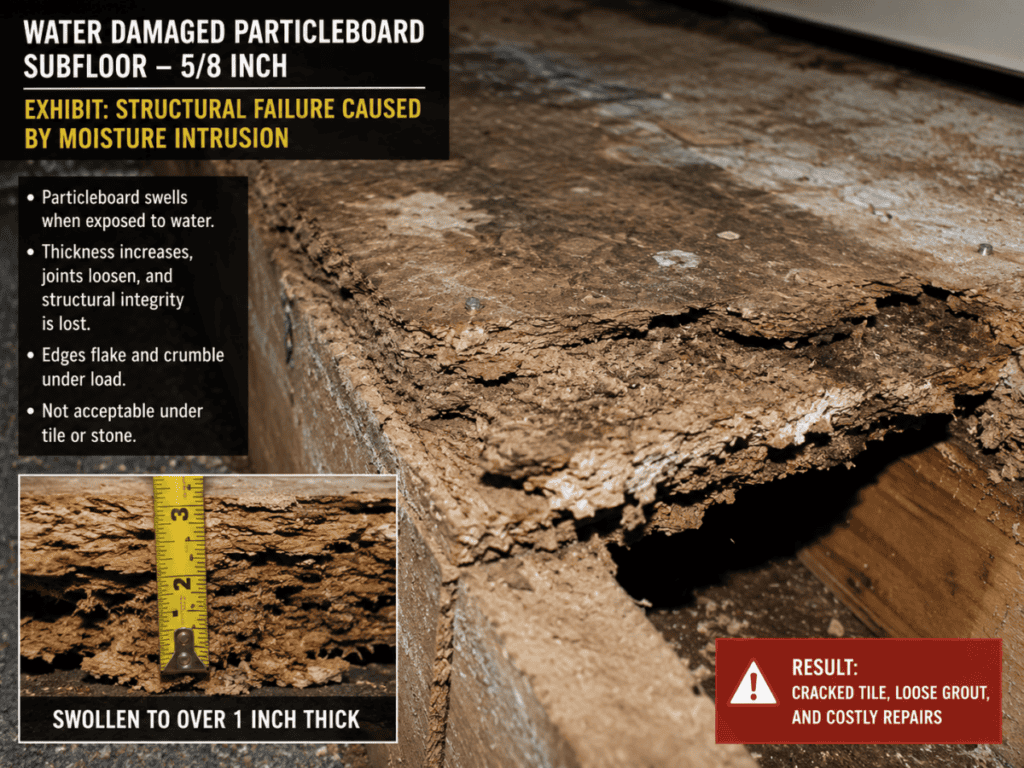
Older mobile homes frequently feature 5/8-inch particleboard subfloors. Particleboard is a major problem for tile installations. It is made from compressed sawdust held together by urea-formaldehyde resins. When particleboard gets wet from a minor plumbing leak or simple ambient humidity, the glue breaks down completely. The material swells up like a sponge, loses all its structural density, and turns back into sawdust. It has zero fastener-holding power and lacks the shear strength required to support a tile mortar bed. You must never attempt to tile over particleboard: it must be completely cut out and replaced with exterior-grade plywood before proceeding.
Before moving forward with any installation, you must perform a rigorous physical inspection of the entire subfloor surface. Look closely for signs of historic water damage, soft spots that sag when stepped on, wood delamination, and active wood rot. Every single compromised section must be completely excised back to the center of the nearest floor joists and replaced with fresh, thick structural plywood.
Should You Install Cement Backer Board?
There is a massive amount of misinformation surrounding cement backer board (such as Durock or HardieBacker). Homeowners frequently believe that adding a 1/4-inch or 1/2-inch layer of cement board will magically transform a weak, bouncy floor into a rock-solid platform ready for tile. This is a dangerous misconception.
Cement backer board is designed to do two specific things: it provides a texturally ideal, highly porous bonding surface that thinset mortar can grip tightly, and it is completely dimensionally stable when exposed to water, meaning it will not swell or rot if moisture seeps through the tile grout lines. What cement backer board does not do is add structural strength to the floor. It has very little structural bending strength. If the wood floor joists below are flexing, the cement board will simply bend right along with them: causing the tile above to crack.
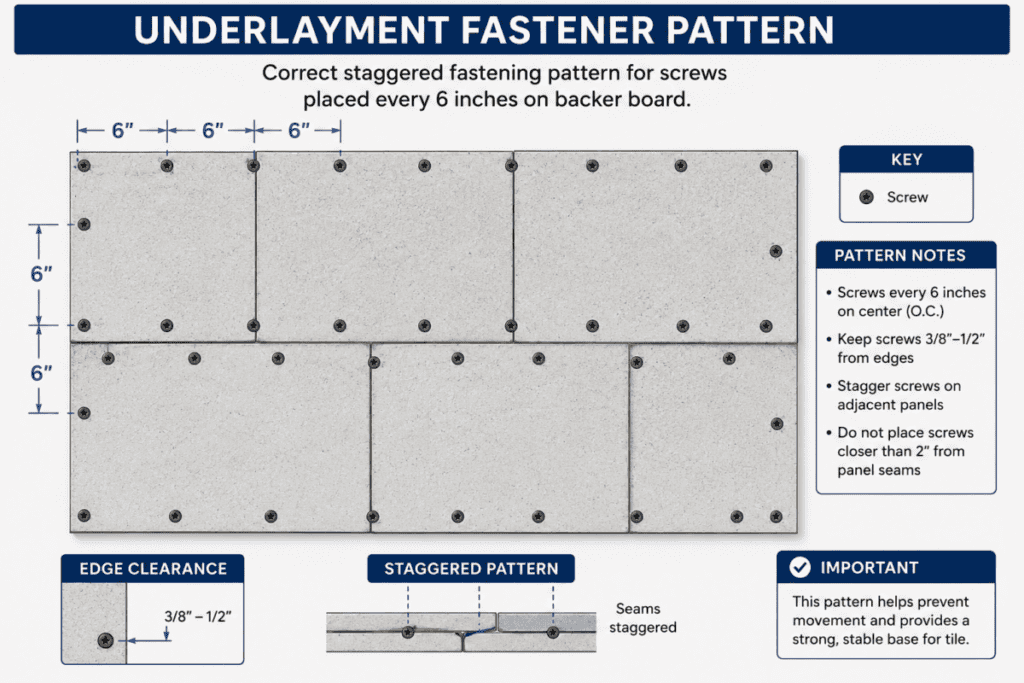
To ensure a long-lasting installation, you must first verify that your subfloor is rigid enough on its own. Then: you must install the cement backer board correctly. It must be bedded in a fresh layer of modified thinset mortar applied with a 1/4-inch notched trowel to fill any minor voids between the sheets and the subfloor. It must then be secured to the subfloor using specialized alkaline-resistant cement board screws spaced exactly 6 inches apart across the entire surface. Finally: all the seams between the backer board sheets must be taped with fiberglass mesh tape and skimmed smooth with thinset to create a monolithic substrate.
Technical Deep Dive: The Chemistry of Modified vs. Unmodified Thinset Mortars
Choosing the correct thinset mortar is critical to keeping your tile bonded to the subfloor over the long term. Under ANSI standards, thinsets are classified as either unmodified (ANSI A118.1) or modified (ANSI A118.4 or A118.15). Unmodified thinset is a simple mixture of Portland cement, sand, and water-retaining agents. It relies entirely on mechanical interlocking to grip the microscopic pores of the tile and the substrate.
Modified thinsets incorporate dry liquid polymers and latex additives into the mix. These polymers radically alter the physical properties of the mortar bed as it cures. The polymer strands form a flexible matrix throughout the crystalline cement structure: providing high liquid adhesion, high shear bond strength, and a crucial degree of elasticity. In a mobile home environment, where minor structural vibrations and thermal shifts are inevitable, an ANSI A118.15 premium modified thinset is mandatory. This flexible mortar bed acts as a structural shock absorber: flexing minutely to prevent the bond from shearing away from the underside of the tile when the home experiences minor movement.
Can You Tile Over Existing Vinyl Flooring?
When tackling a remodel, it is incredibly tempting to leave the old, ugly sheet vinyl flooring in place and tile directly over it to save time and effort. While this is technically possible under a few narrow conditions, it is a high-risk approach that usually leads to premature failure.
You can only tile over vinyl if the existing material is solid sheet vinyl (not individual peel-and-stick tiles), is completely and securely bonded to the subfloor across 100 percent of the room, and is free of any cushioning or foam backing. If the vinyl has any softness or padding, it will compress under foot traffic: causing the tile grout to crack immediately. You must also use a highly specialized, premium modified thinset explicitly rated to bond to non-porous vinyl surfaces, and you must aggressively abrade the surface of the vinyl with coarse sandpaper to give the mortar some mechanical grip.
In almost every scenario, it is far better to completely rip out the old vinyl flooring. Removing it allows you to thoroughly inspect the hidden wood subfloor for old water damage or hidden rot around plumbing fixtures. Ripping it out also keeps your finished floor height lower: preventing awkward thresholds at transitions to other rooms and ensuring that exterior doors can still swing open freely without rubbing against the new tile.
Weight Considerations: Does Tile Weigh Too Much for a Manufactured Home?
A very common concern among manufactured home owners is whether the sheer weight of a ceramic or porcelain tile installation will overload the home’s structural framing: potentially causing the chassis to buckle or the home to sink. This is a valid question, but the physics of the situation are usually misunderstood.
A typical ceramic tile installation, including the tile, the thinset mortar bed, and the 1/4-inch cement backer board, adds roughly 5 to 7 pounds per square foot of dead load to the floor system. Standard residential structural codes require floors to be engineered to handle a minimum live load of 30 to 40 pounds per square foot. Therefore: the weight of the tile itself rarely exceeds the ultimate load-bearing capacity of the wooden joists or the heavy steel main frame undercarriages. The structure can physically hold the weight without collapsing.
The true issue is not mass: it is stiffness. The added weight of the tile increases the structural load, which naturally magnifies any inherent flex or bounce in the floor framing. A floor that bends slightly under your weight when bare will bend significantly more when burdened with an additional 6 pounds per square foot of permanent dead load. It is this increased bending under movement that destroys the installation, not a catastrophic structural collapse of the home. If you want to dive deeper into general structural considerations for aging homes, feel free to review our numerous other mobile home articles at MobileHomeFriend.com.
Common Reasons Tile Floors Fail in Manufactured Housing
When tile floors fail in a mobile home, the autopsy almost always points to one of five structural errors. By understanding these common installation mistakes, you can take explicit preventive action during your remodeling workflow.
The first and most common cause is excessive floor flex due to under-engineered or un-reinforced floor joists. The second is using a weak or compromised subfloor substrate, such as tiling directly over factory-installed particleboard or water-softened OSB. The third is failing to use a premium polymer-modified thinset mortar: using a cheap, rigid unmodified mortar instead that cannot handle minor structural vibrations.
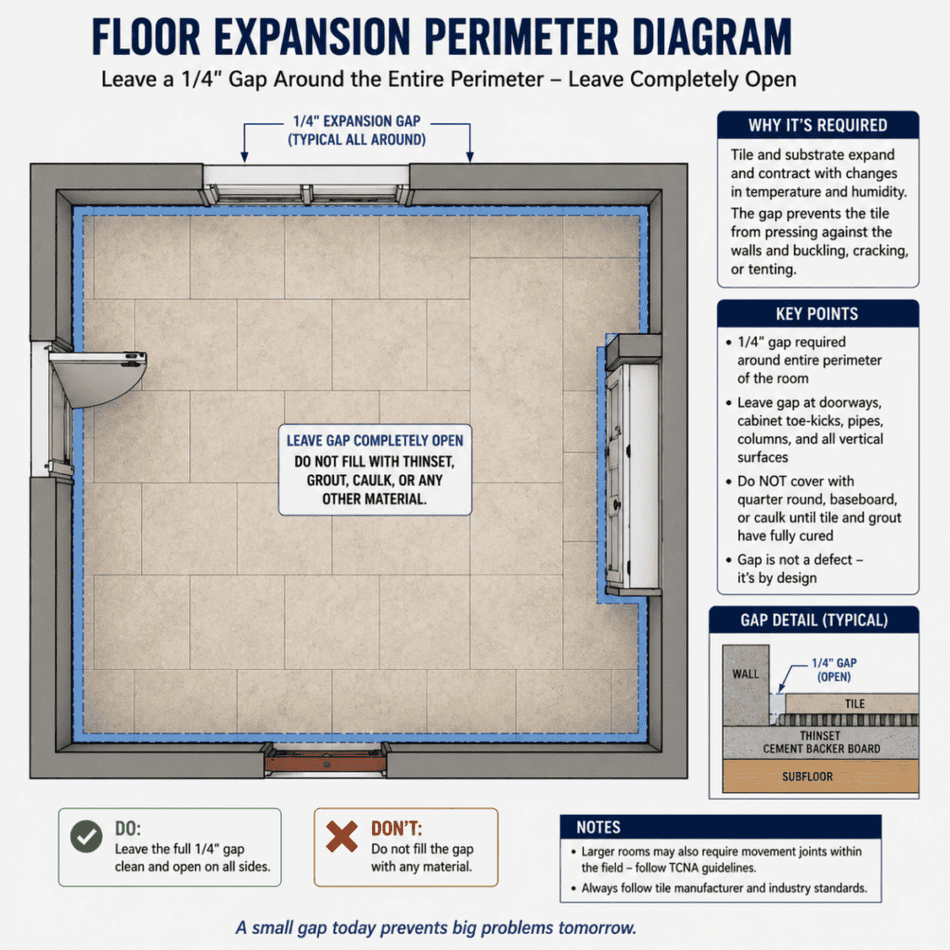
The fourth critical error is omitting proper expansion joints. You must leave a clean 1/4-inch expansion gap around the entire perimeter of the room where the tile meets the walls. This gap must never be filled with hard thinset or grout: it must be left completely open and covered by your baseboard trim or filled with a highly flexible, color-matched 100 percent silicone caulk. Without this relief joint, normal seasonal expanding will force the tiles to push against the walls and lift off the floor. The fifth cause is failing to install an anti-fracture isolation membrane over the backer board, which prevents lateral subfloor wood movement from transferring directly into the brittle tile bed.
How to Properly Prepare a Mobile Home Floor for Tile
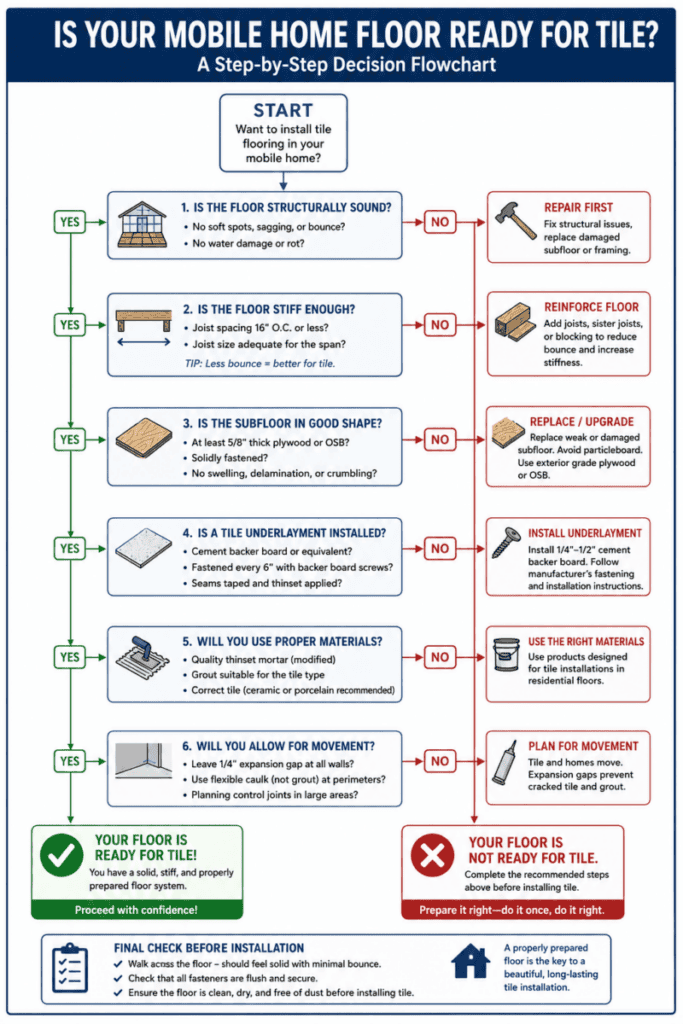
If you want a tile floor that lasts for decades, you must execute a strict preparation protocol. This process focuses entirely on maximizing the rigidity and stability of the platform before a single piece of tile is ever laid down.
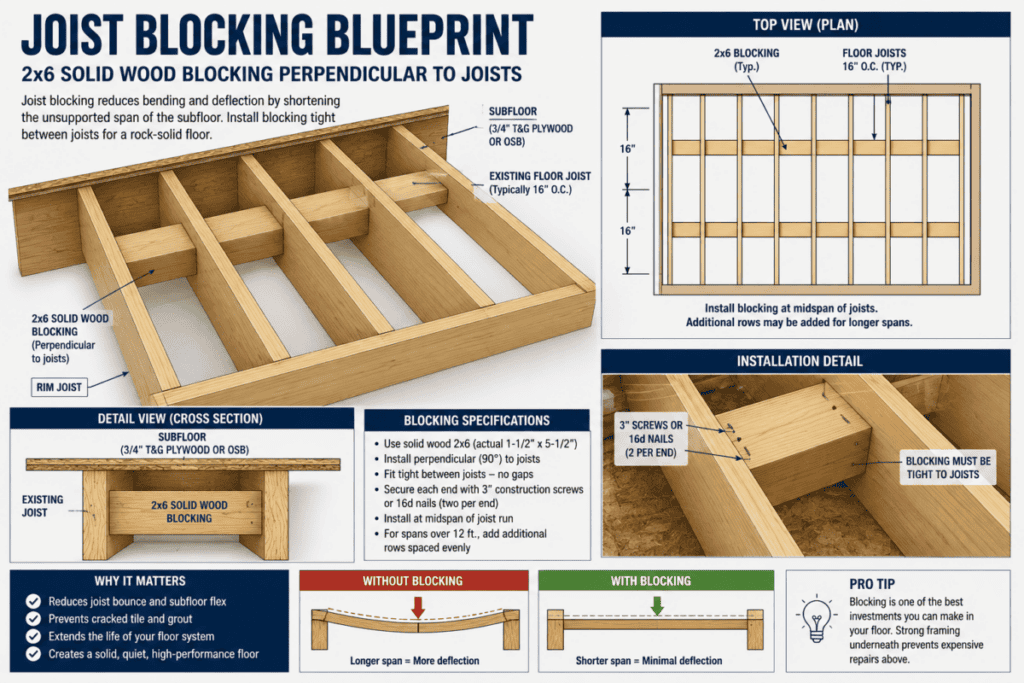
Start by completely stripping the room down to the raw subfloor and replacing every square inch of damaged wood. Next: reinforce the joists from underneath the home or from above by sistering new lumber directly alongside the existing framing members if access permits. You should then install solid 2×6 wood blocking perpendicular between the joists every 4 feet to completely lock the framing together and eliminate lateral twisting.
Next: install a secondary underlayment layer over your primary subfloor. Never rely on a single layer of wood. Adding a layer of 1/2-inch exterior-grade plywood or a high-quality 1/4-inch cement backer board securely bedded in thinset and screwed down tightly will dramatically stiffen the floor system. Always stagger the seams of the second layer so they never align with the seams of the primary subfloor below: minimizing potential weak movement lines.
Alternatives to Consider If Your Floor Is Not Suitable for Tile
If you perform a structural evaluation and discover that your mobile home’s floor framing requires too much costly modification to safely support tile, do not force the installation. There are exceptional modern alternative materials available that provide the exact same aesthetic appeal without the high risk of cracking.
Luxury Vinyl Plank (LVP) or Luxury Vinyl Tile (LVT) is the absolute best alternative on the market for manufactured homes. LVP is 100 percent waterproof, making it ideal for wet zones like bathrooms and kitchens. It is incredibly durable, highly scratch-resistant, and comfortable underfoot. Most importantly: vinyl is completely flexible. If your mobile home floor flexes or shifts slightly over the seasons, the vinyl simply contours to the movement without taking any damage whatsoever.
High-quality laminate flooring and engineered hardwood are also viable options for dry areas of the home. Engineered hardwood features a real wood veneer atop a cross-laminated plywood core: giving you the genuine look and feel of real wood while providing excellent stability against seasonal humidity shifts. For additional details on safe, low-maintenance flooring options designed to support aging-in-place modifications, explore our resources at HousingAfter60.com. ***
Technical Deep Dive: 10-Year ROI and Net Worth Trajectory Analysis (Tile vs. LVP)
Let us look at the long-term asset value and return on investment (ROI) metrics of installing rigid porcelain tile versus heavy-duty Luxury Vinyl Plank in a standard 1,200-square-foot manufactured home over a 10-year holding period. A proper structural porcelain tile installation requires extensive joist reinforcement, subfloor replacement, backer boards, premium thinsets, and professional labor: averaging roughly $18.00 per square foot fully loaded, or a total initial capital expenditure of $21,600.
In contrast: a commercial-grade 20-mil wear layer click-lock LVP installation requires minimal subfloor modification and can be rapidly installed for roughly $6.00 per square foot all-in, totaling $7,200. The initial capital savings remaining in your investment account is exactly $14,400. If you take that $14,400 difference and invest it into a conservative index fund yielding a compounding 7 percent annual return, that capital will grow to roughly $28,327 over a 10-year horizon.
Now consider the structural risk factor. If the mobile home floor experiences shifting or foundation settling at year 5, a rigid tile floor runs a high risk of localized grout failure or tile cracking, requiring localized structural repairs or full replacement. The LVP floor handles the settling with zero structural damage. Upon resale at year 10, real estate market metrics demonstrate that buyers pay zero premium for porcelain tile over high-quality modern LVP in manufactured housing markets. Therefore: choosing the flexible LVP path saves you capital upfront, eliminates structural risk, and increases your projected net worth trajectory by over $28,000 at the end of a decade.
Frequently Asked Questions Regarding Mobile Home Tile Installation
Can I install ceramic tile in a single-wide mobile home?
Yes: you can install it, but it requires significantly more structural reinforcement than a double-wide because single-wide frames naturally experience greater twisting and lateral flex along their long, narrow chassis rails during seasonal weather shifts.
Is porcelain tile truly better than standard ceramic tile?
Yes: porcelain is highly superior for mobile home environments. It is fired at higher temperatures: making it far denser, less porous, and structurally stronger than standard ceramic, which allows it to resist moisture infiltration and stress cracks much better.
Will my new tile floor crack when the home settles over time?
If the settling causes significant structural movement or unleveling, yes: it will crack if you did not install a premium elastomeric anti-fracture isolation membrane between the subfloor and the tile bed to absorb the movement.
Can I safely install electric radiant heated tile floors?
Yes: you can embed electric radiant heating cables directly into the modified thinset mortar layer beneath the tile: provided that your floor framing has been thoroughly reinforced to prevent flex from snapping the sensitive electrical heating elements.
Is it acceptable to tile directly over factory particleboard subfloors?
Absolutely not. You must never attempt this. Particleboard lacks all structural shear strength, expands severely when exposed to moisture, and will quickly rot out: causing a total failure of your new tile installation within months.
Should I automatically reinforce my floor joists before tiling?
Yes: it is highly recommended to proactively install solid wood blocking or sister secondary framing members to minimize deflection, as preventing structural flex is far cheaper than tearing out a cracked tile floor later. ***
Long-Term Maintenance Tips for Mobile Home Tile Floors
Once you have successfully executed a structurally sound tile installation, you must maintain it correctly to safeguard your investment from wear and moisture intrusion over the lifespan of the material.
You must keep your grout lines sealed. Standard cementitious grout is highly porous and will absorb water, dirt, and cleaning chemicals. Apply a premium penetrating fluoropolymer grout sealer 2 weeks after installation, and reapply it every 12 to 24 months. Sealing prevents water from migrating through the grout lines down into the thinset bed, where it could cause wood rot.
Clean the floor exclusively with non-abrasive, pH-neutral cleaners. Avoid harsh acids or heavy bleach solutions: which can slowly erode the grout matrix and weaken its structural bond over time. Inspect the floor routinely for any hairline cracks in the grout lines or loose tiles. If you spot a cracked grout line, scrape it out immediately and replace it with fresh acrylic-modified grout or flexible color-matched silicone caulk to stop moisture migration before it damages your subfloor structure. For additional strategies on maintaining property assets and managing retirement renovations safely, check out our comprehensive checklists at HousingAfter60.com.
Final Thoughts From Charles O’Dell
Tile can be a truly beautiful, exceptionally durable flooring option for your mobile home, but it is not a simple weekend DIY project that you can rush through. The ultimate success of the renovation depends entirely on the hidden structural preparation work you perform before you ever open a single box of tile. A stiff, dry, and rock-solid subfloor assembly is infinitely more important than the color, size, or cost of the tile you choose to put on top of it. If you have any structural doubts about the stiffness or layout of your floor framing, take the time to fix those issues first. Doing it right the first time is significantly cheaper than dealing with the absolute nightmare of tearing out a failed, cracked tile installation later down the road.
About the Author: Charles O’Dell
Charles O’Dell is the founder and primary structural content director of MobileHomeFriend.com. He is a professional real estate investor with over 23 years of hands-on experience in the property renovation industry. Over the course of his career, Charles has personally executed and managed more than 100 comprehensive property flips, with a specialized focus on structural stabilization, manufactured home utility upgrades, and high-ROI renovation workflows. He relies strictly on first-principles engineering logic and practical field experience to help homeowners solve complex structural problems safely and cost-effectively.
Written by Charles O’Dell, a mobile home investor with over 23 years of hands-on experience and more than 100 successful property renovations.