
Table of Contents
Introduction
Article Summary: Older mobile homes look cheap because factory builders used ultra-thin, mismatched trim, vinyl strips, and plastic wall battens to hide production tolerances. Replacing these cheap components with a consistent, 1×4 flat-stock or 3.5-inch trim system instantly stabilizes the visual lines of your interior. This comprehensive guide covers wall-panel joinery, jamb extension fixes, 2026 trim material costs, recommended tooling, and room-by-room execution strategies to maximize your home’s equity. Note: Local labor rates for mobile home trim installations change constantly. See our full regional cost table below.
Affiliate Disclosure: MobileHomeFriend.com is reader-supported. When you purchase tools, fasteners, or materials through links on our site, we may earn an affiliate commission at no extra cost to you. We only recommend job-tested gear used on our real estate flips.
Video Guide Overview
The Short Answer: Why Trim Destroys Mobile Home Interiors
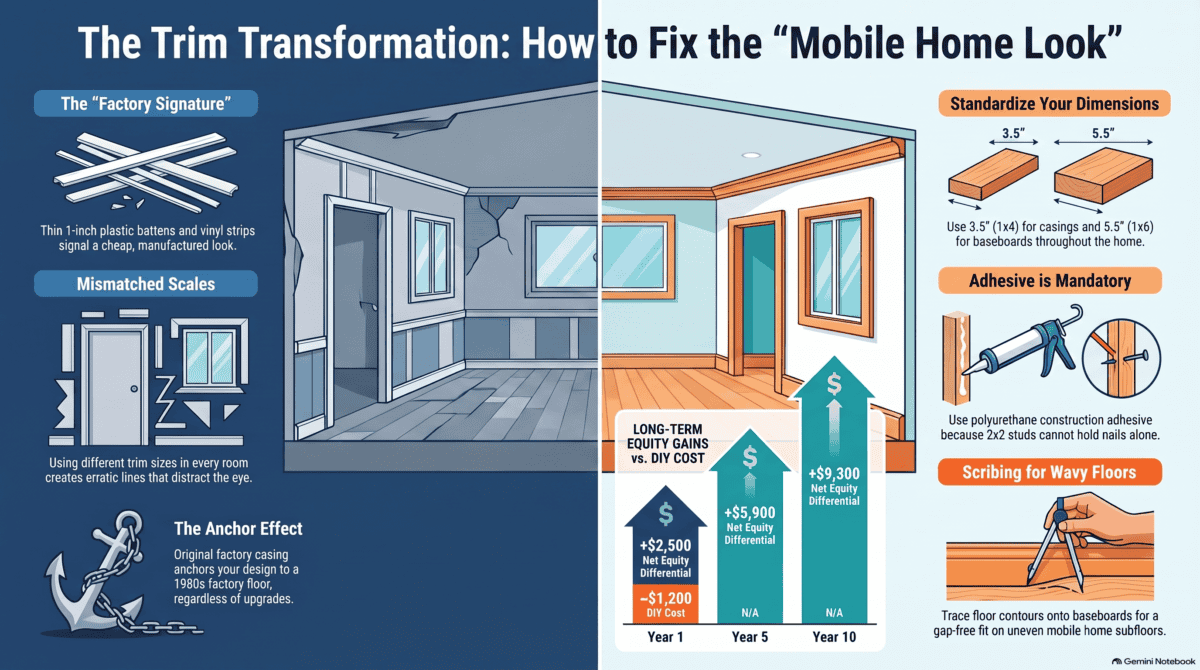
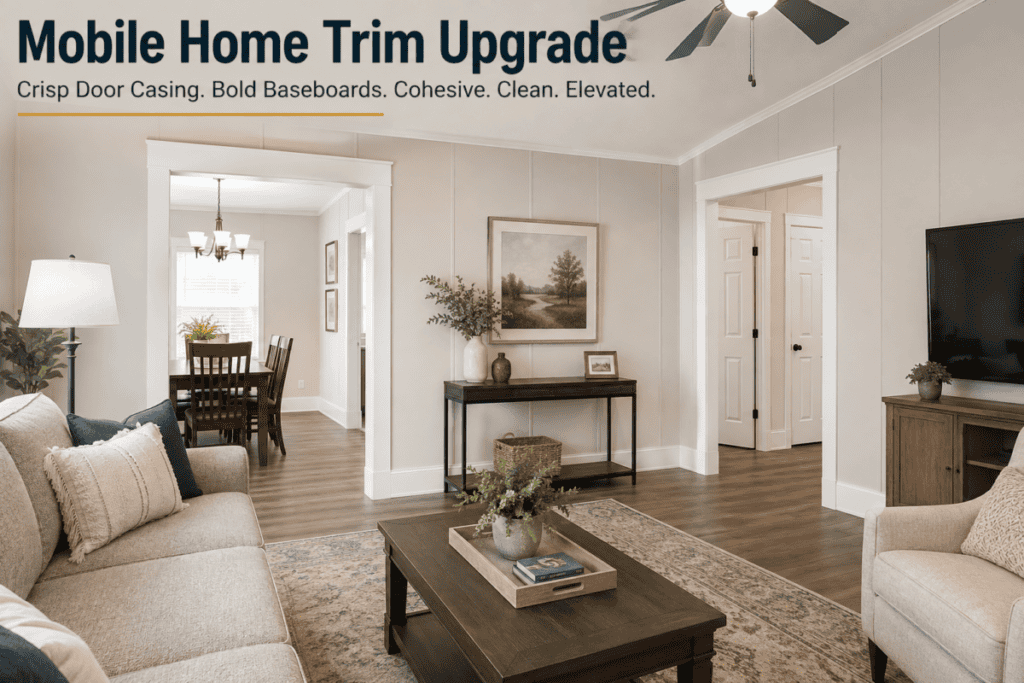
The core problem with older mobile home interiors is not the layout, the floor plan, or the wall structure. It is the visual noise created by cheap, undersized, and mismatched factory trim. Factory builders in the 1970s, 1980s, and 1990s engineered homes for speed and low weight. They covered wall seams with 1-inch plastic battens, wrapped doorways in thin faux-wood strips, and stapled down 1.5-inch vinyl baseboards. When your eyes scan a room, they hit dozens of erratic, dark, plastic lines. Even if you install a $10,000 quartz kitchen countertop or $5,000 luxury vinyl plank flooring, those cheap trim lines send an immediate signal to your brain: manufactured trailer. Replacing those flimsy strips with a unified 1×4 flat-stock painted trim system eliminates that factory signature. It unifies your doors, windows, and floors into an intentional, site-built appearance for a total material investment often under $1,200.
1. Why Old Mobile Home Trim Has Such a Big Visual Effect
Trim performs two distinct functions in residential construction. The first is its practical engineering job. Trim conceals rough structural seams, expansion gaps, un-taped drywall edges, and shifting materials. The second function is its visual architecture job. Trim creates the continuous geometric grid that the human eye follows across every square foot of an interior.
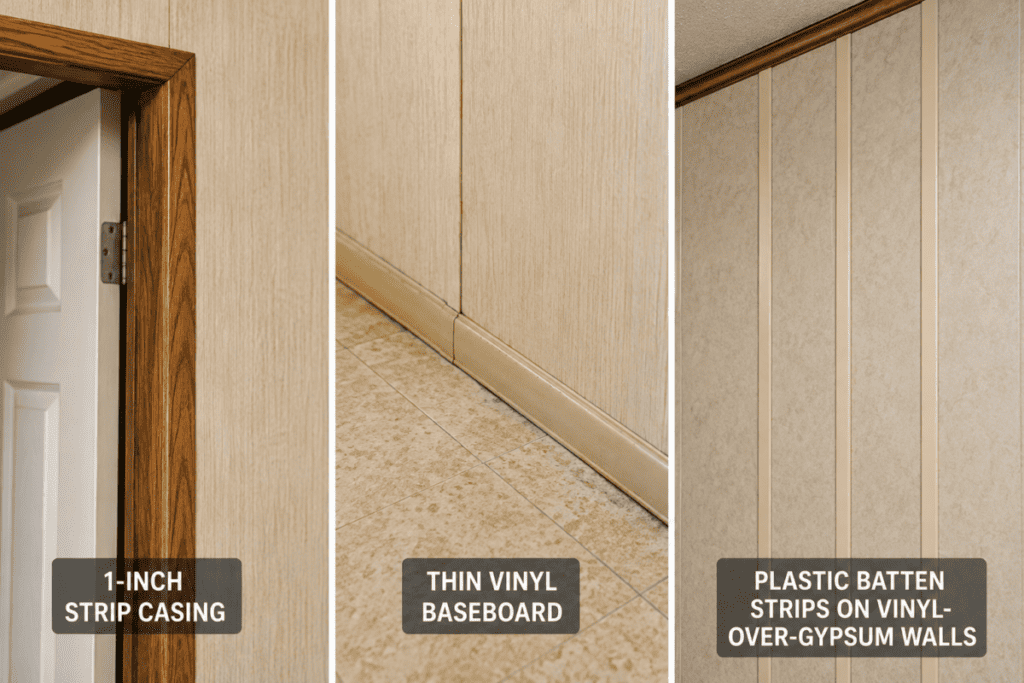
In a standard site-built home, trim uses consistent dimensions. Baseboards anchor the walls to the floor. Door casings define passages. Window casings frame natural light. In an older manufactured home, however, trim is applied purely as a cheap patch. Baseboards measuring 1.25 inches sit under 1-inch door casing, while 2-inch dark wall battens shoot vertically up the wall every 48 inches. The eye cannot rest because every boundary line changes scale, texture, and color.
Many homeowners throw money at cosmetic upgrades while leaving original factory casing intact. They spend thousands on waterproof LVP flooring, freshly painted drywall, and updated light fixtures. Yet the room still feels cheap. The remaining original trim acts as an anchor pulling the design back to a 1980s factory floor. Until you strip away those flimsy plastic borders, the room will never look truly finished.
| Trim Upgrade Category | DIY Materials (Self-Installed) | Pro Installation (Labor + Materials) |
|---|---|---|
| 1×4 Flat MDF Door & Window Casing Package (Per Room) | $65 – $110 | $250 – $450 |
| 5.5-Inch Baseboard Upgrade (1,200 Sq Ft Home) | $380 – $620 | $1,400 – $2,600 |
| Wall Batten Elimination & Seam Repair (Whole House) | $150 – $300 | $1,200 – $2,800 |
| Jamb Extensions & Casing Custom Adjustments (Per Opening) | $15 – $30 | $85 – $160 |
2. Why Older Mobile Homes Often Have So Much Unusual Trim
To fix mobile home trim, you must understand why factories installed it in the first place. Manufactured home builders operate on tight production lines, strict transport weight limits, and high-speed assembly quotas. They do not build houses the same way a custom site-builder frames a stick-built home.
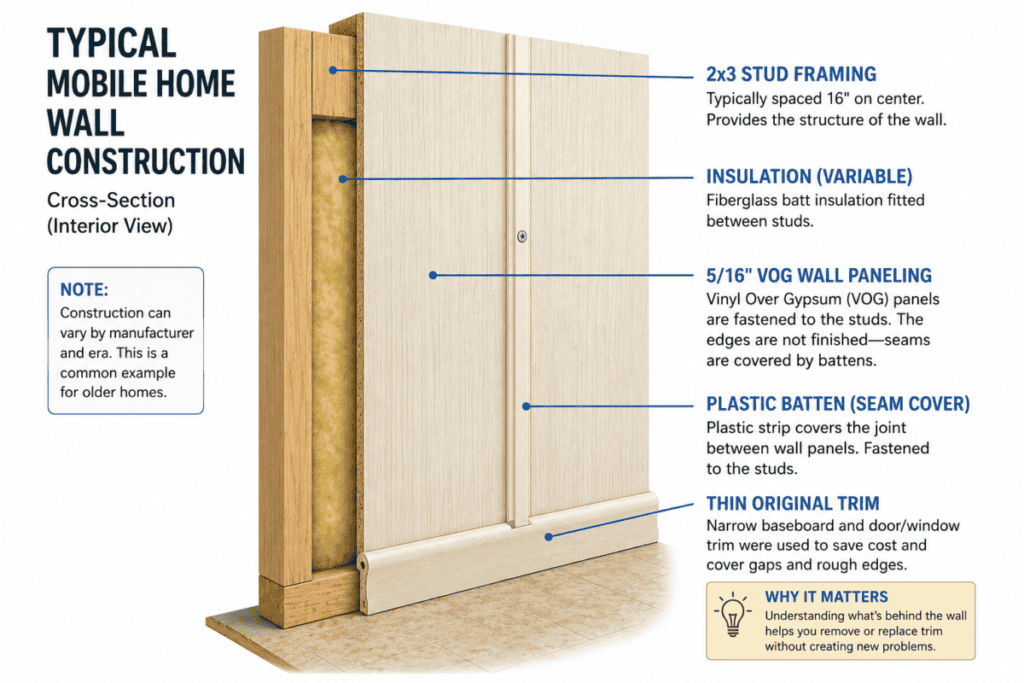
Factories utilized 5/16-inch Vinyl-Over-Gypsum (VOG) panels instead of standard 1/2-inch taped drywall. Taping, mudding, sanding, and drying drywall joints requires days of cure time that assembly lines cannot afford. Moving a home down a highway also flexes the entire chassis. Traditional taped drywall seams would crack instantly during transport. To solve this, factories left 1/4-inch expansion gaps between wall panels and stapled plastic or wood battens over every seam.
- Pre-finished Faux-Wood Strips: Eliminated on-site painting and disguised wood knots or surface defects.
- Ultra-Thin Door Casing: Kept materials light and minimized wall-depth overlap.
- Stapled Vinyl Baseboards: Flexed around uneven subfloors without snapping or requiring careful miter cuts.
- Plastic Window Returns: Snapped into aluminum window frames in seconds, bypassing custom jamb extensions.
Recognizing this distinction is critical. Some mobile home trim is purely decorative, but much of it hides structural tolerances, structural flex gaps, or exposed wiring channels. Before you yank off a piece of molding with a pry bar, you must know exactly what structural flaw or gap lies behind it.
3. Don’t Just Replace Individual Pieces—Create a Trim System
The most common mistake mobile home owners make during a remodel is replacing trim piecemeal. They swap out a rotten bathroom baseboard with 3-inch colonial pine, replace a damaged bedroom door casing with 2-inch flat MDF, and leave dark oak battens in the hallway. This creates a patchwork layout that looks even worse than the original factory setup.
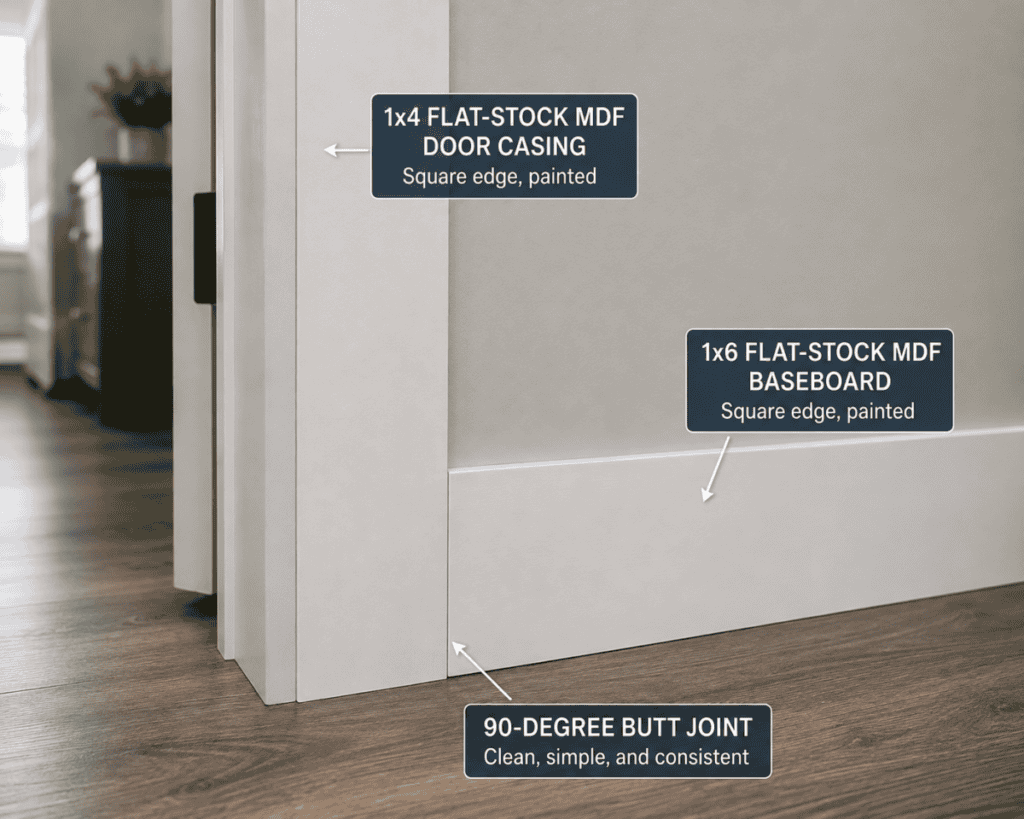
You must establish a single trim system vocabulary for your entire house. A trim system consists of a set of matching profiles, dimensions, and paint colors used consistently across every doorway, window, floor line, and wall seam. When the trim system is identical in every room, your eye stops processing boundaries and starts viewing the home as an integrated unit.
Technical Deep Dive: Designing a Standardized Flat-Stock System
A standardized flat-stock system is the single best trim strategy for older manufactured homes. It uses simple 1×4 boards (3.5-inch width) for door and window casing and 1×6 boards (5.5-inch width) for baseboards. This design eliminates complex miter cuts at door corners in favor of clean 90-degree square butt joints. The heavier profile covers legacy wall marks and panel gaps while providing a timeless, craftsman-inspired architectural line.
| Tool Model | Primary Function | Key Advantage for Mobile Homes |
|---|---|---|
| TrimMaster Pro 18G Cordless Brad Nailer | Fastening MDF and Pine Trim | No heavy air hose; fires precise 1.25-inch nails into thin 2×3 framing studs. |
| PrecisionCut Dual-Bevel Compound Miter Saw | Cutting Baseboards & Casings | Laser guide ensures exact 45-degree miter and 90-degree square cuts every time. |
| ContourGrip Scribing & Level Tool Set | Fitting Baseboards to Uneven Floors | Traces uneven mobile home floor lines directly onto wood for gap-free scribe cuts. |
4. Choosing a Style That Fits an Older Mobile Home
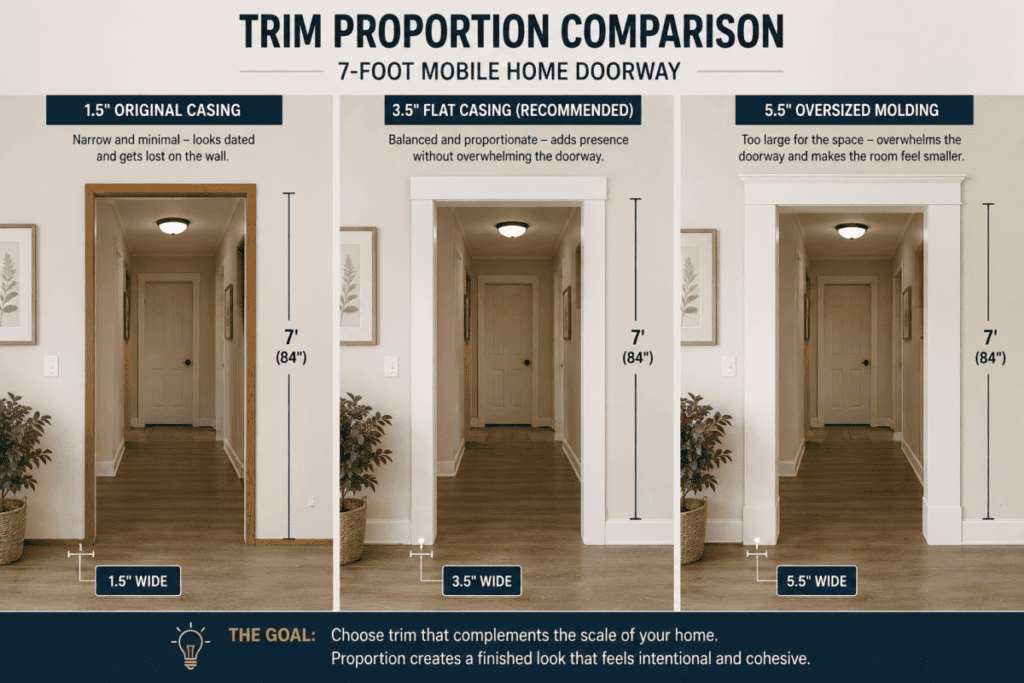
When selecting new trim, restraint wins every time. Many homeowners attempt to compensate for cheap manufactured construction by buying high-end 5.25-inch crown molding, heavy Victorian casing, and ornate rosettes. In a mobile home with 7-foot or 7.5-foot ceilings, this approach backfires completely. Overly complex trim profiles crowd the visual field, draw the ceiling downward, and make small bedrooms feel like closets.
Simple flat-stock trim profiles work best in mobile homes. A square-edge 1×4 casing profile paired with a square-edge 1×6 baseboard profile creates strong vertical and horizontal grid lines. If you prefer traditional profiles, choose a modest 2.25-inch to 3.5-inch colonial profile. Keep depth under 5/8-inch to avoid awkward overlaps with light switches, outlets, and thin door jambs.
Your goal is proper proportion, not maximum size. If you want to learn more about setting up long-term property improvements, check out our guide on 15 Budget Improvements That Increase Mobile Home Value to see how clean interior lines boost long-term valuation.
5. How Wide Should the New Trim Be?
Scale dictates whether trim looks custom or clumsy. Original mobile home casings are often a tiny 1.25 to 1.5 inches wide, making doors look like temporary office partitions. To transform the interior, widen the casing to a substantial profile without overwhelming the modest wall space.
- Door Casing Width: Standardize on 3.5 inches (1×4 flat stock). This provides a clean border that easily covers old staple holes, paint lines, and wall panel gaps.
- Window Casing Width: Use 3.5 inches on the sides and top, paired with a 3.5-inch window stool and apron underneath.
- Baseboard Height: Upgrade from cheap 1.5-inch vinyl strip baseboard to a 5.5-inch (1×6 flat stock) or 4.25-inch profiled baseboard. This anchors walls securely to the subfloor.
Before purchasing hundreds of linear feet of trim, perform a physical mockup. Buy a single 16-foot length of 1×4 MDF casing and 1×6 MDF baseboard. Cut short samples, tack them around one door and along a wall section using painter’s tape, and view them from across the room. A board that looks modest in a big-box store aisle can quickly look oversized inside a small mobile home bedroom.
6. Painted Trim vs. Wood Trim
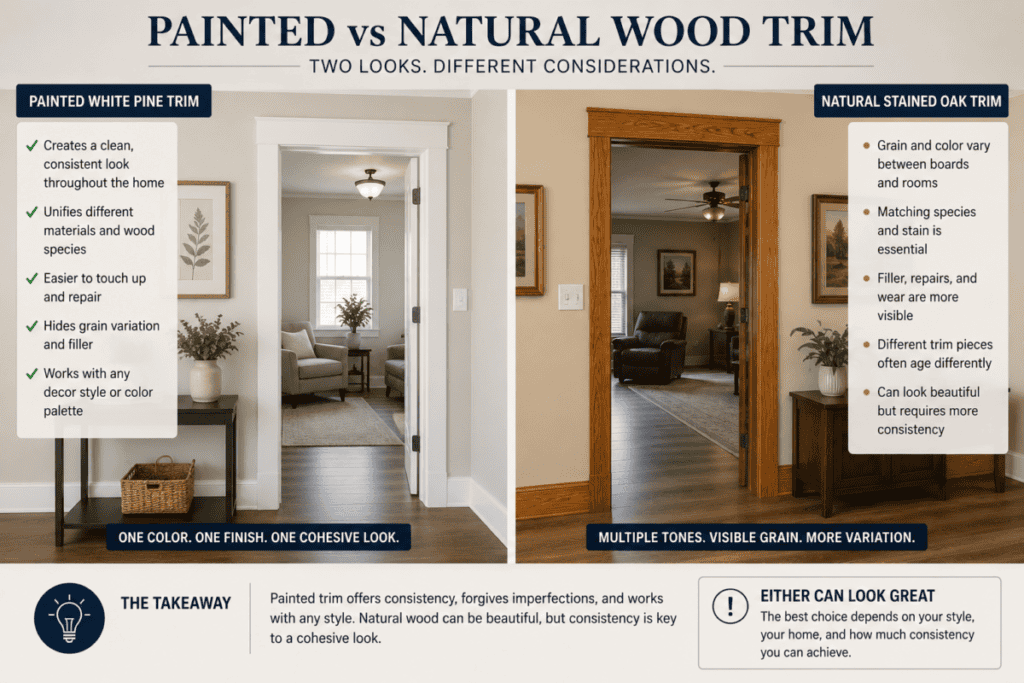
Choosing between painted trim and natural stained wood trim comes down to material control and installation complexity. Stained wood trim requires consistent wood species, matching stain shades, and near-perfect carpentry joints. Painted trim, on the other hand, gives you massive flexibility when renovating on a budget.
Painted Trim Advantages:
1. Hides mixed materials, allowing MDF, finger-jointed pine, and PVC to sit side-by-side seamlessly.
2. Conceals putty, nail holes, caulk joints, and corner shims under a single finish coat.
3. Brightens dark interior spaces, making low-ceiling hallways feel wider and open.
4. Simplifies future touch-ups using standard off-the-shelf interior paint.
Natural stained wood trim can look rich, but it highlights every flaw in an older mobile home. If your walls are slightly out of plumb or your door jambs differ in depth, wood putty will never match the stain perfectly. For a clean, unified look across the entire home, stick with a high-durability satin white interior paint on all trim surfaces.
7. The Mobile-Home Wall Problem
Trim installation in a site-built home is straightforward: locate 16-inch-on-center 2×4 studs behind 1/2-inch drywall and drive finishing nails directly into solid wood. In an older mobile home, wall framing is very different, and driving nails blindly leads to major frustration.
Older manufactured home exterior walls are typically framed with 2×3 or 2×4 studs, while interior partition walls often use ultra-thin 2×2 or 2×3 framing placed on erratic spacing. The wall covering itself is usually 5/16-inch VOG paneling or thin wood veneer paneling. Because the panels lack the density of true 1/2-inch drywall, a finish nail driven into thin paneling without hitting a stud behind it will pull right out.
Technical Deep Dive: Fastening Trim to 2×2 and 2×3 Stud Assemblies
When installing heavy 1×4 MDF casing or 1×6 baseboards into 2×2 partition walls, standard nail placement fails. First, locate studs using a quality electronic stud finder or magnetic screw finder. Second, drive 1.25-inch or 1.5-inch 18-gauge brad nails at alternating 45-degree angles (toe-nailing) into the top and bottom plates. Third, run a continuous bead of heavy-duty polyurethane construction adhesive along the back of the trim board before nailing. The adhesive carries the structural weight, while the angled brad nails hold the trim tight against the wall until the glue sets.
8. What Do You Do With Those Wall Battens?
Wall battens are the thin strips of plastic, vinyl, or wood nailed over the vertical seams between 4×8 wall panels. They are the single most identifiable feature of an older manufactured home interior, and homeowners frequently ask how to get rid of them.
You have three primary options for handling wall battens during a trim renovation:
Option 1: Paint the Battens (Low Cost)
If the wall panels are in good condition and firmly anchored, leave the battens in place. Paint both the wall panels and the battens the exact same color using a high-quality bonding primer and matte or eggshell latex paint. Eliminating the color contrast makes vertical battens drop out of sight.
Option 2: Replace with Flat Wooden Battens (Mid Cost)
Remove cheap factory plastic battens and replace them with thin, clean 1.5-inch flat wood lattice strips. Paint them to match your overall trim system for an intentional board-and-batten look.
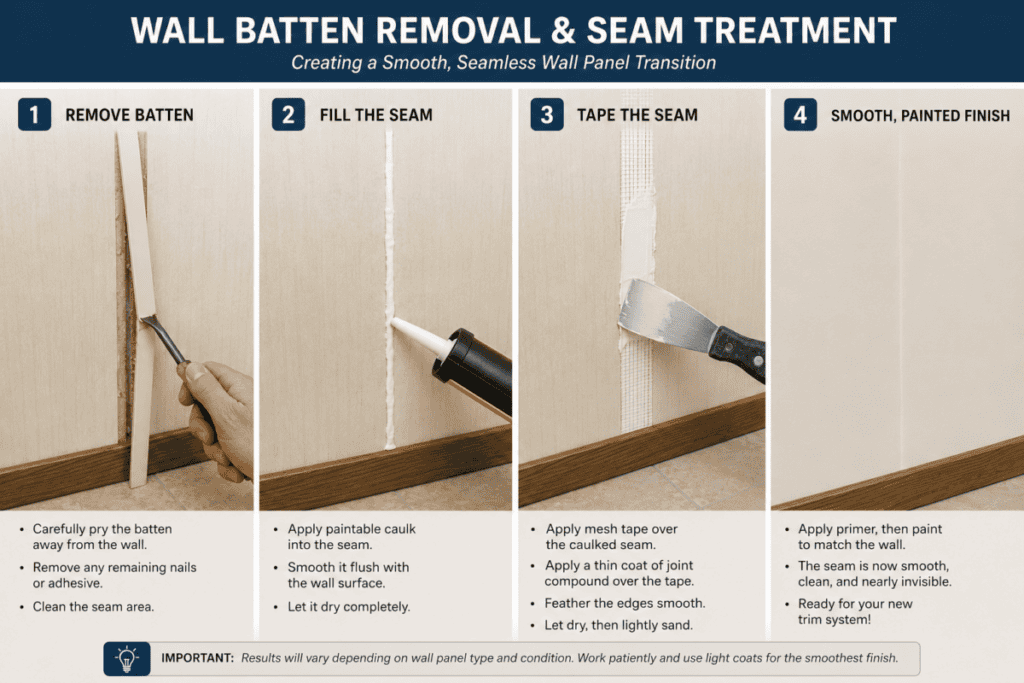
Option 3: Eliminate Battens Completely (High Cost / Labor Intensive)
Pry off the battens, scrape away factory adhesive, scrape panel edges clean, and fill the seam gap. Apply a heavy-duty self-adhesive fiberglass mesh tape over the joint, skin the seam with three thin coats of setting-type joint compound (Easy Sand 45), sand smooth, and prime. For more detail on structural aging and interior maintenance updates, review our analysis on Should You Remodel An Older Mobile Home.
9. Doorways: One of the Biggest Opportunities
Interior doorways are high-traffic focal points. Upgrading cheap factory casing around a doorway delivers an immediate boost in overall fit-and-finish.
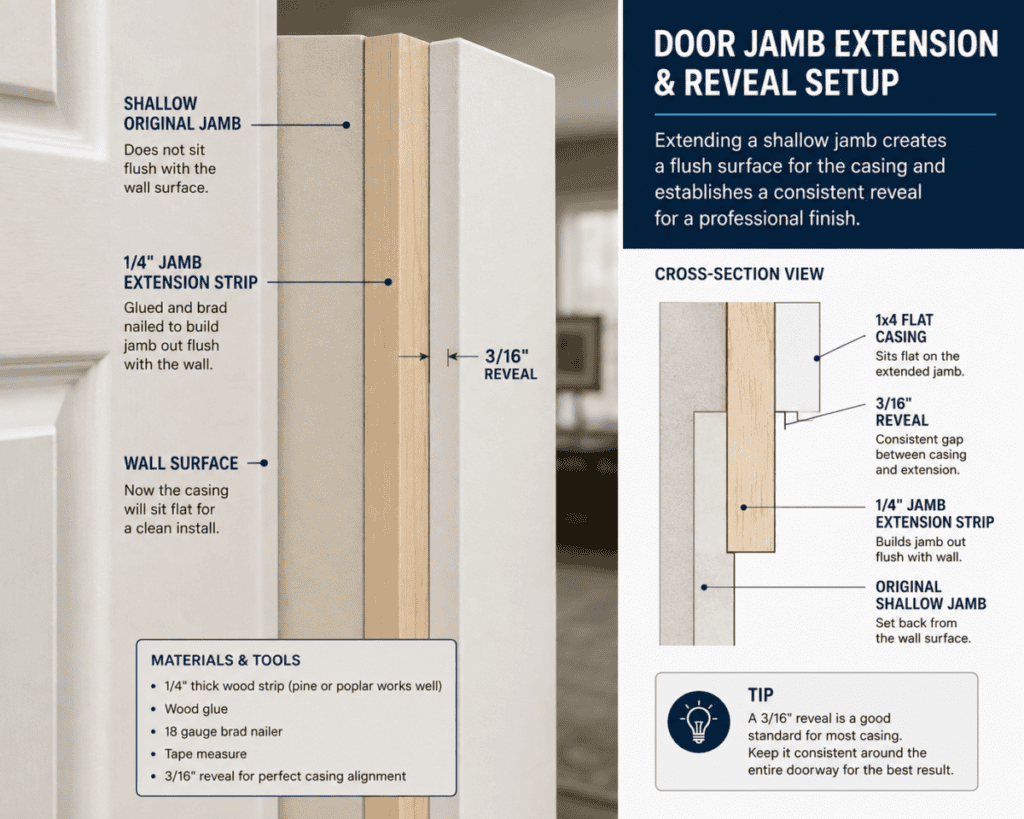
Factory door casing is usually stapled directly into thin particleboard jambs. When you pry off old casing, the jamb edges often break or sit receded 1/8-inch to 1/4-inch behind the finished wall panel. You cannot nail flat casing over a recessed jamb without twisting the board out of square.
Technical Deep Dive: Custom Jamb Extensions and Reveal Lines
To fix a recessed door jamb, build custom jamb extensions. Rip thin 1/4-inch clear pine strips on a table saw to match the exact depth gap between the particleboard jamb edge and the face of the wall panel. Glue and pin these extension strips directly to the jamb face. Next, set a combination square to 3/16 inch and mark a crisp reveal line around the inner perimeter of the jamb. Align your new 1×4 flat casing precisely on this reveal line before fastening. Leaving a consistent 3/16-inch reveal creates a professional shadow line and prevents door hinges from rubbing against the new casing.
| Year | Property Equity Impact (DIY Trim System Upgrade) | Property Value Trajectory (Original Cheap Trim Kept) | Net Equity Differential |
|---|---|---|---|
| Year 1 | +$2,500 (Instant appraisal boost on $800 material spend) | $0 (Baseline home valuation) | +$2,500 |
| Year 3 | +$3,200 (Sustained buyer appeal & higher rental yield) | -$800 (Normal wear on loose factory trim) | +$4,000 |
| Year 5 | +$4,100 (Faster sale speed; zero buyer discount flags) | -$1,800 (Buyer negotiates discount for “trailer” interior) | +$5,900 |
| Year 10 | +$5,800 (Fully modernized interior asset) | -$3,500 (Major cosmetic degradation requires full strip-out) | +$9,300 |
10. Windows Can Be More Complicated
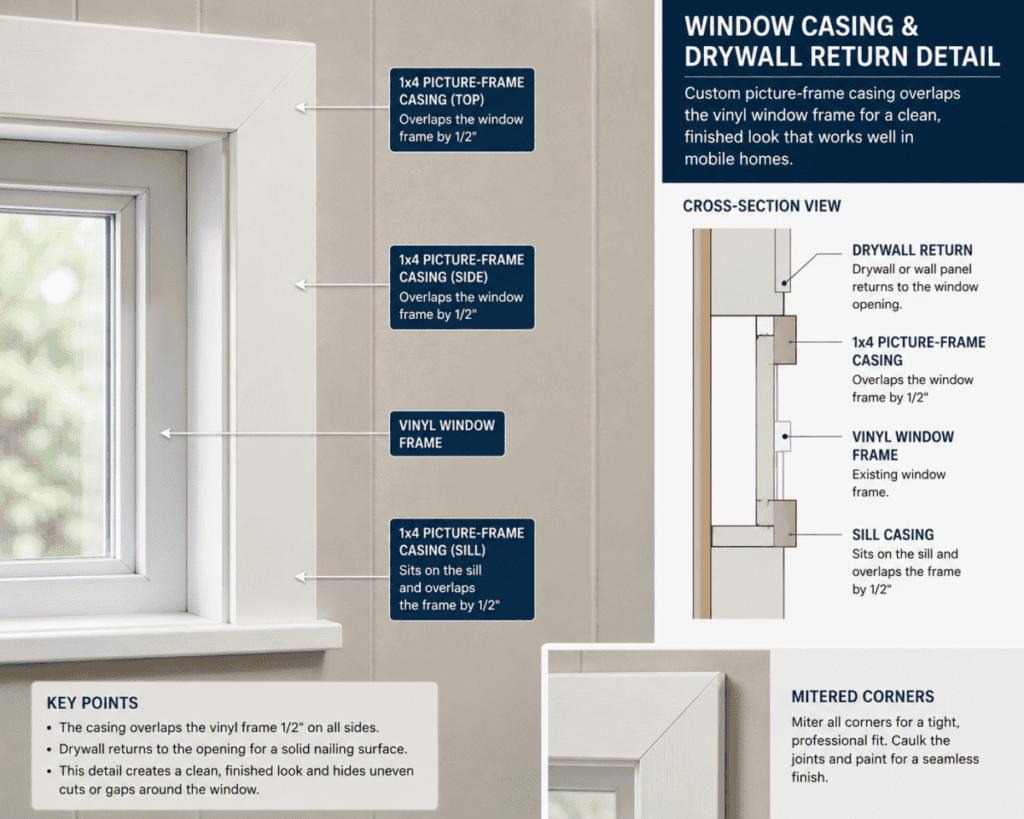
Mobile home windows present unique trim challenges. Original aluminum slider windows often utilize vinyl return channels or panelling that wraps straight into the frame without an interior wood jamb. When you remove old vinyl window trim, you are often left staring directly at raw exterior wall cavity framing and insulation.
Before pulling off window trim, check how the frame is integrated into the wall. If the window uses a vinyl return, construct a four-sided picture-frame jamb box out of 1/2-inch or 3/4-inch primed MDF. Slide this custom box into the rough opening until it butts tight against the window frame. Secure the jamb box into the wall framing studs using shims and brad nails. Once your custom jamb extension box is level and square, install your 3.5-inch flat casing over the front face to seal the opening completely.
11. Baseboards: The Line That Ties the Whole Home Together
Baseboard is the single most powerful trim element because it forms an unbroken horizontal anchor around the entire bottom perimeter of your home. Original mobile home baseboards are notoriously bad, often consisting of 1.25-inch paper-wrapped foam or thin flexible vinyl strips stapled directly to the wall.
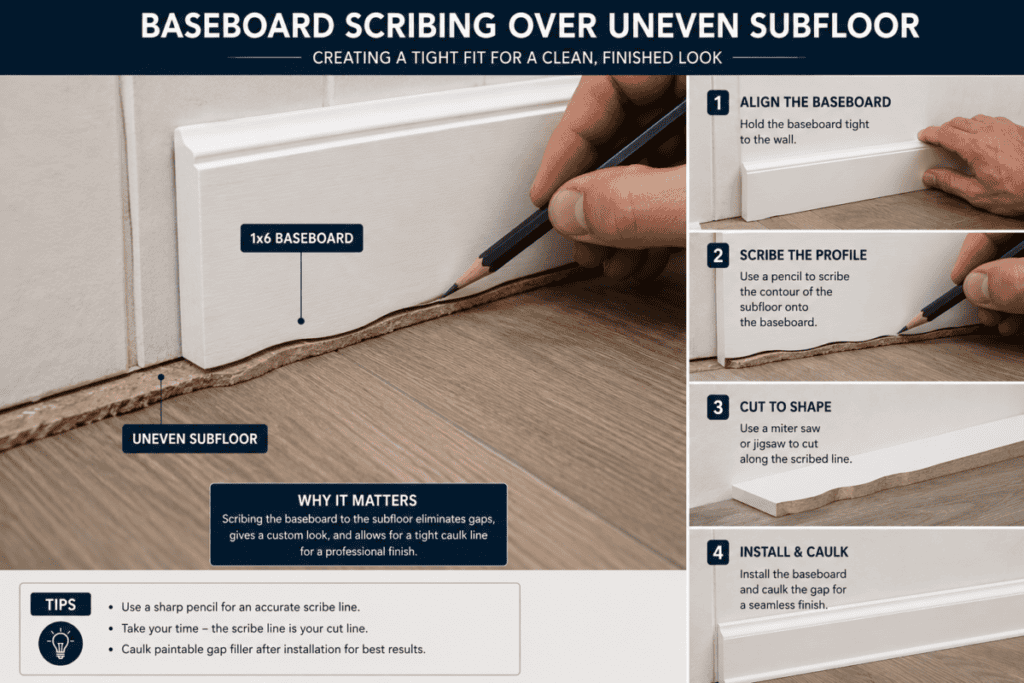
When upgrading to a solid 5.5-inch baseboard, you will immediately encounter uneven floors and bowed walls. Manufactured home floors naturally flex over time, creating dips and crowns along wall lines. If you try to force a straight wooden baseboard down onto an uneven subfloor, giant gaps will open up along the top edge or bottom edge.
Technical Deep Dive: Scribing Baseboards to Wavy Subfloors
Do not force a straight board down onto a wavy floor and rely on massive tubes of caulk to hide the mess. Use a professional scribing technique instead. Lay your 1×6 baseboard board across the wall area, holding it perfectly level with wooden shims placed under the low spots. Set a carpenter’s scribing compass to match the widest gap between the floor and the bottom edge of the board. Drag the point of the compass along the subfloor while the pencil end traces the exact floor contour onto the face of your baseboard. Cut along that pencil line using an oscillating multi-tool or jigsaw angled slightly inward (a back-bevel cut). The baseboard will drop into place with a tight, gap-free fit against the floor line.
12. Large Openings and Awkward Transitions
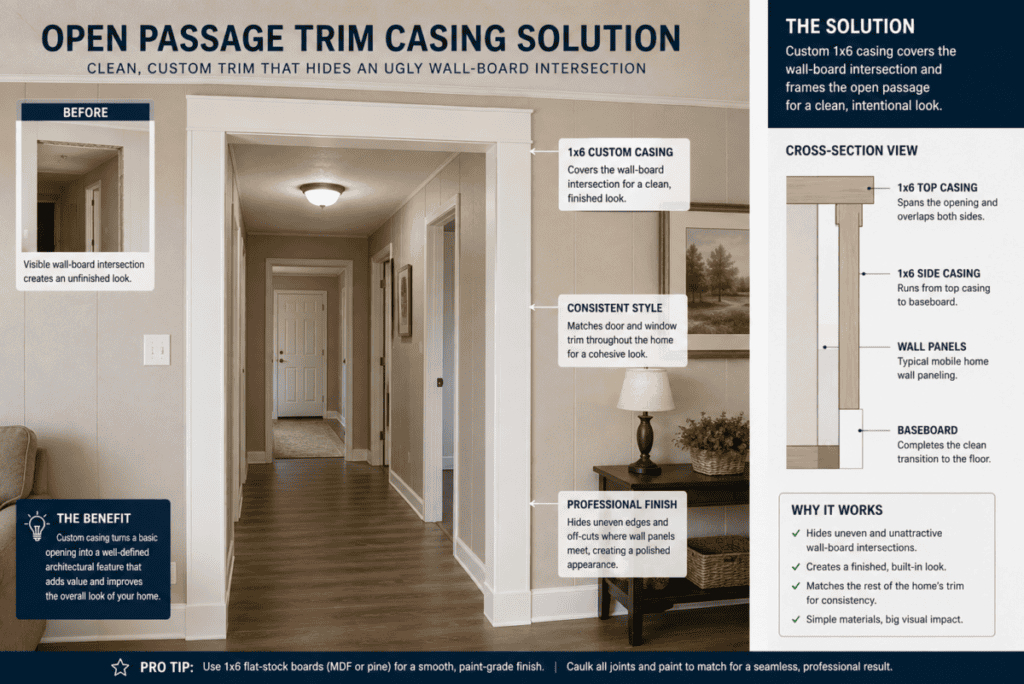
Older mobile homes are notorious for awkward wall transitions. Where the living room meets the kitchen, or where a hallway opens into a main room, factory builders often used thick plastic corner caps or 2-inch dark battens to cover raw panel ends. When built-in hutch cabinets or old partition walls are removed during a remodel, these exposed joints look even worse.
Treat these awkward transitions as opportunities to build intentional architectural features. Wrap open pass-through openings in custom 1×6 or 1×8 flat casing assemblies to create a cased opening. Where paneling meets newly installed drywall, do not butt the materials together directly. Install a vertical 1×4 transition trim board, edge-routed with a clean chamfer, to create a smooth step between the two wall depths.
13. When New Trim Meets Old Cabinets and Built-Ins
If you are not executing a complete kitchen or bathroom tear-out, your new trim system must terminate cleanly against original cabinets, bathroom vanities, and built-in shelving. Forcing thick baseboards directly into old cabinetry looks sloppy and leaves raw end-grain exposed.
When running a 5.5-inch flat baseboard into a cabinet toe-kick or side panel, apply a plinth block transition or cut a clean 45-degree return miter. A return miter cuts the end of the baseboard back into the wall surface at a 45-degree angle, sealing the end grain completely. Where door casing hits a kitchen cabinet side-panel, install a custom 3/4-inch square return block to give the casing a flush surface to land against.
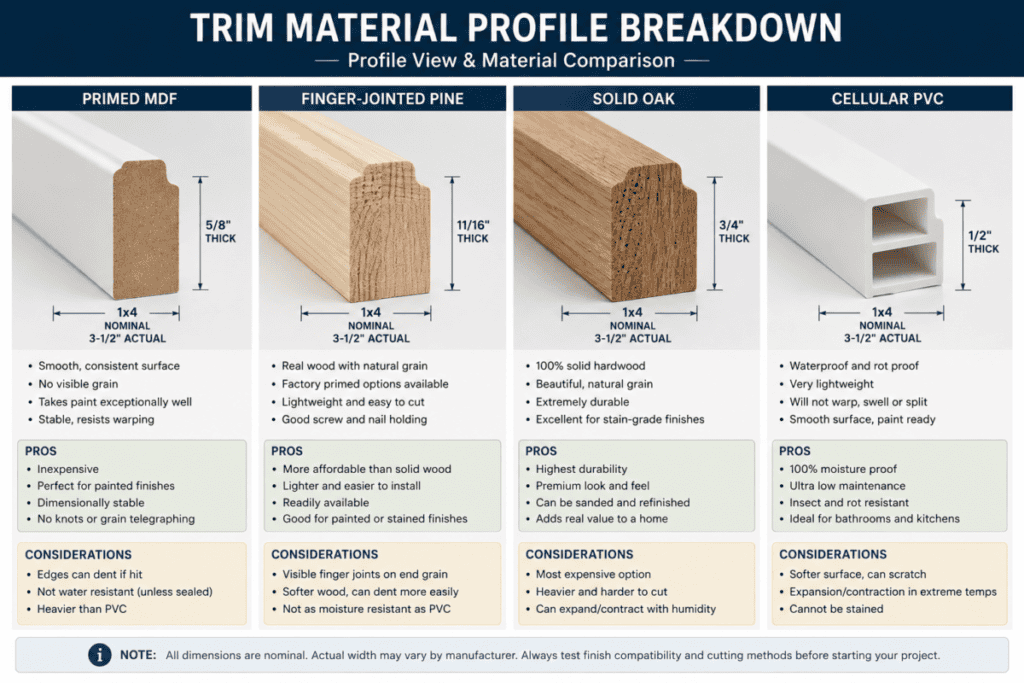
14. MDF, Finger-Jointed Pine, Solid Wood, or Something Else?
Selecting the right trim material determines how long your hard work lasts, especially when dealing with mobile home humidity fluctuations and subfloor flex.
- Medium-Density Fiberboard (MDF): The most economical, perfectly straight choice for painted trim. It takes paint smoothly and has zero knots. However, MDF swells and turns into wet cardboard if exposed to water leaks or high bathroom humidity.
- Finger-Jointed Pine: Solid wood pieces jointed together and factory primed. Excellent for painted casing and baseboards, easy to nail, and far more water-resistant than MDF. Ideal for kitchens, bathrooms, and exterior doors.
- Solid Hardwood (Oak/Maple): Extremely durable and stainable, but expensive, prone to warping, and harder to cut and nail into thin mobile home studs.
- Cellular PVC Trim: 100% waterproof synthetic trim board. Essential for mobile home bathroom baseboards, laundry rooms, and water heater closets where hidden plumbing leaks occur.
15. You Don’t Have to Replace Everything at Once
Attempting to trim out an entire mobile home in a single weekend is a fast track to fatigue and sloppy cuts. A whole-house trim swap involves hundreds of individual miter cuts, scribes, caulk lines, and nail holes.
Execute your trim project in logical phases:
- Phase 1: Design and Mockup: Build a 3-foot test frame around one secondary bedroom doorway to lock in your casing style, baseboard height, reveal spacing, and paint color.
- Phase 2: Master Bedroom & Bath: Complete one enclosed zone to master your wall stud locations, jamb extension methods, and scribing steps.
- Phase 3: Main Living Areas: Trim out high-visibility spaces including the living room, kitchen passages, and main entryways.
- Phase 4: Hallways & Remaining Bedrooms: Finish low-traffic areas using remaining off-cuts to minimize material waste.
16. The Best Test Room
The ideal test room for your trim system is a small back bedroom. A secondary bedroom contains all the technical challenges you will encounter throughout the entire home: an interior door frame, a window frame, an exterior wall baseboard section, and vertical wall-panel seam battens.
By working out your cutting templates, jamb extension thicknesses, and scribing tools in a small bedroom, you keep mistakes out of high-visibility spaces like the front living room. Once you solve the tight corners in the bedroom, you can trim out the rest of the home at double the speed. For additional insights on planning property updates, see our overview of How Do You Update An Old Mobile Home?.
17. Budget: Where to Spend and Where to Save
You do not need a massive budget to completely transform a mobile home’s interior trim. You just need to deploy your dollars strategically across materials and tooling.
Where to Save Money:
1. Buy primed finger-jointed pine or MDF 16-foot stock boards instead of pre-cut 8-foot retail boards to lower linear-foot material costs.
2. Build simple flat-stock casing profiles using standard S4S (Surfaced 4 Sides) boards instead of buying expensive pre-molded ornate trim profiles.
3. Keep your existing interior doors and jambs; fresh casing and new paint will make old hollow-core doors look brand new.
Where to Spend Money:
1. Buy high-grade elastomeric acrylic latex caulk (Dynaflex 230 or top-tier acrylics) to prevent cracked seams along flexing mobile home walls.
2. Buy top-shelf bonding primer and semi-gloss enamel paint for maximum durability and easy cleaning.
3. Rent or purchase a quality 18-gauge cordless brad nailer to avoid split trim boards and heavy air hoses.
18. Don’t Forget the Cost of the Small Stuff
When budgeting a trim renovation, beginner DIYers often calculate the cost of molding boards and forget the secondary materials that make up 25% to 35% of the total project cost.
- Fasteners: 1,000-count boxes of 1.25-inch and 2-inch 18-gauge brad nails ($18 – $30).
- Adhesives: 4 to 6 tubes of heavy-duty polyurethane construction adhesive ($35 – $60).
- Caulk & Fillers: 6+ tubes of paintable elastomeric caulk and premium spackling compound ($40 – $70).
- Abrasives: Multi-packs of 120-grit, 180-grit, and 220-grit sanding sponges ($20 – $35).
- Paint Supplies: 1 gallon of high-hiding primer and 1 to 2 gallons of semi-gloss enamel paint ($90 – $160).
19. Tools That Make the Job Easier
Having the right tools is the difference between clean 90-degree joints and jagged, split trim boards. While you do not need a commercial woodworking shop, a few specific tools will save you dozens of hours of frustration.
- 10-Inch or 12-Inch Compound Miter Saw: Essential for accurate 45-degree miter cuts and crisp 90-degree square cuts.
- 18-Gauge Brad Nailer: Pneumatic or cordless nailers sink brad heads perfectly beneath the wood surface without damaging the surrounding face.
- Oscillating Multi-Tool: The ultimate problem-solver for undercutting door jambs, trimming baseboard shims flush, and flush-cutting wall battens.
- Contour Scribing Compass: Required for tracing uneven mobile home subfloor lines directly onto your baseboard stock.
- Pry Bar Set & Molding Puller: Specialized wide-blade trim pullers remove old factory molding without punching holes through thin 5/16-inch wall panels.
20. Why Caulk and Paint Matter So Much
Installing trim boards gets the wood on the wall, but prep, caulk, and paint deliver the finished result. In an older mobile home, wall bows, stud twists, and subfloor dips guarantee that small gaps will exist between your new trim boards and the wall surfaces.
Never rely on massive beads of caulk to bridge wide gaps caused by bad cuts. Fit your joints as tight as possible using proper carpentry, scribing, and shimming. Once the trim is nailed securely, apply a thin, clean bead of elastomeric paintable caulk along every wall-to-trim seam, inside corner, and casing junction. Smooth the caulk line immediately using a damp sponge or wet finger to leave a razor-thin shadow seal. Fill all nail holes flush with lightweight vinyl spackling, sand smooth with 220-grit sandpaper, apply a dedicated stain-blocking primer over raw wood cuts, and lay down two coats of durability-rated semi-gloss trim enamel.
21. Common Mistakes
Avoid these costly mistakes when upgrading your mobile home trim system:
- Mistake 1: Installing Oversized Molding. Placing 6-inch colonial casing in a home with 7-foot ceilings creates a crowded, miniature visual effect.
- Mistake 2: Nailing Trim Only to Paneling. Fastening heavy trim to thin 5/16-inch VOG panels without hitting framing studs or using construction adhesive causes boards to sag and pull away over time.
- Mistake 3: Removing Wall Battens Without a Plan. Prying off vertical seam battens without preparing to tape, mud, or flat-strip the underlying 1/4-inch panel gap leaves an ugly structural channel exposed.
- Mistake 4: Skipping the Reveal Line. Flushing door casing perfectly flat against the edge of a door jamb leads to hinge interference and crooked corner miters. Always set a consistent 3/16-inch reveal.
- Mistake 5: Using Cheap Non-Flexible Caulk. Standard painter’s caulk cracks within months as the mobile home flexes during seasonal temperature and humidity changes. Always use high-performance elastomeric caulk.
22. The Before-and-After Example
Consider a standard 1988 double-wide living room transformation from one of our real estate rehabs. The original space featured 1.25-inch dark faux-wood door casing, 1.5-inch flexible vinyl baseboards, and dark plastic wall battens running vertically every 4 feet across light almond VOG panels. The room felt cluttered, dark, and cheap.
We executed a complete trim system overhaul in three working days. First, we pulled off all old casing and baseboards using a wide-blade trim puller. Second, we filled, mesh-taped, and mudded the wall panel seams, sanding them flat before painting the walls a light greige tone. Third, we installed custom 1/4-inch wood jamb extensions around every interior doorway and framed them with 3.5-inch flat-stock MDF casing (1×4) set on a 3/16-inch reveal. Fourth, we installed 5.5-inch flat baseboards (1×6) scribed tight to the subfloor and anchored into the wall plate studs with brad nails and adhesive. Finally, we caulked all seams and painted the trim with two coats of crisp semi-gloss bright white enamel. Without moving a single wall or spending money on major structural alterations, the interior looked like a modern, stick-built craftsman home.
23. A Whole-House Before-and-After Detail Gallery
Achieving a high-end look across a manufactured home comes down to repeating precise construction details room after room. Review these core transition fixes:
- Door Casings: Replaced thin 1.25-inch factory plastic casing with 3.5-inch flat stock built around custom jamb extension boxes.
- Baseboard Perimeter: Swapped 1.5-inch stapled vinyl baseboards for 5.5-inch flat-stock MDF scribed to the subfloor contour.
- Wall Seams: Eliminated dark plastic battens in favor of seamless taped joints or flat 1.5-inch wood lattice accent strips.
- Window Returns: Converted raw aluminum window cutouts into clean four-sided cased picture frames complete with stools and aprons.
- Hallway Arches: Transformed raw panel-edge pass-throughs into substantial cased openings using 1×6 flat casing.
24. Why the Finished Home Feels Different
Once your new trim system is fully installed, caulked, and painted, the entire feel of your home changes. The constant background visual noise of dark lines, thin plastic strips, mismatched wood tones, and broken seams disappears entirely.
The human brain thrives on visual order. When door casings match window casings, and baseboards run continuously from room to room in the exact same style and color, your eyes process a single cohesive architectural design. Instead of feeling like a collection of temporary factory panels, the home feels solid, permanent, and intentionally built. That structural stability is what buyers and appraisers interpret as true build quality.
25. You Aren’t Trying to Hide the Mobile Home
There is an important design philosophy to remember when remodeling an older manufactured home: your goal is not to pretend the home is a $1,000,000 stone mansion. Trying to force heavy, ornate architectural features into a lightweight mobile home structure looks artificial and out of place.
Upgrading your trim system is not about deception. It is about replacing cheap, high-speed factory shortcuts with clean, durable, well-proportioned materials that suit modern living. A mobile home can remain proudly efficient, affordable, and practical while still featuring a clean, beautifully detailed interior. Replacing flimsy molding with a simple, high-quality trim system gives your home the clean, comfortable atmosphere it deserves.
Actionable Trim System Upgrade Checklist
Follow this step-by-step checklist to execute a clean, professional trim overhaul in your home:
- [ ] Audit Existing Framing & Jambs: Measure door jamb depths, check wall panel thickness (5/16″ vs 1/2″), and locate stud framing using a magnetic finder.
- [ ] Select Material & Profile: Choose a unified trim vocabulary (e.g., 1×4 flat casing, 1×6 flat baseboard) and purchase 16-foot primed finger-jointed pine or MDF stock boards.
- [ ] Build a Test Room Mockup: Trim out one secondary bedroom first to test your cuts, jamb extension thicknesses, scribing tools, and reveal lines.
- [ ] Carefully Remove Old Trim: Pry off old molding using a wide-blade trim puller to prevent cracking thin wall panels. Pull remaining staples with end-cutting pliers.
- [ ] Install Jamb Extensions: Add thin pine extension strips to recessed door and window jambs to create a flush mounting surface for your new casing.
- [ ] Mark Reveal Lines: Set a combination square to 3/16 inch and mark crisp reveal guidelines around all door and window jamb perimeters.
- [ ] Cut & Scribe Baseboards: Level your baseboards, scribe bottom edges to match wavy subfloors, and cut 45-degree miters or 90-degree square joints.
- [ ] Fasten with Adhesive & Brads: Apply construction adhesive to the back of trim boards and secure into studs using 1.25-inch to 1.5-inch 18-gauge brad nails driven at alternating angles.
- [ ] Prep, Caulk & Fill: Fill all nail holes flush with vinyl spackling, sand smooth, and seal all wall and wood seams with flexible elastomeric paintable caulk.
- [ ] Prime & Paint: Apply stain-blocking primer over exposed cut edges and finish with two coats of high-durability semi-gloss interior trim enamel.
Summary & Next Steps
Fixing cheap, mismatched mobile home trim is the single highest-return DIY project you can execute inside an older manufactured home. By swapping out flimsy 1-inch plastic strips and wall battens for a clean, unified 1×4 flat-stock casing and 1×6 baseboard system, you eliminate factory shortcuts and give your interior an intentional, custom appearance. Take time to measure your jamb depths, select moisture-appropriate materials like finger-jointed pine or PVC for wet areas, use construction adhesive alongside brad nails, and seal every seam with flexible elastomeric caulk before painting.
Related Questions
Q: Can I install crown molding in a mobile home with 7-foot ceilings?
A: You can, but keep the scale small. Choose a modest 2-inch to 2.5-inch simple bed-mold or flat cove profile. Oversized 4-inch or 5-inch crown molding will crowd low ceilings and make rooms feel significantly smaller.
Q: Should I remove my mobile home wall paneling and install 1/2-inch drywall before trimming?
A: Replacing VOG paneling with true 1/2-inch drywall adds significant weight, cost, and time. Unless the panels are severely water-damaged, it is far more cost-effective to tape and mud the existing panel seams or flat-strip them, and then install your new trim system directly over the stabilized panels.
Q: How do I handle baseboard transitions over LVP flooring expansion gaps?
A: Luxury vinyl plank (LVP) requires a 1/4-inch to 3/8-inch expansion perimeter along walls. Ensure your new baseboard is thick enough (5/8 inch thick) to cover this gap fully without binding the flooring down. If using thinner baseboards, add a flexible shoe molding or quarter-round along the bottom edge.
About Charles O’Dell: Charles O’Dell is a real estate investor, mobile home park developer, and hands-on renovator with over 23 years of experience. He has completed over 100 successful mobile home flips and structural retrofits. As the founder of MobileHomeFriend.com, Charles provides direct, first-principles logic and practical engineering solutions to help manufactured home owners build real property equity.
Related Articles
Written by Charles O’Dell, real estate investor with 23+ years of experience and over 100 successful mobile home rehabs.