Table of Contents
Introduction
Updated for 2026+: This article has been reviewed and expanded to reflect current moisture-control practices, manufactured housing construction standards, and real-world climate risks commonly affecting mobile and manufactured homes. Updates include clearer guidance on crawlspace moisture, ventilation mistakes, regional humidity differences, and when mold remediation should be handled professionally rather than as a DIY project.
Water and humidity in any home, site-built, modular, or manufactured can cause problems for any homeowner. In fact, water remediation (restoration) is a $210 BILLION dollar business in the United States. In case you’re wondering, that is A LOT!
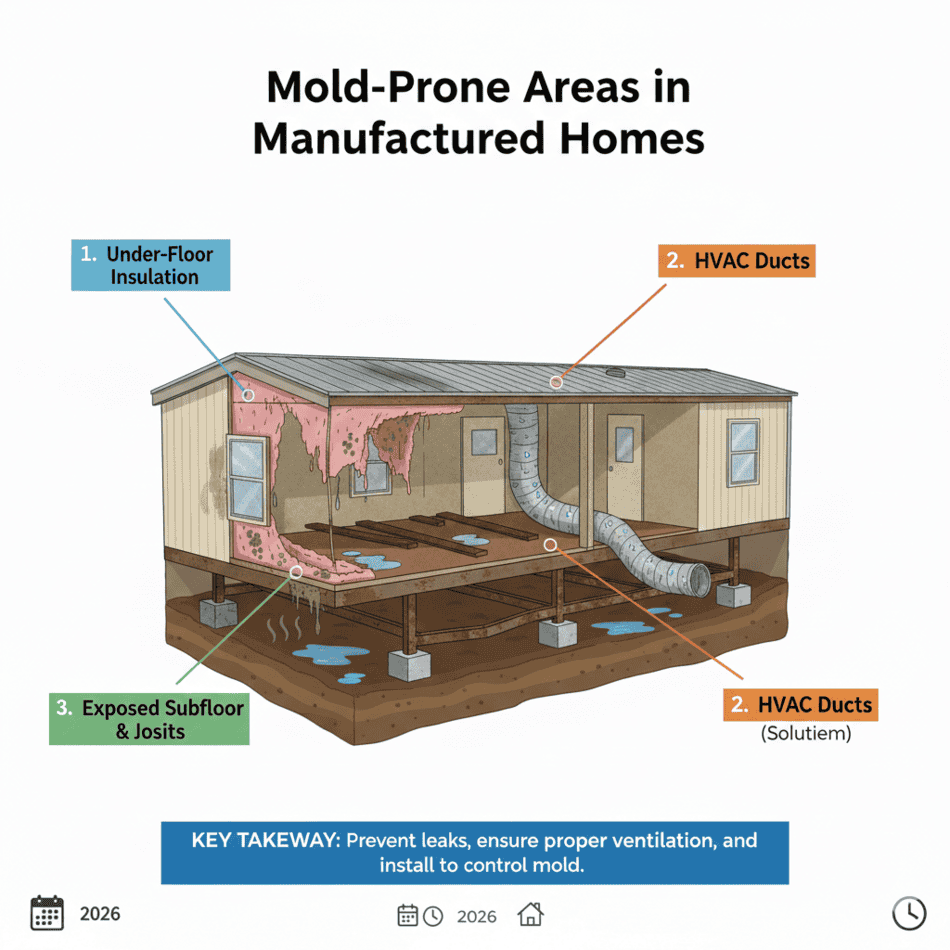
When water gets trapped in spaces such as attics, walls, crawl spaces, carpets, wood subfloors, etc. mold can develop. Mold is a common health hazard and causes all types of respiratory issues.
Affiliate Disclosure: This article may contain Amazon affiliate links. If you choose to purchase through these links, the site may earn a small commission at no additional cost to you.
Video Guide Overview
The Short Answer
Short Answer (2026 Update): Dampness and mold in a mobile home are almost always caused by unmanaged moisture from below the home, poor ventilation, plumbing leaks, or condensation. Lasting solutions require identifying the moisture source first, then correcting airflow, vapor barriers, drainage, or insulation. Surface cleaning alone does not prevent mold from returning.
Remember the old saying “an ounce of prevention is worth a pound of cure”? That is absolutely the case when it comes to getting rid of dampness and mold inside of a mobile home.
Most folks think that water damage inside of a home comes either from leaking plumbing or a leaky roof. While those are both true, that is only the beginning. Sealing out moisture, whether from the roof, windows, doors, floor, skirting or ground is necessary to prevent buildup of dampness and mold. Keeping the moisture away to begin with is the ultimate weapon against buildup of dampness and mold.
Moisture Causes and Risks
Causes
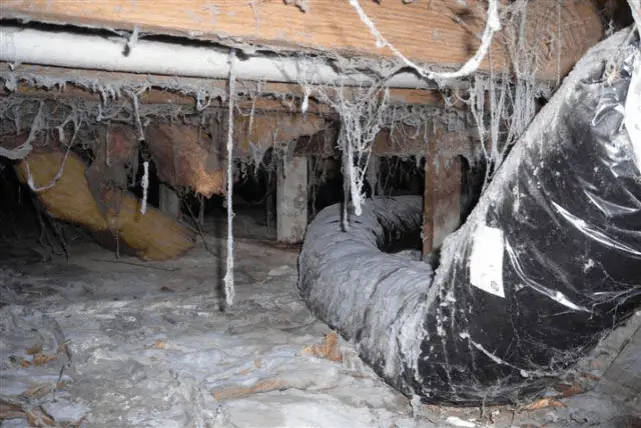
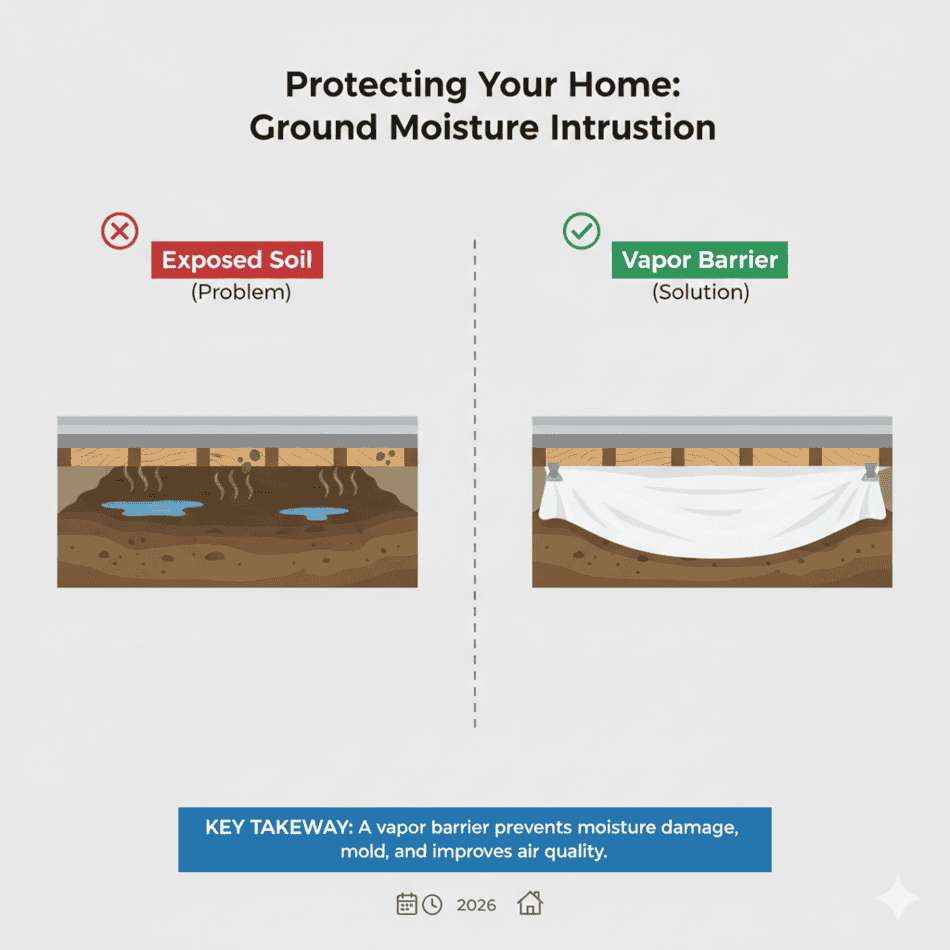
Contrary to what most people would believe, more dampness and moisture enters the home from below than most anywhere else. Taking measures to seal out this moisture is one of the key ways to get rid of mold and unwanted dampness.
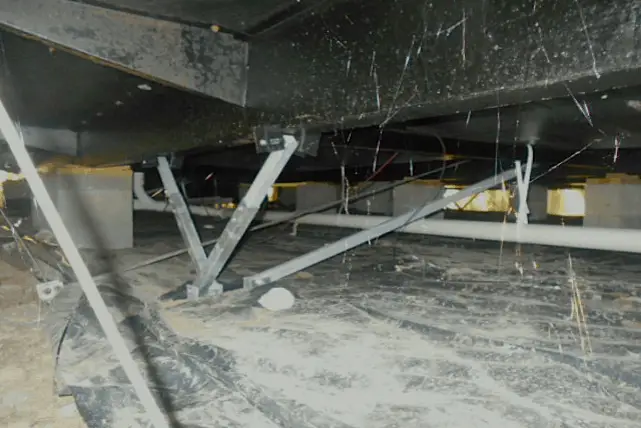
One of the most common misunderstandings is assuming mold originates only from interior humidity. In manufactured homes, moisture frequently enters from below the structure due to exposed soil, missing vapor barriers, poor site drainage, or standing water under the home. This moisture migrates upward into insulation, flooring, and wall cavities.
Regional climate plays a significant role. Homes in humid regions such as the Southeast, Gulf Coast, and Pacific Northwest face chronic moisture intrusion, while homes in arid climates can still experience condensation from evaporative coolers, oversized HVAC systems, or unsealed ductwork.
Homeowners should verify whether dampness is seasonal, weather-related, or constant. Persistent moisture usually indicates a structural or drainage issue rather than temporary indoor humidity.
Risks
Mold growth in a mobile home is not just a cosmetic issue. Prolonged dampness can deteriorate subflooring, corrode metal fasteners, reduce insulation performance, and compromise indoor air quality. Over time, this can affect resale value, insurance eligibility, and financing approvals.
State-level disclosure rules vary. Some states require sellers to disclose known moisture or mold problems, while others leave disclosure largely voluntary. Buyers should not assume inspections will always identify hidden mold behind walls or under flooring.
Practical Steps To Eliminate Dampness
Eliminating Moisture
Effective remediation starts with moisture control, not cleaning products. Readers should confirm that the home has an intact ground vapor barrier, functioning perimeter drainage, and no active plumbing leaks. Ventilation improvements must be balanced carefully; adding vents without controlling ground moisture can worsen the problem.
In colder climates, over-ventilated crawlspaces can increase condensation during winter months. In humid climates, sealing and conditioning the crawlspace may be more effective than traditional venting.
Some of us live in extremely humid climates which has its own problems causing moisture in the house. But, there are additional daily activities that put moisture into the air of our homes. Showering, laundry and cooking all cause moisture in the home. Most homes are equipped with exhaust fans in these areas to help eliminate moisture. It is a good idea to run these fans during these activities. Also keep them on for a while after finishing so they can do their job and eliminate as much moisture as possible.
Also, HVAC systems work by removing humidity from the air. This dries the interior of the home and eliminates a lot of humidity. We’ll cover more on HVAC.
Lot Drainage
When the manufactured home is originally set up on the homesite, the ground underneath the home is supposed to be graded to let the any water under the home drain off to the outside. This is generally done by mounding the ground up in the middle and sloping towards the outside. If the home has a cement slab underneath, the cement should also have been poured to create drainage to the outside. If water is pooling underneath the home when it rains, then there is a definite water drainage problem.

Water underneath the home causes all sorts of problems, from bad moisture under the home, to excessive settling of the home causing it to sink in places and become un-level.
Although it is harder to rectify this situation after-the-fact, additional earth can be put under the home, compacting it as much as possible and sloping to towards the outside of the home. This will help keep the water from pooling underneath.
Ground Cover
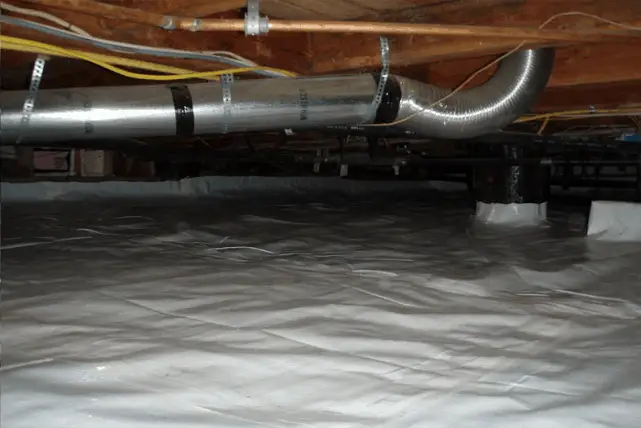
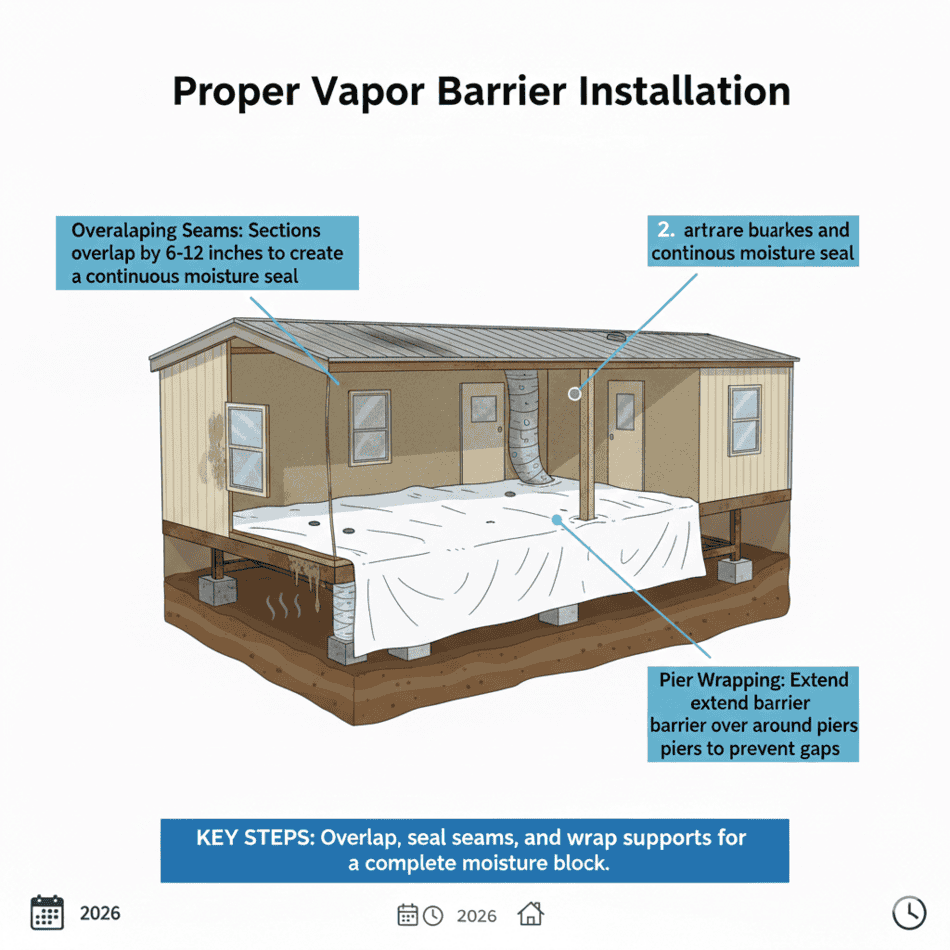
HUD regulations require that skirting be vented in order to prevent the buildup of moisture from the ground underneath the home. But vented skirting doesn’t stop the moisture from rising from the ground. If the foundation underneath your manufactured home does not have a cement slab, then putting a barrier over the ground will prevent most of the ground moisture from the area.
The the most recognizable brand name for this cover is “Visqueen”. It is a 6 mil think sheet of polyethylene. This should be placed to cover the ground as much as possible. Use a 12” overlap between the separate sheets. The area covered should be as much of the ground inside the skirting as possible.
Belly Wrap
The belly wrap in a mobile home is a sheet of plastic that is tightly wrapped underneath the home. This not only keeps the floor insulation in place, but also keeps the ground moisture and humidity out of the home. The belly wrap should be checked at least once a year for damage.
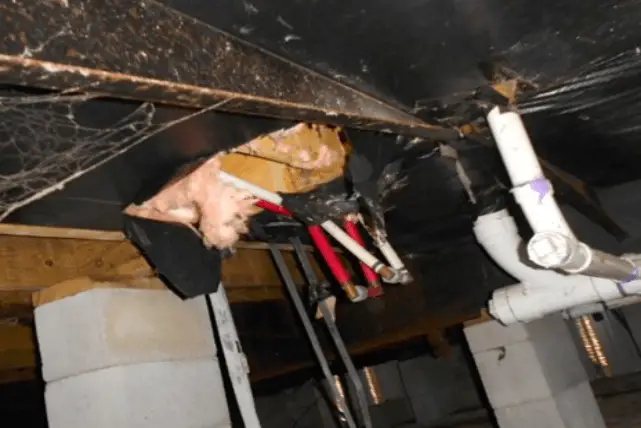
The wrap can be torn and damaged during transportation of the home, and during the set up on the home site. It can also be damaged by holes made to repair plumbing leaks or by animals underneath the home.
To repair any damage to the belly wrap, material matching the original along with flexible tape and sealant should be used to make sure the repair is watertight. If the repair is toward the outer edges of the wrap where there are fasteners, then new fasteners can also be used. The idea is to cover any damaged areas with a like-kind material; sealed to prevent moisture and further damage.
For additional information on repairing the belly wrap of a mobile home follow this link to an excellent post “Mobile Home Energy – Repairing The Belly”.
Skirting
Although skirting certainly serves and improves the aesthetics of the home, its design is to protect the home as well. Skirting can be of most any type, the most common being:
- Vinyl
- Aluminum
- Pressure treated wood
- Block
- Cement
Skirting keeps the critters out from underneath the home. It is generally warmer and dryer under the home the home than it is outside of it, so animals love to take advantage if they can. They will often tear open the belly wrap and use the insulation to make a nest or den. Great for them, but bad for the homeowner.
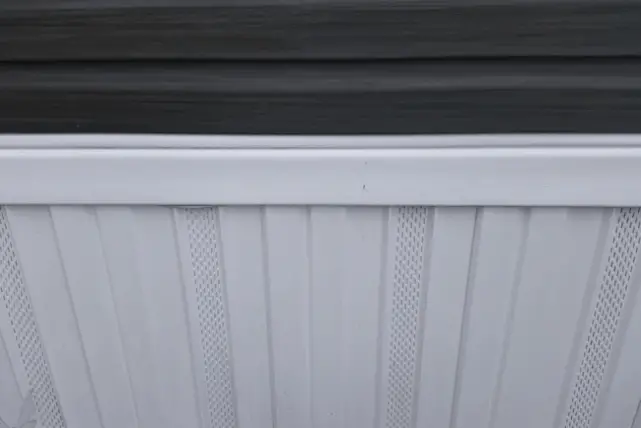
Skirting also helps keep out moisture from underneath the home. HUD regulations require that the skirting be vented as follows:
- 1 square foot of venting for every 150 square foot of skirting.
- A vent within 3 feet of every corner to prevent dead air pockets.
The venting allows what moisture does get under the home, after all the other preventative measures, to dry out. This helps prevent the growth of mold
Dryer Venting
Since dryers are designed to remove the moisture from a load of laundry, they vent that moisture to the outdoors. In a manufactured home, the dryer vent often ducts to underneath the home and through the belly wrap. If this is the way your dryer vents, then it is necessary to make sure the dryer vent is sealed where it goes through the floor, through the belly wrap and through the skirting.
The vent SHOULD not vent directly to the crawl space under the home. This would quickly cause excessive moisture buildup and be a good source of mold growth. If the dryer vent tube goes below the home, the tube needs to mount to the skirting and exit to the outside.
Seal Any Openings In walls, Floor And Ceiling
It simply makes good sense to seal off any openings into the home. Windows, doors, electrical plugs and switches, light fixtures, HVAC registers, dryer vent, plumbing pipes all have openings into the walls, attic or floor of the home. These holes allow air, and therefore moisture to enter into the home. There are a number of ways to seal these openings:
- Caulking
- Double sided foam tape
- Expandable spray foam
Go through the home and check every door, window and other openings to make sure that the weatherstripping and sealing materials are doing their job. This is an easy DIY job that pays large dividends also in lowered utility bills for heating and cooling.
HVAC System
A central air conditioning unit works to cool the home by removing humidity from the air. Generally, this will keep the air inside the home nice and dry. There are a number of measures that need to be taken to keep your HVAC system operating at its peak efficiency.
Change Filters Monthly – This is pretty common knowledge, but one that we find often gets neglected. If the system has to work harder to circulate the air, the efficiency of the unit drops and the humidity inside may increase as well.
Keep HVAC Registers Clear – In a manufactured home, the HVAC registers are almost always located in the floor as all the the ductwork is generally run underneath the floor. When furniture or rugs are placed over the registers it causes an imbalance in the system. Also, it generally isn’t wise to close off registers for the same reason.
Thermostat Should Be Set Above 75 Degrees In Hot Humid Weather – This may sound counterintuitive when the HVAC system is designed to remove humidity from the air, but, the system doesn’t circulate the air in the walls, attic and crawl space below the floor and above the belly wrap. When the difference in temperature between the interior of a room and the cavities around it is too great, it can cause moisture condensation to build up within the those cavities. As this happens constantly during the hot season, it allows for mold to grow inside walls, attic, and below floors. Words directly from HUD regarding this : “Keep the thermostat set at or above 75°F in the summer. In high humidity climates, a lower setting could cause water to condense inside wall cavities.”
Bigger Doesn’t Mean Better – When it comes to purchasing an HVAC system for your home, many people think that a larger unit can only be better. This is not the case. The larger unit has a tendency to turn on and off constantly, not giving it adequate time to remove humidity from the air. Also, turning on and off will use more electricity and burn out the unit more quickly. HUD tells us “Equipment that is too large will turn on and off frequently, allowing humidity to build up indoors”.
CAUTION With Karosene, Propane Or Unvented Combustion Heaters – Not only can any combustion heater be fatal if unvented (carbon monoxide) but can also be damaging to the home. HUD says that “about a gallon of water vapor is released into the air for every gallon of fuel consumed. This is a significant source of water vapor that can quickly cause damage.”
Crawlspace and Under-Home Moisture Control
The area beneath a mobile home is the most overlooked contributor to dampness and mold. Exposed soil releases moisture continuously unless blocked by a sealed vapor barrier. Older homes often have incomplete or deteriorated plastic sheeting that no longer provides protection.
Homeowners should verify that the vapor barrier covers all exposed ground, overlaps seams, and extends to piers and perimeter walls. Standing water, erosion, or negative grading near the home should be corrected before interior remediation is attempted.
Summary On Preventative Moisture Measures
From our discussion, you can see that moisture enters the home from all sorts of ways. Moisture causes mold and mildew. Maintaining a relative humidity levels from 30 to 50 percent is ideal. In order to do this, invest in a humidity meter. This can be purchased at most hardware stores.
Preventing excess condensation from forming in your manufactured home is best done by controlling humidity level. We have gone through the best ways to do this in the sections above. Many manufactured homes are small structures with low ceilings. It is a good idea to open windows when possible to vent out the air.
Recognizing Moisture Problems
Recognizing the signs of problems with moisture in a manufactured home is your first line of remedy. Keep in mind that big problems usually start as small ones that are ignored. Be aware that moisture problems are on the horizon if:
- Air smells musty
- Persistent odors
- Discoloration of ceilings and walls
- Condensation on windows
- Swelling of doors and windows making them difficult to close
- Standing water around and under the home
HUD has produced an excellent PDF document that will take you in depth. Follow this link to “Moisture Problems In Manufactured Homes: Understanding Their Causes And Finding Solutions”.
Cleaning Up After Mold

Mold clean-up can be a dangerous activity and one not to be taken likely. Mold has the potential to cause health problems if people come into contact with the mold spores.
To be work around mold, you would be using the proper safety gear. This means an N-95 respirator, along with safety goggles (without vent holes), some rubber gloves, a long-sleeve shirt, and long pants with work boots. Also, while doing any work, open all windows and doors in the manufactured home to create as much venting and air flow as possible.
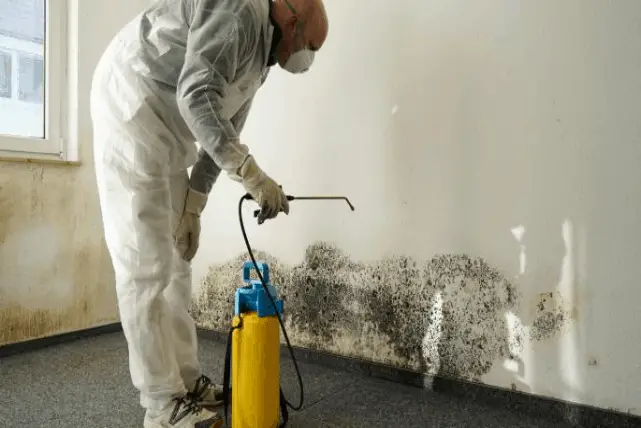
REMOVING THE MOLD
You’ll want to get a five gallon container and fill it with the following:
- 1 gallon of water
- 1 cup of household bleach
- 1/4 cup of dishwashing liquid (should not contain ammonia)
This should be mixed thoroughly and then poured into a spray bottle for usage. Then take the following actions for removal:
- Spray the mold with with the cleaner mixture
- Wipe the surface with a clean cloth
- Respray the surface again and wait for 15 to 20 minutes
- After the time wait, spray the surface again and wife with a damp sponge
- Fill another container with cool clean water
- Rinse with another saturated cloth
- Allow the surface to air-dry
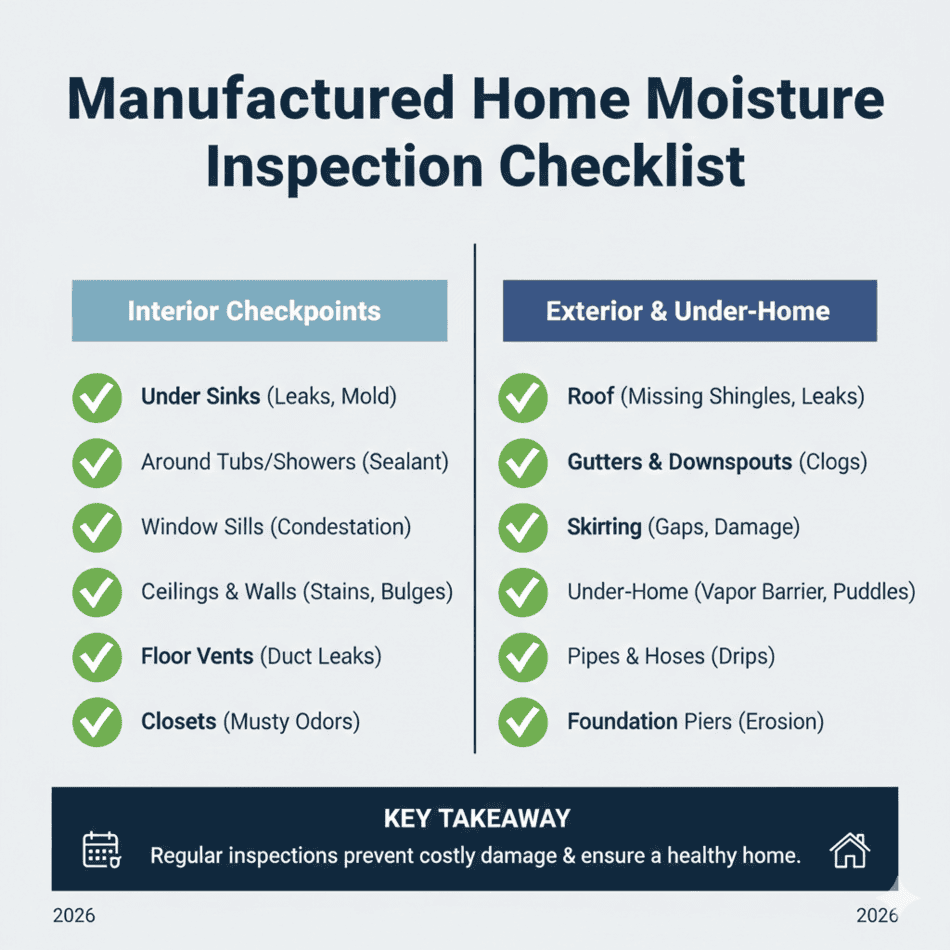
Dampness and Mold Due Diligence Checklist
- Confirm ground vapor barrier is intact and fully covers exposed soil
- Check for standing water or erosion under the home
- Inspect plumbing penetrations and under-floor leaks
- Verify bathroom and kitchen exhaust fans vent outdoors
- Look for condensation on ducts, windows, and HVAC components
- Document prior mold remediation and warranties, if any
Internal Links To Other Relevant Mobile Home Friend Articles
If you are evaluating moisture risks before purchasing, this guide on why mobile home inspections matter explains what inspectors typically find under manufactured homes.
For readers unsure whether dampness is related to structural age, this article on mobile home life expectancy outlines how moisture accelerates long-term deterioration.
If moisture issues are linked to roof leaks or exterior failures, see whether mobile home roof coatings really work and when they are appropriate.
Helpful Tool Suggestions
Optional tool: A heavy-duty crawlspace vapor barrier can help block ground moisture when properly installed. View example on Amazon
Optional tool: A digital hygrometer allows homeowners to monitor indoor humidity levels over time. View example on Amazon
Optional tool: A dehumidifier may help maintain stable humidity once moisture sources are corrected. View example on Amazon
Related Questions
WHAT ARE THE MOST COMMON PROBLEMS WITH OLDER MOBILE HOMES?
The most common problems we find with mobile homes can be summed up as:
- Foundations – Piers sinking, tilting and pulling away from the mobile home frame. Tie-down straps also becoming loose.
- Doors and Windows Out Of Alignment – When foundation settling occurs, it is common for mobile home doors and windows to get out of alignment where they will not close or latch properly.
- Roof – Roofs often develop leaks. This is especially true of older mobile homes that have metal rooftops.
- Leaks – Mobile homes are especially susceptible to water damage from leaks. Leaks can often occur around the perimeter of the roof, windows, and plumbing. This is especially true around sinks, toilets and tub showers. Subfloor damage can and often occurs.
- Ceilings – Mobile homes with acoustical panels instead of drywall can be especially problematic if there have been leaks. It is often extremely difficult to find matching acoustical panels. Installing them can also be problematic.
- Plumbing – Many older homes used polybutylene pipes which have been notorious for degrading from the inside out, and then bursting.
- Wiring – Wiring can be problematic if the home has had owner added additions and features where the wiring has been tapped into the original electrical panel.
- Homeowner Built Additions – Very common for a DIY type of owner to have built on a room, porch or shed. If not built properly, these can cause damage to the homes’ roof, foundation, walls, and electrical systems.
- HVAC – Over time, previous owners often ad window a/c units because the original HVAC system was not cooling and heating properly. Sorting out the original system can be expensive, but is not difficult to tackle.
- Insulation – The most problematic for insulation in mobile homes is under the floor. The home has a “belly wrap” that holds the floor insulation in place. This can often become damage and cause problems.
- Washer Drains and Dryer Vents – Often you might see these two items draining and venting directly below the home. These can be especially problematic for the foundation of the home.
- Damaged Skirting – Skirting is designed to keep the area below the home dry and critter free. Often skirting may have holes or panels missing. This allows quite a bit of havoc to occur which can damage many mobile home systems.
For additional information please follow this link for the blog post – “The 12 Most Common Problems With Older Mobile Homes”.
CAN TANKLESS HOT WATER HEATERS BE INSTALLED IN MOBILE HOMES?
Yes, you can add a tankless water heater to a mobile home, but you need to find out what on-site gas or electric changes need to be made in order for your home to accept the tankless water heater. You also need to consider your local climate when determining where to install the water heater.
Tankless water heaters are becoming more and more popular because they offer many great benefits to homeowners. However, there are also some misconceptions about theme out there that I wanted to share with you.
Before you attempt to install a tankless water heater in your mobile home, here are some important points that I’ll be covering:
- Myths About Tankless Water Heaters
- Benefits of Tankless Water Heaters
- Gas Water Heater Needs
- Electric Water Heater Needs
- How Your Climate and Surroundings Affect Where You Can Install Your Water Heater
A quick side note that I’ll address a little more later in this post. Installing a tankless water almost always requires changes to your home. These changes will vary depending on whether or not you have an electric or gas water heater. These changes can be quite costly, and they may deter you from installing a tankless water heater.
For additional information please follow this link for the blog post – “Can Tankless Hot Water Heaters Be Installed In Mobile Homes?”
About the Author:
This article is written by a housing professional with decades of experience in mobile home construction, inspection, renovation, and resale. Content is based on field observations, building science principles, and real-world ownership risks commonly encountered in manufactured housing.
