Table of Contents
Introduction
I have spent the last two decades crawling under mobile homes. I have seen floors that felt more like trampolines than solid ground. If your floor feels soft: stop walking on it. You are literally one step away from falling through your kitchen and meeting your plumbing face-to-face.
My name is Chuck O’Dell. I do not sugarcoat things. If your floor is rotting: it is a structural failure. We are going to fix it today using logic and 20 years of dirt-under-my-fingernails experience. This is not just a cosmetic fix: it is an engineering necessity.
Video Guide Overview
Welcome to the world of MobileHomeFriend.com. I started this because I was tired of seeing “handymen” slap a piece of thin plywood over a rotted hole and calling it a day. That is not a repair: that is a booby trap. When I buy a property: the first thing I check is the Subfloor Integrity.
A mobile home is a unique beast. It is built on a steel chassis. It moves. It breathes. When moisture gets trapped between your floor coverings and that chassis: the party is over. We are going to talk about why this happens: and more importantly: how to make it stop forever.
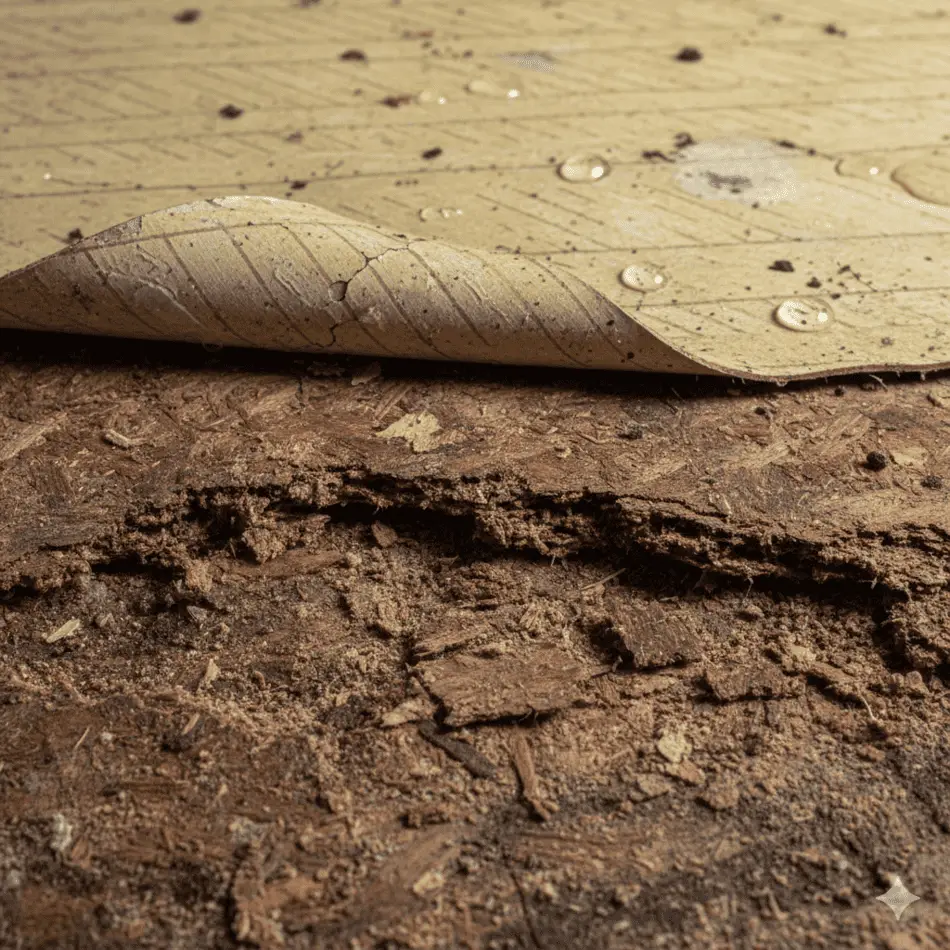
I remember a flip I did back in 2008. The owner swore the floor was “just a little squeaky.” I walked into the bathroom: and the toilet was literally leaning at a 15-degree angle. The Particle Board had turned into wet oatmeal. I had to replace the entire Rim Joist. Do not let that be you.
Affiliate Disclosure
I believe in being 100% transparent. Some of the links in this article are affiliate links. This means I might earn a small commission if you buy a tool I recommend. I only recommend stuff I actually use in the field. This helps me keep the lights on and the advice free.
The “Short” Answer
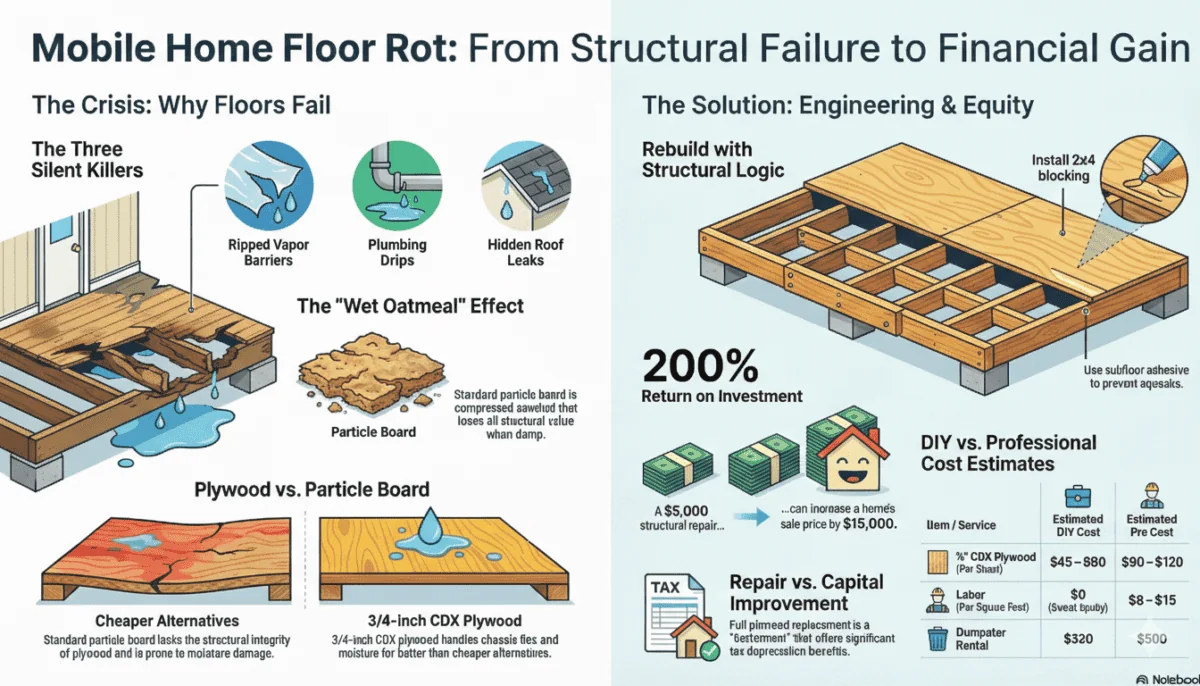
Mobile home floor rot is almost always caused by trapped moisture attacking Particle Board subflooring. To fix it properly: you must remove the damaged material: sister or replace the Floor Joists: and install 3/4 inch CDX Plywood or OSB Sturd-I-Floor. Never use particle board for a repair: because it is essentially compressed sawdust and glue that hates water.
The Root Causes: Why Your Floor is Dying
You cannot fix the floor if you do not stop the water. In my 100+ flips: I have identified three main killers of mobile home floors. First: we have Vapor Barriers. If the plastic sheeting under your home is ripped: ground moisture rises up and soaks your wood. It is a slow: silent death for your Subfloor.
Second: we have Plumbing Leaks. A tiny drip under a sink can destroy a 4×8 sheet of flooring in six months. Particle Board acts like a sponge. It wicks moisture across the room. I have seen a leaky tub destroy a hallway floor 10 feet away. You must check your P-Traps and Supply Lines every year.
Third: and most common: are Roof Leaks. Water runs down the inside of the walls. You do not see it until it pools at the bottom. By the time your carpet feels damp: the Bottom Plate of your wall and your floor are already gone. Always look up before you look down. If the roof is leaking: your new floor will rot in a year.
Engineering Deep Dive: The Physics of Floor Deflection
Let’s talk about why your floor bends. In engineering: we look at Floor Deflection. This is governed by the Modulus of Elasticity: which is a fancy way of saying how much a material stretches under pressure. Standard Particle Board has a very low modulus. This means it bends easily and breaks often.
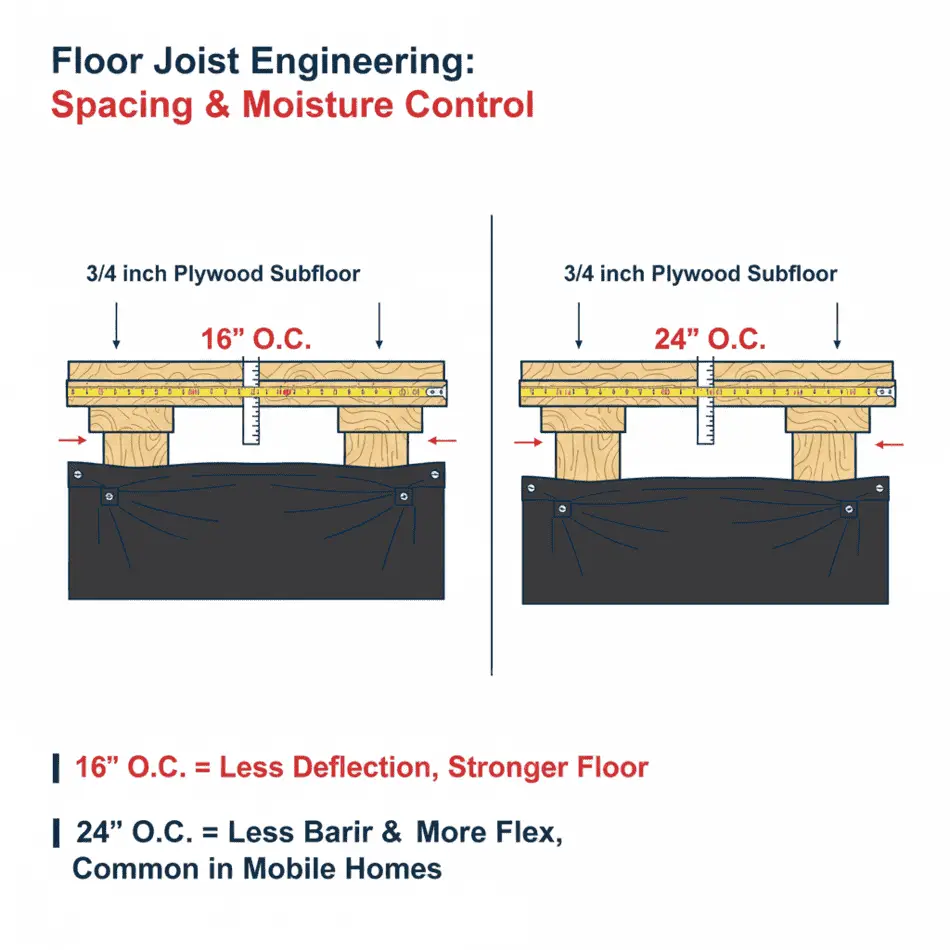
Most older mobile homes use 24-inch On-Center (OC) joist spacing. This is a wide gap. When you use 5/8 inch Particle Board over a 24-inch gap: you get a lot of Deflection. This movement breaks the glue bonds in the wood. Once those bonds break: the wood loses all structural value. It becomes a Dead Load on your chassis.
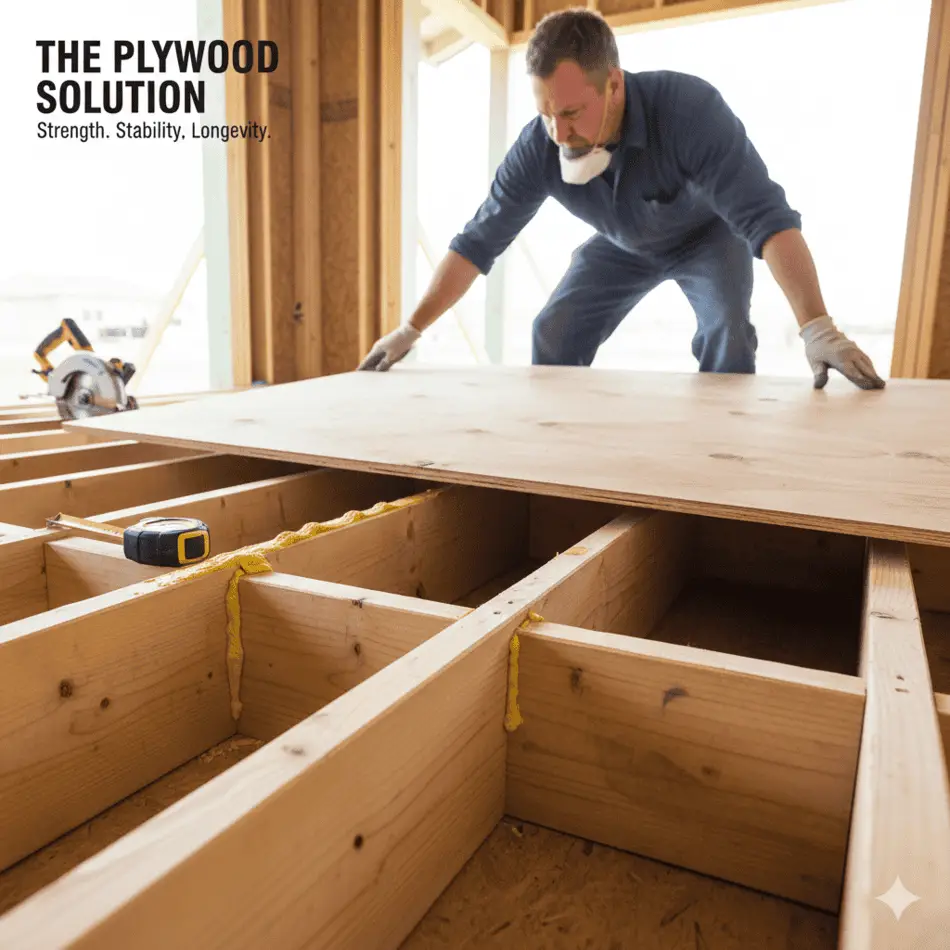
I prefer 3/4 inch CDX Plywood. Plywood is made of cross-laminated layers. This gives it a much higher Modulus of Elasticity than OSB (Oriented Strand Board). While OSB is cheaper: it swells at the edges when wet. Plywood can get wet: dry out: and keep its shape. In a mobile home: where Chassis Flex is common: you need that Tensile Strength. If your joists are 24 inches apart: you absolutely must use Tongue and Groove edges. This ensures the Shear Strength is transferred between sheets: preventing “soft spots” at the seams.
We also have to consider Static Loads vs Dynamic Loads. A refrigerator is a static load. You walking is a dynamic load. If your floor is engineered for 40 pounds per square foot: but you have Structural Rot: that capacity drops to nearly zero. We use #2 Southern Yellow Pine for joist repairs because it handles these loads better than Spruce or Fir. Logic dictates that your repair should be stronger than the original build.
Step-By-Step Repair Logic
I do not want you to just patch a hole. I want you to rebuild a foundation. Follow these steps exactly. Do not skip the Safety Gear. You will be dealing with mold and old fiberglass insulation.
- Phase 1: Diagnosis and Demolition. Remove all floor coverings like carpet or vinyl. Use a Circular Saw set to a depth of exactly 3/4 inch. This prevents you from cutting into your Floor Joists or Electrical Lines. Cut out the rotted section until you find “bright wood” (wood that isn’t black or soft).
- Phase 2: Joist Inspection. Once the hole is open: check the Floor Joists. If they are dark or soft: you must Sister them. This means bolting a new 2×6 or 2×8 alongside the old one. Use Construction Adhesive and 3-inch Deck Screws every 6 inches. This restores the Structural Logic of the frame.
- Phase 3: Blocking. You cannot leave the edges of your new plywood hanging in the air. You must install 2×4 Blocking between the joists. This creates a solid perimeter for your new Subfloor sheet to sit on. Without blocking: your floor will squeak and eventually fail again.
- Phase 4: Insulation and Vapor Barrier. Replace any wet or moldy insulation with new R-19 Fiberglass Batts. Ensure the Belly Wrap (the black plastic under the home) is patched with Belly Repair Tape. If moisture gets in from below: your hard work is wasted.
- Phase 5: Subfloor Installation. Measure your 3/4 inch Plywood. Leave a 1/8 inch gap at the edges for Thermal Expansion. Apply a heavy bead of Subfloor Adhesive to the top of every joist. This is the “secret sauce” that prevents future squeaks.
- Phase 6: Fastening. Use 2-inch Wood Screws. Do not use nails. Nails pop out over time as the home moves. Drive a screw every 6 inches along the edges and every 12 inches in the field (the middle of the sheet). Countersink them slightly so they don’t hump up under your new flooring.
- Phase 7: Sanding and Sealing. Sand the seams flat. If this is a wet area like a bathroom: apply a Waterproof Primer to the wood. Now you are ready for your finished flooring.
Legal/Tax Logic Deep Dive: Investor Compliance
As an investor: how you record this repair matters for your Internal Revenue Service (IRS) filings. Under the IRS Tangible Property Regulations: you have to distinguish between a Repair and an Improvement. A repair keeps the property in its ordinary efficient operating condition. An improvement makes it better or extends its life significantly.
If you are fixing a small hole: it is a Restoration. However: if you are replacing the entire floor system with Plywood instead of Particle Board: you have technically performed a Betterment. Under the 2026 Disclosure Law: you must disclose any major structural remediation to future buyers. Failing to do so can lead to a Lien or a lawsuit for non-disclosure of Material Defects.
I always categorize my full-floor replacements as Capital Improvements. This allows me to Depreciate the cost over 27.5 years. It also increases my Basis in the property. This is crucial for reducing Capital Gains Tax when I eventually sell the unit. Logic says: keep every receipt. If the IRS audits your Structural Integrity claims: you need to show the invoices for CDX Plywood and Structural Screws. Documentation is the only shield you have against the tax man.

2026 Cost Transparency Table
| Item/Material | Estimated Cost (DIY) | Estimated Cost (Pro) | Notes |
|---|---|---|---|
| 3/4″ CDX Plywood (4×8) | $45 – $60 per sheet | $90 – $120 per sheet | Pro cost includes labor. |
| Subfloor Adhesive (Case) | $65 | Included | Essential for squeak prevention. |
| 2×6 Pressure Treated Joist | $12 per 8ft board | $35 per board | Used for sistering. |
| Dumpster Rental | $350 | $500 | Particle board is heavy and bulky. |
| Labor (Per Square Foot) | $0 (Your Sweat) | $8 – $15 | Varies by region and rot severity. |
ROI Calculation Deep Dive: The Math of Structural Equity
Why spend $5,000 on a floor for a home worth $40,000? Let’s look at the Net Present Value (NPV) of the repair. A mobile home with a rotted floor is often unfinishable for a Chattel Loan or FHA Title I Loan. This limits your buyer pool to “cash only” bottom-feeders. These buyers want a 30% discount on the Market Value.
By spending $5,000 to stabilize the structure: you move the home from “un-financeable” to “move-in ready.” This shift typically increases the Exit Cap Rate by 2-3 points in a rental portfolio. In a retail flip: it can mean a $15,000 swing in the Sale Price. That is a 200% Return on Investment (ROI) on your repair costs.
I calculate Structural Equity by looking at the Life Expectancy of the material. Particle Board has a remaining useful life of zero once it gets damp. 3/4 inch Plywood has a 50-year structural rating if kept dry. When I show a buyer that I replaced the floors with plywood: I am not selling a repair: I am selling Peace of Mind. In the 2026 market: where buyers are savvy: structural logic is your best sales tool. Don’t be cheap. The math doesn’t lie.

Affiliate Products Table
| Product Category | Recommended Brand/Tool | Purpose |
|---|---|---|
| Circular Saw | DeWalt 20V Max 7-1/4″ | Precision cutting of subfloor sheets. |
| Subfloor Glue | Liquid Nails Subfloor & Deck | Permanent bond to eliminate squeaks. |
| Moisture Meter | General Tools Digital Meter | Testing joists for hidden water. |
| Safety Gear | 3M Respirator with P100 | Protection against mold spores. |
Actionable Checklist
- Inspect the Belly Wrap for sagging water pockets.
- Locate all plumbing fixtures and check for Slow Drips.
- Verify the Joist Spacing (16″ or 24″) before buying wood.
- Purchase 3/4 inch Tongue and Groove Plywood for best results.
- Ensure you have a P100 Respirator for mold protection.
- Set saw depth to 3/4 inch to avoid Electrical Hazards.
- Apply Subfloor Adhesive to every contact point.
- Secure the perimeter with 2×4 Blocking.
- Use Structural Wood Screws: not nails or drywall screws.
- Update your Capital Improvement log for tax season.
Internal Resources
For more technical guides on maintaining your home as you age: check out these resources:
- The True Cost Of Fixing Mobile Home Issues
- The Complete Guide To Mobile Home Subfloor Repair
- Mobile Home Insulation: Stopping The Heat Loss
Summary & Bio
Floor rot is not the end of the world: but it is the end of your floor’s life. If you use logic: the right materials: and a bit of elbow grease: you can make your mobile home stronger than it was the day it left the factory. Don’t cut corners: because the person who falls through a cheap repair might be you.
Charles “Chuck” O’Dell is the founder of MobileHomeFriend.com. With over 20 years of experience and 100+ property transformations: Chuck focuses on the technical reality of affordable housing. He believes that every homeowner deserves a solid foundation: and he isn’t afraid to get dirty to prove it.
I have personally flipped and remodeled over 100 properties since 2003 with a focus on structural logic.
