Table of Contents
Introduction
(Updated December 4, 2025) Newer manufactured homes are looking better than ever before. In the last few years, I’ve been in some that look and feel like a traditional stick-built home. However, by the time you select upgrades, purchase the land, and pay for the setup, the cost can often approach the price of a site-built home. The strategic and often more profitable option is to buy an older manufactured home already on a desirable site and remodel it to look new again. How difficult and expensive is this? Not as much as you think. As an investor, I break down the entire process—from purchase price negotiation to final granite installation—using a real project example to show you how to execute a remodel that generates significant profit and provides beautiful, affordable housing.
Whether you are an investor looking to make a high margin from a rental property, or someone looking for affordable housing for your family, an older mobile home can be a great place to start!
Video Guide Overview
Affiliate Disclosure: As an investor, I often rely on specific tools and materials. This article contains affiliate links to products I have personally used and recommend. If you purchase through these links, I may earn a small commission, at no extra cost to you.
The Short Answer
The secret? For every dollar you put into the old mobile home, you want to be able to get a $2 return on the investment. If you hold to that formula, rarely would you ever lose money. When actually doing the remodel, it is tempting to keep putting money into it, regardless of the return. We have often been guilty of doing too much!
The following are the steps we take at Mobile Home Friend as we remodel an older mobile home.
- Find, evaluate, and acquire the right older mobile home
- Plan before you start the remodel
- Demolition
- Cleanup
- Make repairs and modifications
- Landscaping
There are thousands upon thousands of great deals to be had on older mobile homes; all across the country. So, finding the right bones to work with will go a long way in making sure your investment pays you dividends.
We are often offered mobile homes for free from various parks, or tenants in parks looking to get out. And, we turn many of these down! Why, you ask? We find some of them simply aren’t worth putting any money into them. Each case is unique and depends on the given the market surrounding that house.
What Is The Market For Mobile Homes?
According to the Manufactured Housing Institute (MHI):
- 22 Million people in the United States live in mobile homes
- Manufactured homes comprise 9% of all new housing starts in the U.S.
- 2017 saw 93,000 new manufactured homes delivered
- See industry overview at – “Mobile Home Industry Quick Facts“
There are millions of people currently living in manufactured homes. There are millions more looking for the increasingly difficult to find affordable housing. There will always be a demand.

Find, Evaluate, And Acquire The Older Mobile Home
Just like the stock market, what you buy plays one of the most important roles when it comes to finding success with an older mobile home remodel. We’ve done, and will continue to do many. That said, we have become more selective in what we buy. See our post on one remodel that we did not do the right way – “How Many Lessons Did We Learn On Our First Mobile Home Flip?“
We’ve had several parks and individuals offer us, for free, older mobile homes that were in dire need of repair. Of these homes, we’ve turned down more than we’ve accepted. Here is a guide on older mobile homes that we DO NOT purchase:
- Pre-HUD standard homes (built before June 1976).
- Any single wide narrower than 14 feet (we might make an exception to this depending on the park it is in, or the land it is one and what we plan to do with it).
- Any mobile home that has significant roof (caving in), wall, or floor damage. (This is judged on a case by case basis, but of the ceiling and walls are caving in, it is a no go.
- Any mobile home that would require repairs far in excess of what the house could sell for as an “After Repair Value“.
- Any home that is in a super run-down park. You’ll know the park when you see it. There simply some parks that almost nobody wants to live in.
Now we’ll look at a list of things that don’t bother us too much:
- Broken windows
- A few soft spots or a few holes in the floor
- A leaking roof
- Bad kitchens and bathrooms
- Holes in some of the walls
- Stenches that turn your stomach
Let’s take you for a ride on an older mobile home that we acquired in a park.

Facts About This Mobile Home:
- 1981 14 x 64 2 bedroom and 2 bathroom
- Paid owner $1,000
- Several broken windows
- Several holes in floor
- No HVAC system
- Cat urine smell that would make you hurl
- 27 dead cat skeletons in and under the house
- Remodeled similar homes in this park were selling for $17,000 to $31,000

Why We Bought It
We purchased this older manufactured home in a park that would be considered a 2 to 3 start park. The park has about 500 units, and at one time back in the 1970s, it was a very nice place. The park now has around 200 empty spaces, most of the homes are from the 1970s and 1980s. As homes are abandoned, or come up for sale, there are a few people like us who are buying them up for a flip.
When we walked a few of our contractors through the home to evaluate it for remodel, one of the men, actually ran out of the house and hurled; the smell was really, really bad.
There were some good things about this house as well:
- It had newer expensive full awnings on both sides of the house.
- It was structurally sound.
- The aluminum siding and paint were both in excellent condition, even though they were both over 40 years old.
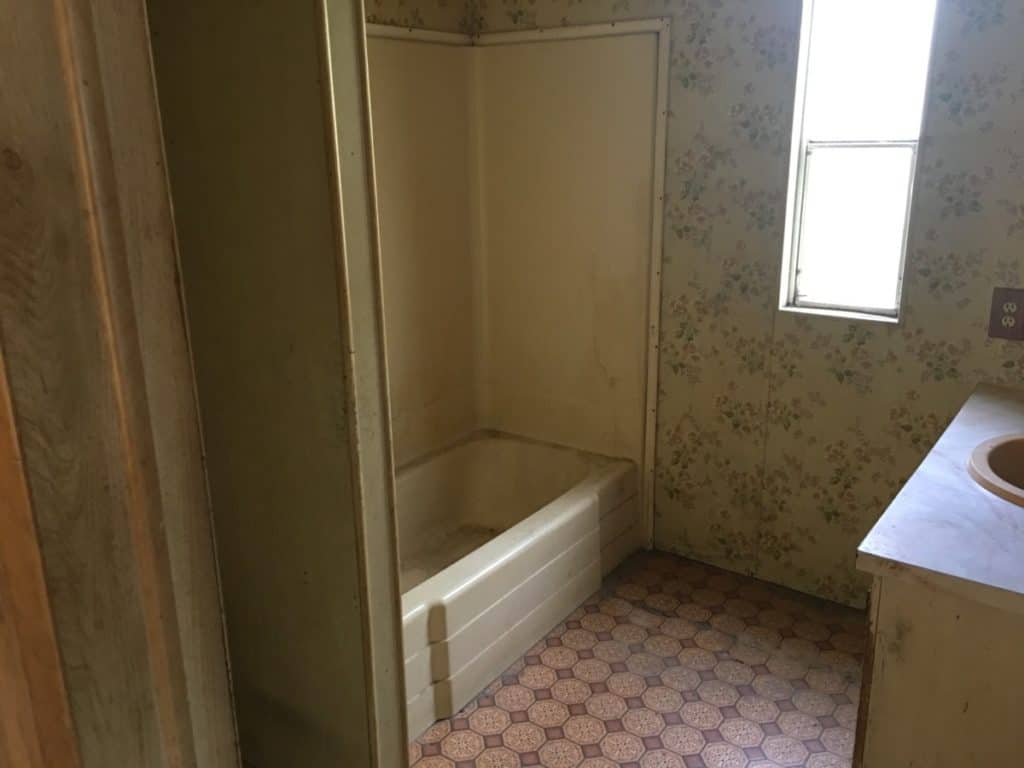
- The tub and shower enclosures were in good shape.
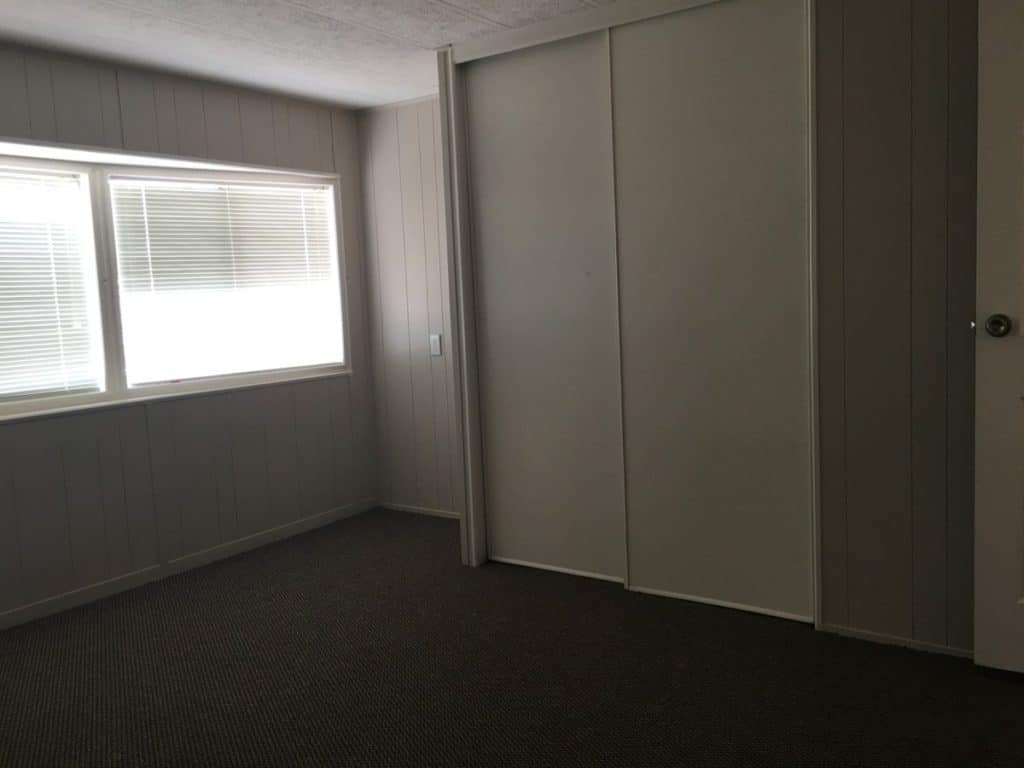
- The wall paneling through the house was in good condition.
- There were no leaks in the roof and the ceiling panels were all in good condition.
The smell was actually our greatest concern, but, we have dealt with numerous revolting smelling properties in the past and have always been able to eliminate the odor. We were in high hopes that the same would hold true with this one.
With the above going for the home, we felt that we could get away with a light remodel and still sell for in the $23,000 range. Previous to this home, we had been fixing the homes up more than we likely needed to. We had been selling them for top dollar, but we wanted to experiment with a lighter remodel and see what kind of sales experience we would have.
Plan Before You Start The Remodel
We have found that whether we’re working with a stick-built home, or a manufactured home, remodeling tends to be like peeling back layers of an onion. You can continue to peel back layers, but there are more layers underneath. At some point, you have to stop peeling and simply use the onion.
When evaluating this house, we carefully looked at everything and decided what we would do before ever starting. That doesn’t mean that things won’t come up, but we wanted to be sure of what we planned on doing before hand, so that our projection estimates would be as accurate as possible.
The following work is what we had decided to do on this house:
- Strip the interior and underneath the home of all trash and skeletons.
- Remove and replace the skirting around the home.
- Tear down the dilapidated shed at the side of the house.
- Replace the HVAC unit with a refurbished one.
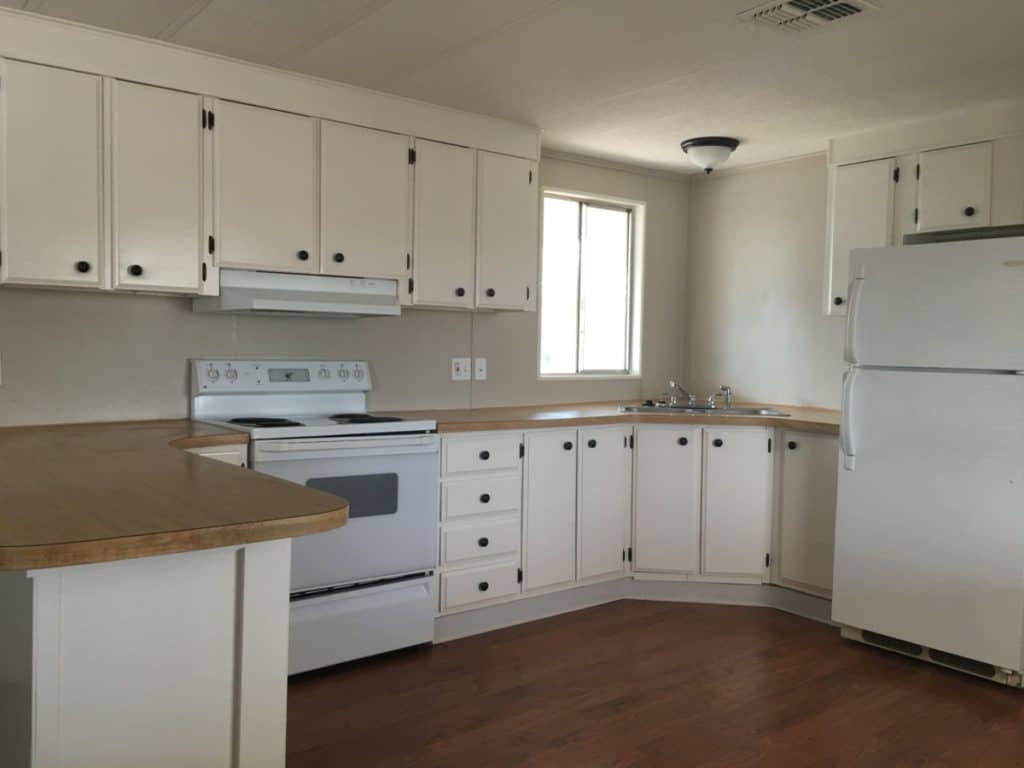
- Reuse all of the original cabinetry and countertops; painting them out.
- Replace the interior doors and hardware.
- Replace all of the moldings at the ceiling, floor and between each wall panel.
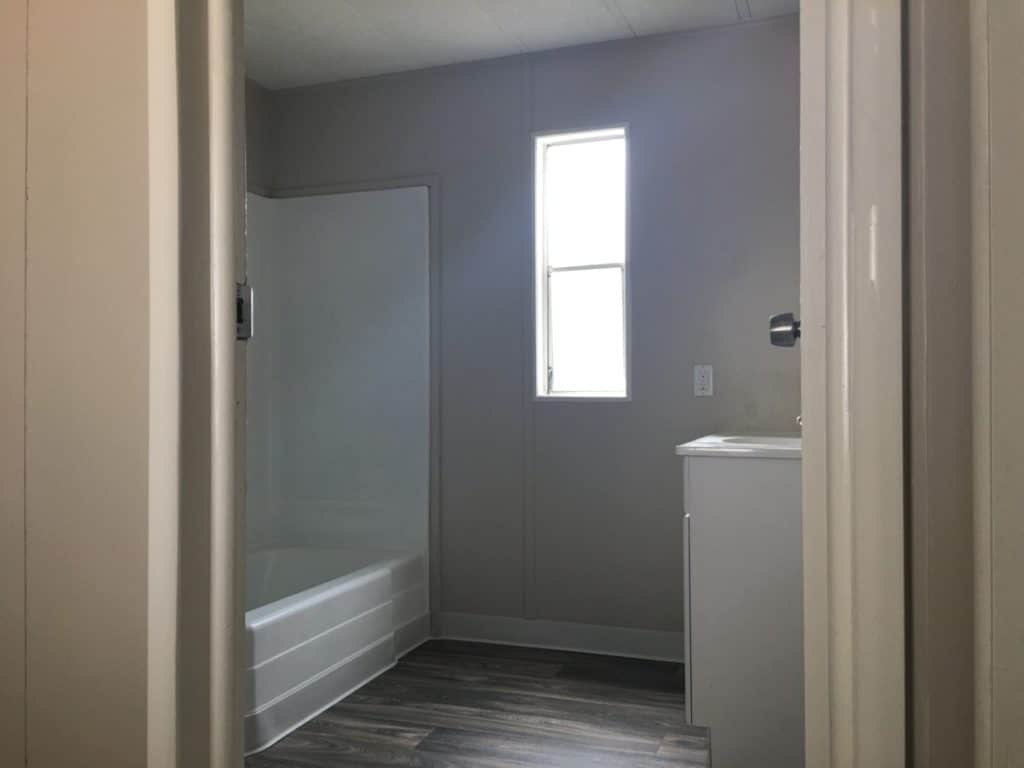
- Refinish the tub and shower enclosures.
- Repaint the full interior.
- Replace all of the flooring.
- Replace all light fixtures and faucets.
- Power wash the exterior.
Demolition
If HGTV is to be believed, demo day should be the most fun of the entire renovation. In my experience, I don’t see it that way. Reason? If you are trying to save a lot of the existing structure, walls, cabinets, finished, etc., then removing the unwanted items must be done carefully! Using sledge hammers to knock down cabinets, kicking down walls and other structures can cause quite a bit of damage to the things you want to keep. Carefully remove what you are replacing, trying not to damage what is around it.
For example, in this house renovation, we were going to keep all fo the existing cabinetry, but, we were replacing doors and moldings. In a mobile home, there are cheap plastic moldings all over everything. They are usually put into place at the factory using staples.
To keep from damaging the finish on the paneled walls, which were to be painted only in this case, we had to carefully pry away from the walls and ceilings all of the small strips of plastic molding. The same went for the doors and hinges. We were going to use the existing door jambs with new doors. That required careful removal of the existing lightweight mobile home door hinges.
Cleanup
A huge part of the demolition process is to clean everything that will not be staying, out and away from the house. In this house, there was lots of junk and furniture left inside. We ordered a dumpster from the city to dispose of everything.
We removed things in the following order:
- Leftover junk from the previous owner, inside, outside, and underneath the home.
- All moldings, doors, and hinges throughout the interior of the home.
- Toilets
- Flooring
- Light fixtures
- Plumbing fixtures
- Exterior shed
- Broken windows
These items came close to filling up a 40 yard dumpster. Once everything was out and swept up, the house already looked like it was well on its way to being renovated.
Any remodeling project can at times seem overwhelming. For me, there is a lot of stress that builds when the job site is a mess; that may just be me. By having the space swept up and clean on an ongoing basis, it allows my mind to function better about what work still needs to be done, and the quality of the work that is being done. I also find that when the job site is kept clean, and required to be maintained as such, the contractors seem to do better overall work on my jobs.
Make The Repairs And Modifications
Once we’ve cleaned everything out of a house and removed all that may be in the way of doing the renovations, it is finally time to start working on the modifications.
We typically perform our renovations in the following order:
- Roof Repairs – If there are leaks in the roof, they need to be taken care of before water can damage any of the other repairs. The roof of this mobile home was in overall good shape. We used a specialized elastomeric roof coating to seal the roof and extend its life. This is the same high-quality product we recommend using in all of our professional remodels.
- Windows – This is much the same as the roof. We want to be sure that as the rest of the remodeling is performed, it won’t be damaged by water. This home had a couple of broken windows. We simply replaced these. The windows in this home were the original single pane windows. They were in decent shape, so we decided NOT to replace with upgraded units.
- Plumbing – One benefit of working on a manufactured home, is that there is an easily accessible crawl space underneath to rework any plumbing that may need it. Depending on what the plumbing looks like, we will often replace the plumbing lines with PEX Plumbing Tool Kits. If we’re going to be doing plumbing underneath or inside of walls, we want to have access before we start to do any siding or wall work. The plumbing in this house was good underneath the home. There were a few small links under the kitchen sink, so we replaced all of the under sink plumbing throughout the house, but we didn’t go any further.
- Electrical – This is much the same as plumbing. At times it is necessary to open up walls or ceilings to run new electrical. We often replace all of the switches and plug outlets in a house if it is quite old and worn looking. All of the electrical in this house was functional when we made the purchase. No modifications had been made. However, the switches and receptacles looked very tired, so we replaced all of those with new ones.
- HVAC – Usually, this doesn’t damage anything inside the house, and the vent system is already in place. But, there have been times where we replace the ductwork, or the furnace/air handler inside of the home. The ductwork in this home was all still in good condition, however, the HVAC unit itself was missing. We installed a refurbished all-in-one unit outside and connected it to the ductwork system. We removed the furnace/air handler that was in a closet inside the home. We turned that space into a pantry. To save valuable interior space, we highly recommend reviewing the installation requirements for a Tankless Hot Water Heater.
- SubFloor – Having a good subfloor in the house will make a significant difference in how the overall remodel project turns out. The subfloor provides the firm and level foundation for whatever type of finished flooring we use. At times, it is necessary to use a floor leveler in order to get the floor to be free of low spots. We highly recommend doing this, as walking across an un-level floor can really detract from the homes value. Any work on the subfloor to strengthen weak areas, squeaks, holes, and soft spots pays huge dividends when it comes time to sell the home. This house had a few holes in the subfloor. This is how the many cats had gained access to the home. We cut out the soft spots and holes, and replaced those areas with new subfloor material.
- Siding – Rarely will we reside an older mobile home, even the ones with aluminum siding. Whether wood siding, or aluminum, we will often replace panels that are damaged. We did reside one older mobile home that had badly damaged aluminum siding. We used vinyl siding, and it looked fantastic when it was done. However, the time and the cost was simply not worth it to us when we evaluated the overall remodel. If you are renovating for your own use, it may be worth it to you, but all of our remodels are done for investment, so just replacing damaged panels works well for us. This home had aluminum siding and it was all in excellent condition. There were two panels that we unscrewed and went up underneath to smooth out a couple of small dents.
- Walls and Ceilings – This is one of the largest variables in the work that we do. If the older wood paneling is in good shape, we will often prime it and paint. If it is in rough shape, we will many times replace certain walls with drywall, or we will tape and float the paneling. We can then texture the paneling so that it looks like drywall. This is less expensive that doing drywall throughout the house, but far more costly than just priming and painting. The wall paneling in this home was overall in good condition. We decided to just paint. However, we’re not a fan of all of the small plastic molding found throughout the house. We removed all of the trim in this house and replaced it with wood battens, baseboards and ceiling trim. The end result was stunning considering we kept the old wall paneling.
- Doors and Trim – Once the walls have been repaired or prepped for whatever we are doing in that particular house, we will install the new doors and interior trim. Upgrading the doors in an older mobile home make a huge difference in the finished look. Also, in most mobile homes, there is lots and lots of trim throughout the house. If we keep the trim and just paint out the interior, then we are very careful to caulk all of the gaps between the trim and the walls. This is a biggy for me, as I believe that the unfilled gaps between the trim and the walls makes the overall renovation look shabby. There is quite a bit of work when it comes to caulking all of the gaps, but the difference in the finished appearance is well worth it. In this house, we removed all of the trim and interior doors, replacing them with regular interior house doors from home depot. We also replaced all of the trim with higher quality non-plastic trim. Even though we retained the paneled walls, the overall look of the home was amazing. Replacing the low quality mobile home doors and trim give the interior of the home a new feeling of quality.
- Painting – Prepping is the real key to achieving a great looking painted interior. This is especially true if your are going to paint over the paneling. The coating on the paneling is usually a type of vinyl. The trim and moldings throughout are also generally plastic. It is extremely important to prime these materials properly or the paint will simply flake off when the work is completed. Here is an excellent article on “How To Paint Vinyl Coated Walls” in a mobile home. The same prep-work should be performed on the exterior as well. A badly worn exterior detracts in a big way the look of the overall house. In the case of this remodel, we didn’t even have to repaint the exterior of a 36 year old home. We simply power washed and scrubbed the exterior and in looks almost as good as new.
- Skirting – Old and damaged skirting really tarnishes the look of any manufactured home. For a single wide, new skirting with materials and labor usually runs about $850. For a doublewide about $1,000.
- Cabinets – If we’re installing new cabinets or vanities in the house, the installation follows the painting of the interior. If we’re renovating the cabinets by sanding, prepping, and painting, they are painted out at the same time the rest of the house is being painted. The 36 year old cabinets in this home were in good condition. They had never been painted previously. We did have to repair a few drawers that were broken. My handyman was able to do that for about $30. We removed all of the cabinet doors. The cabinet faces and the doors all had a plastic type of finished. We prepped them for paint properly, and they looked marvelous when completed. The base area of the cabinets, and the back of the bar area was beaten up quite a bit, so we replaced that with new panels and moldings that were painted to match the walls. The toe kick areas were also significantly damaged. By installing new toe-kicks, the newly painted cabinets looked solid.
- Countertops – In our area, we have found that we can usually install granite or quartz countertops for close to the price of laminate tops. This is especially true if there are lots of angles to be cut with the laminate. Most major metro areas have several wholesale building material locations that have great prices on precut granite for counters, islands or vanities. They just have to be cut to length. Usually we are willing to spend a little more here because of the upgraded look that it gives to the kitchen and bathrooms. The countertops in this house were the original 36 year old laminate ones that came in the home. They weren’t in great shape, but weren’t terrible. We decided against replacing them, as the countertop had a strange shape to match the design of the cabinets. This is common in mobile homes. We gave them a good scrubbing and worked ok for this application.
- Fixtures – At this stage, the light and plumbing fixtures are replaced. New mid-quality fixtures typically run less than $1,000 per house, yet they bring a modern look and feel to any property. We always make sure that the finishes of door knobs, door hinges, light fixtures, and plumbing fixtures are all of the same type of finish whether it be brushed nickel, oil-rubbed bronze, or chrome. We recommend finding matching door hardware and plumbing fixtures and separate modern light fixtures to simplify the process. In this remodel we spent less than $500 for all of the above items. We always look for a sale at Home Depot or Lowe’s. There is always something on sale at both of the big box stores.
Landscaping
Even with a nice remodel, if the land around the house looks disheveled, the entire house loses its appeal. When we’re working with a older mobile home for either a flip, or for investment as a rental, we will always clean up the lot and do some landscaping. This is true whether the house is in a park or on its own land.
In Arizona, we use lots of granite. When we do a home in a park, we will clean up the lot by getting rid of all debris and weeds. We then will cover the lot with a granite. It makes the house and lot look clean and ready to go.
If the house is on its own lot, we will put a chain link fence around the property if it doesn’t already have one. We also put up privacy fence screens which don’t cost very much, but add a good look to the property. We then will put granite over the entire lot with a few bushes and a tree close to the house if it doesn’t already have them.
Finishing Up
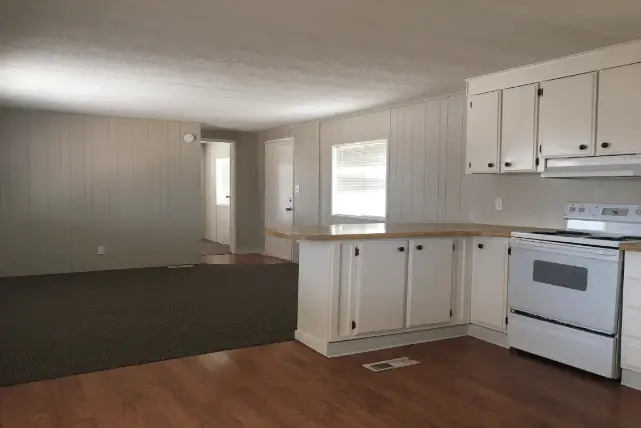
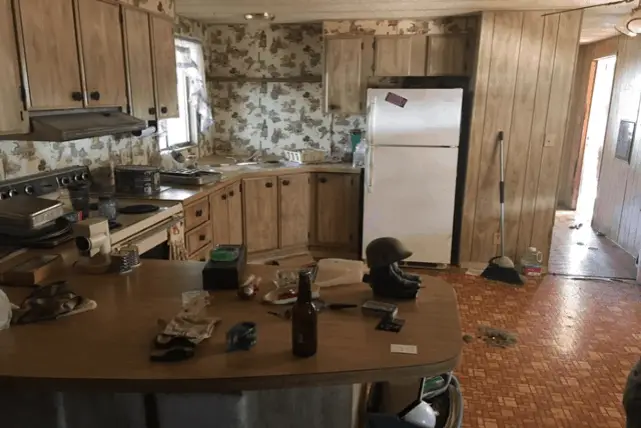
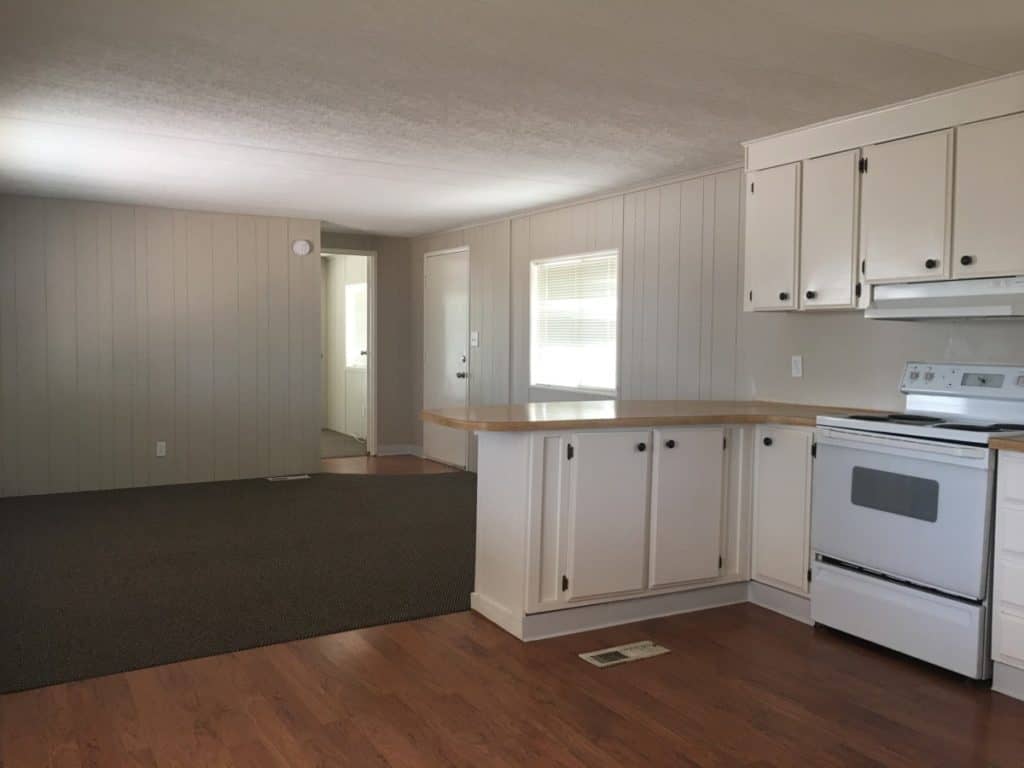
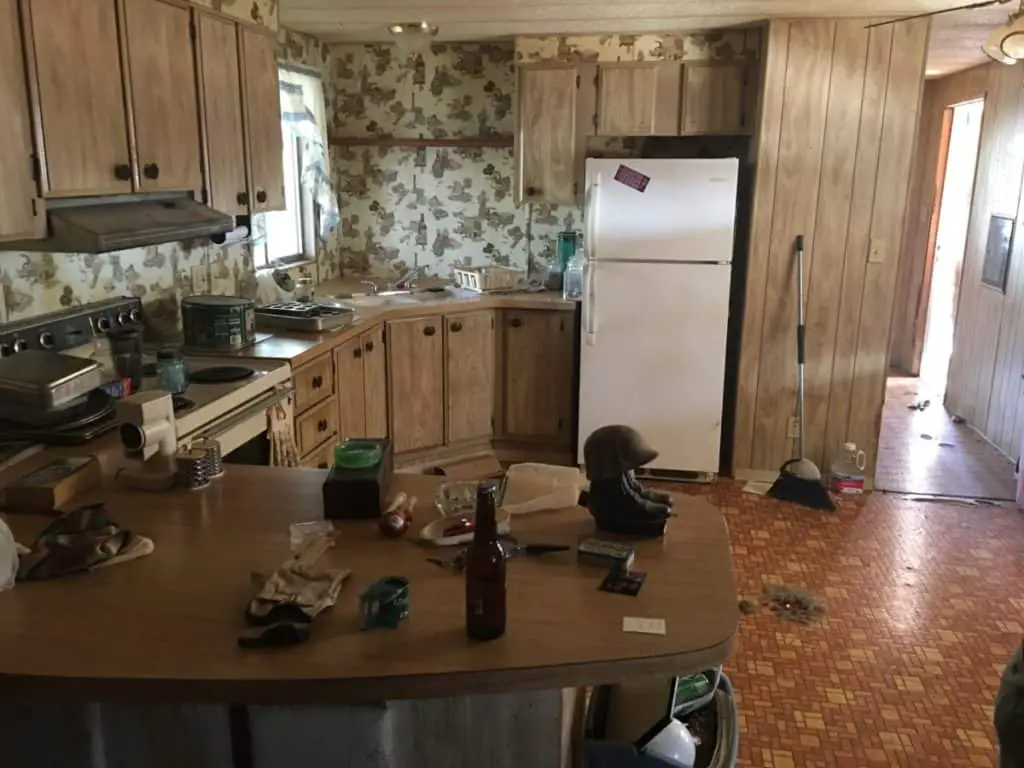
Remodeling an older mobile home can be fun. It is always satisfying to see what we started with and then what the finished product looks like:


Conclusion
This was the first mobile home that we decided to do differently than what we had been doing. Usually, we gutted homes to the studs and replaced most everything, walls, plumbing, electrical, windows, flooring, etc. Using that method the homes came out beautifully, but our remodel expenses were prohibitive for some of the older mobile homes where the “After Repair Value” (ARV) would not be high enough to justify the costs.
We learned that even when we didn’t replace everything, we still ended up spending a bunch, but far less than usual. We figured it was worth following this pattern with other homes. The following is a record of our results with this house:
| Purchase | 1,000 | |
| Labor | 6,059 | |
| Materials | 5,153 | |
| Utilities | 132 | |
| Total Costs | 12,344 | |
| Sale Price | 19,000 | |
| Costs | (12,344) | |
| Net Profit | 6,656 |
Written by a professional investor who specializes in mobile home flips and renovations for maximum profit and efficiency.