
Table of Contents
Introduction
I have spent 20 years flipping over 100 properties, and I can tell you that water is the single greatest enemy of the manufactured home. Seven years ago, I wrote the original guide on this topic. Today, in 2026, the physics of water hasn’t changed, but our tools and methods have. If you have standing water or damp soil under your home, you are on a countdown. Every day that moisture sits there, it is actively attacking your floor joists, inviting termites, and compromising the soil’s ability to hold up your multi-ton investment.
I do not do fluff. I do solutions. In this expanded guide, we are going to look at the structural mechanics of why water destroys these specific types of homes. Unlike a site-built home with a deep concrete foundation, a mobile home sits on a “pier and beam” system. This system relies entirely on the bearing capacity of the soil. When that soil becomes saturated, it loses its ability to support weight. This leads to settlement, which leads to cracked walls, stuck doors, and eventually, a totaled home. Let’s get into how to dry out your crawlspace and keep it that way for the next decade.
Video Guide Overview
Affiliate Disclosure
I believe in transparency. Some links in this article are affiliate links. If you purchase a tool through these links, I earn a small commission at no extra cost to you. I only recommend gear I have used on my own job sites to move water or fix leaks.
The Short Answer
Standing water under a mobile home is caused by one of three things: external site drainage failures, internal plumbing leaks, or high-water table seepage. You must immediately identify the source by checking for active pipe drips, then inspect the perimeter of your home for “negative grade” where the ground slopes toward the skirting rather than away from it. To fix it, you must stop the source, pump out the volume, and install a 6-mil or 20-mil vapor barrier to prevent future evaporation into your floor system. If the water has been there for more than two weeks, you must also inspect the belly wrap for trapped moisture.
The Technical Deep-Dive: Why Moisture is a Structural Threat
In a manufactured home, the floor system is composed of transverse or longitudinal joists, usually made of 2×6 or 2×8 lumber. Beneath this is the insulation and the “belly wrap” or road barrier. When water pools on the ground, it creates a humid micro-climate. Through a process called vapor drive, moisture moves from areas of high concentration (the wet ground) to areas of lower concentration (your dry floor joists).
By 2026, we are seeing more homes using engineered wood products in their floor systems. While strong, these products are even more susceptible to delamination when exposed to constant high humidity. If the humidity under your home stays above 60% for an extended period, you will begin to see fungal growth. This fungus consumes the lignin in the wood, leading to “soft spots.” Once a joist loses its structural integrity, the steel chassis of the home can actually start to twist because the wood is no longer providing the necessary lateral bracing.
The Problem with Modern Gutters and Runoff
In recent years, we’ve seen a shift in weather patterns with more “flash” rain events. A standard 4-inch K-style gutter on a mobile home is often insufficient for these volumes. When a gutter overflows, the water falls directly at the base of your skirting. If your skirting isn’t sealed at the bottom, or if the ground has even a slight dip, that water is funneling directly under your home. This is hydrostatic pressure at work; the water wants to find the lowest point, and unfortunately, the excavated pad under your home is often that point.
Identifying the Source: The Triage Phase
Before you spend a dime on gravel or pumps, you need to know where the water is coming from. Put on a headlamp and get under the home. Do not be afraid to get dirty; this is where the money is saved. I categorize water sources into three tiers:
Tier 1: Internal Plumbing Failures
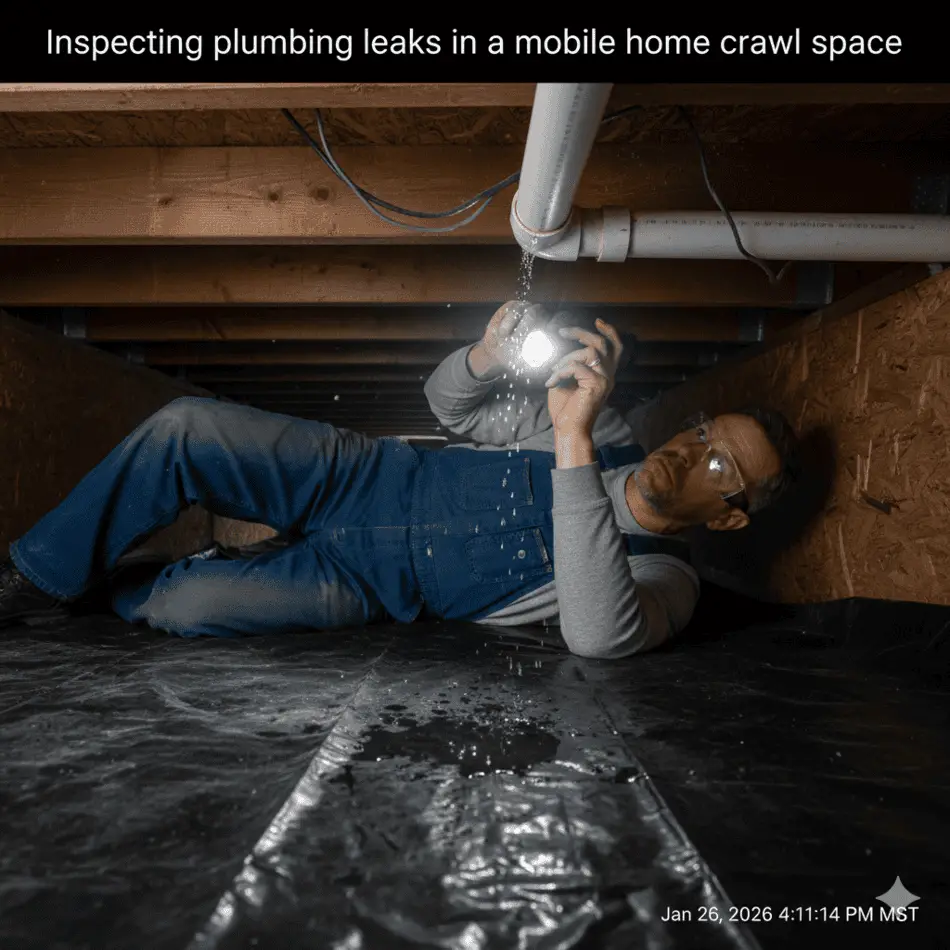
If the water is localized under a bathroom or kitchen, it is a plumbing failure. In older homes, this is often the result of failing polybutylene pipes. In 2026, we see many PEX fittings that were improperly crimped or have corroded due to high mineral content in park water systems. Look for active drips from the belly wrap. If the wrap is bulging like a water balloon, do not stand directly under it. Use a small utility knife to make a tiny incision and drain it into a bucket. If the water is clear and odorless, it’s a supply line. If it’s grey or has an odor, your drain lines are compromised.
Tier 2: External Surface Runoff
If the water is consistent across the entire footprint or concentrated at the perimeter, it is surface runoff. Look at your skirting. If there are water marks on the inside of the skirting panels, the water is pushing in from the outside. This is often caused by “negative grade.” Over years, the weight of the home causes the pad to sink slightly, while the surrounding yard remains at its original height. This creates a “dish” effect. During a heavy rain, the entire yard drains into the “dish” where your home sits.
Tier 3: Groundwater and Seepage
This is the most difficult to fix. If the ground is dry around the perimeter and there are no plumbing leaks, but you still have a pond in the middle, you are likely dealing with a high water table or “wicking” from an underground spring. In these cases, the water is coming up from the earth itself. This requires a more aggressive approach, including permanent sump pumps and heavy-duty encapsulation.
Step-by-Step Technical Remediation
1. Mechanical Extraction
You cannot wait for the sun to dry out 200 gallons of water. The humidity will rot your floors long before the ground dries naturally. Use a submersible utility pump. Place the pump in the lowest spot (the “sump”). If the ground is flat, you may need to dig a small temporary pit (about 12 inches deep) to allow the pump to suck the water down to a 1/8-inch level. Do not discharge this water near the home. Use a 50-foot hose to move it to a ditch or the street. If you leave the hose too close, the water will simply cycle back under the home through the soil.
2. Correcting the Grade and Site Drainage
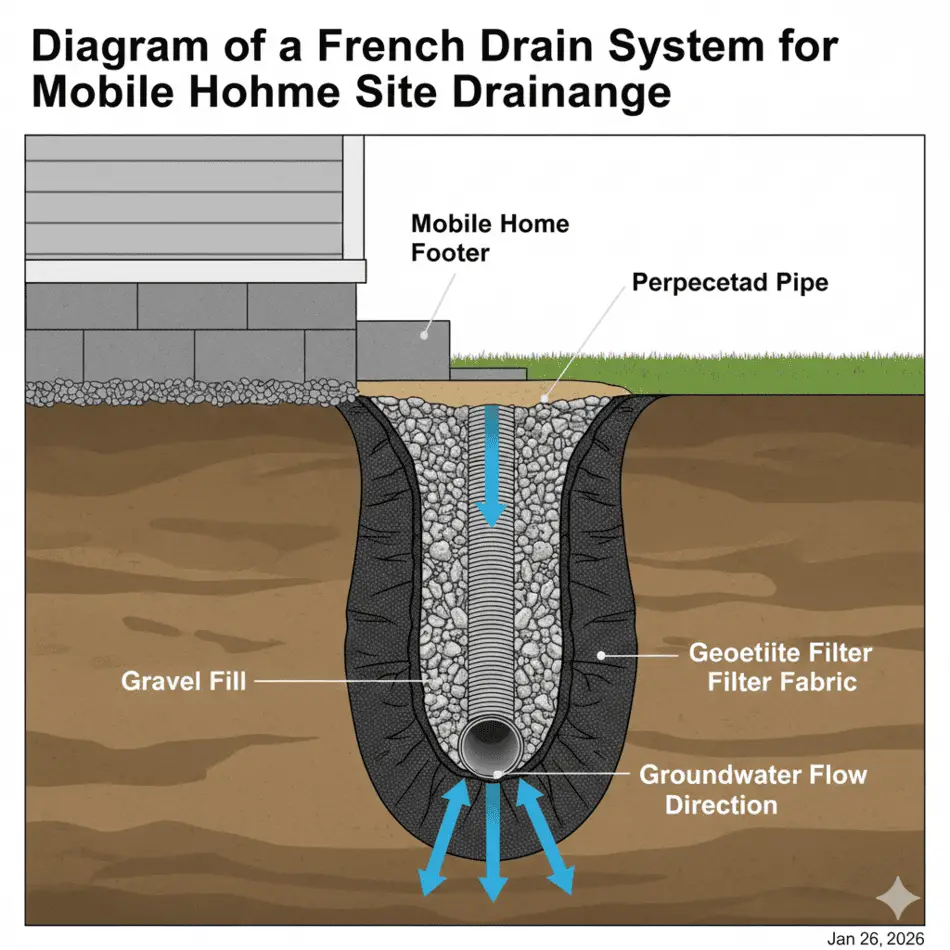
The “pad” should be the highest point. You have two options here: adding fill or diverting flow. I prefer diverting flow. Adding fill under a home that is already set is a nightmare. Instead, focus on the perimeter. You must install a French Drain system or a swale. In 2026, I recommend using pre-slotted NDS pipes wrapped in geotextile fabric. You want to intercept the water 3 feet away from your skirting and divert it. Ground should slope away from the home at a rate of 1 inch per foot for the first 6 feet.
If you are in a park where you cannot dig deep trenches, you must use surface drains. These are catch basins that sit flush with the grass and connect to solid PVC piping. Ensure these pipes are sloped at least 2% (a 1/4-inch drop per foot) to ensure gravity does the work. Never use the “accordion” style flexible drain pipe; it traps sediment and will fail within three years.
3. Managing the Belly Wrap and Insulation
If water has been trapped inside your belly wrap, you cannot just “let it dry.” Wet fiberglass insulation loses its structure and becomes a sodden mass that will never dry in a confined space. You must cut out the wet insulation. I know it’s a mess, but if you don’t, the wood joists will rot from the inside out. Once the insulation is removed, use a high-velocity air mover to dry the wood joists until they reach a moisture content of 15% or less. Only then should you replace the insulation and patch the belly wrap using scrim tape and adhesive spray.
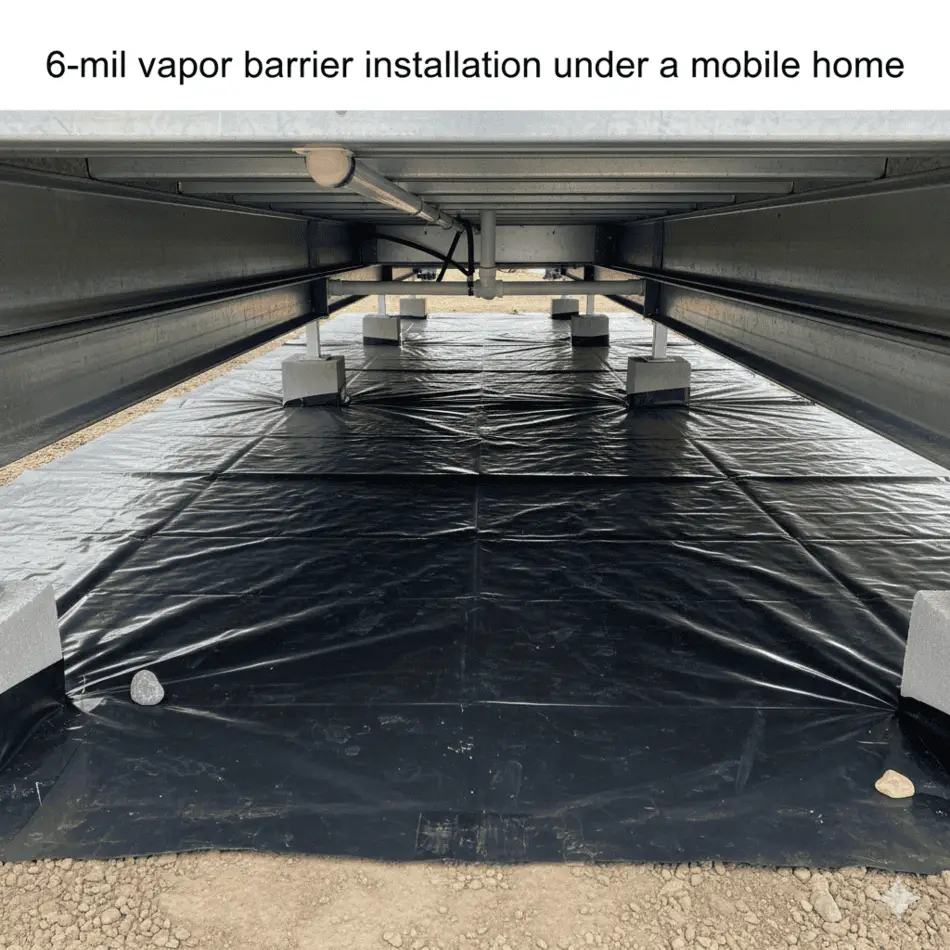
4. Vapor Barrier Installation (Encapsulation)
Once the ground is dry to the touch, you must seal it. A 6-mil polyethylene plastic is the minimum, but for a permanent “set it and forget it” fix, I now use 20-mil reinforced liners. Overlap your seams by 12 inches and tape them with waterproof seam tape. This prevents the “greenhouse effect” where the earth breathes moisture into your joists. In 2026, many local codes are moving toward full encapsulation, which means running the plastic 6 inches up the piers and sealing it. This creates a “closed system” that keeps the wood at a constant, safe humidity level.
Cost Transparency Table (2026 Estimates)
Prices have shifted significantly due to material costs in 2026. Here is what you should expect to pay for a standard 14×70 single-wide or 28×60 double-wide.
| Service/Material | DIY Cost | Professional Cost |
|---|---|---|
| Submersible Pump & Hose | $150 – $250 | $400+ (Service Call) |
| 6-mil Vapor Barrier (Full Home) | $200 – $400 | $1,200 – $2,500 |
| 20-mil Heavy Duty Liner | $600 – $900 | $3,000 – $5,000 |
| French Drain Installation (50 ft) | $300 – $600 | $2,500 – $4,000 |
| PEX Plumbing Leak Repair | $50 – $100 | $350 – $600 |
| Belly Wrap & Insulation Repair | $150 – $300 | $800 – $1,500 |
Affiliate Products Table
| Product Name | Purpose | Why I Recommend It |
|---|---|---|
| Hydro-Sentry 2026 Smart Leak Sensor | Detection | WiFi-enabled sensors that go under the home and alert your phone before a drip becomes a flood. Essential for remote owners. |
| Tite-Seal 20-Mil Reinforced Liner | Vapor Barrier | Virtually indestructible. You can crawl on this for years without tearing it, unlike cheap 6-mil poly which shreds on rocks. |
| Flow-Master Submersible Utility Pump | Extraction | Pulls water down to 1/16 of an inch. Necessary for clearing flat crawlspaces quickly. Very quiet operation. |
The “Dry-Site” Actionable Checklist
- Inspect Gutters: Ensure downspouts terminate at least 5 feet away from the skirting using solid extensions.
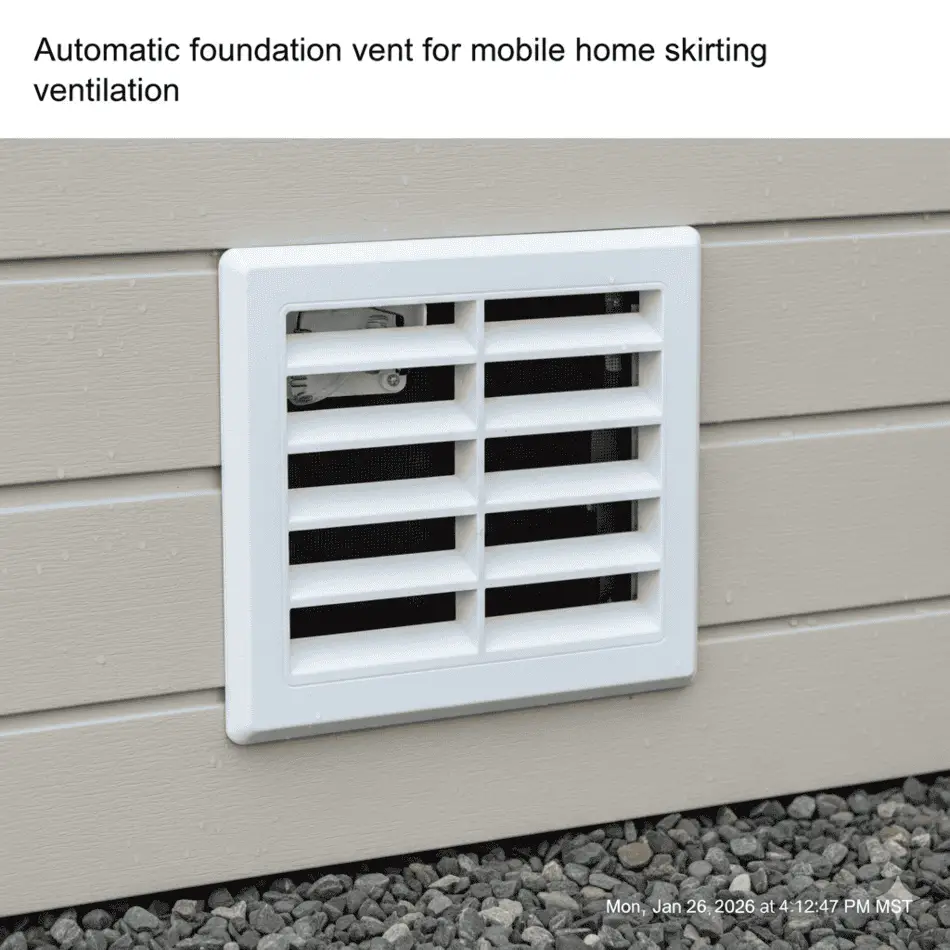
- Check Skirting Vents: You need 1 square foot of venting for every 150 square feet of floor space. If it’s too humid, add a solar-powered fan to one vent.
- Plumbing Pressure Test: Turn off all faucets. Check your water meter. If the dial is moving, you have an active leak under the home.
- Belly Wrap Inspection: Look for “bulges” in the black under-belly. If you see a sag, poke it gently. If water leaks out, you have a trapped leak that must be drained and the insulation replaced.
- Verify Grading: During a rainstorm, put on a raincoat and walk the perimeter. If you see puddles against the home, your grade is failing.
- Anchor Inspection: Check your tie-down straps. If the ground is wet, the anchors can “pull” or loosen. This is a major safety hazard.
- Mold Spot Check: Use a moisture meter on the wooden rim joist. Anything above 18% moisture is a breeding ground for wood-destroying organisms.
Internal Resources
For more specific guides on maintaining your home’s foundation and systems, check out these articles:
- How to Properly Re-Level Your Mobile Home After Water Damage
- The Ultimate Guide to Mobile Home Skirting Insulation
- Repairing Your Mobile Home Belly Wrap: A Step-by-Step Guide
- Choosing the Right Skirting for Wet Climates
The Advanced Section: Engineering a Permanent Solution
The Perimeter French Drain
If you have persistent water, a simple splash block under your downspout isn’t enough. You need to engineer a perimeter drain. Dig a trench 12 inches wide and 18 inches deep. Line the trench with filter fabric. Lay 4 inches of 3/4-inch washed gravel. Place your perforated pipe (holes facing DOWN). Fill the rest with gravel to within 2 inches of the surface, then fold the fabric over and top with decorative stone or mulch. This creates a high-speed “highway” for water to exit your lot without ever touching your pad.
Active vs. Passive Ventilation
In humid regions (like the Southeast or Northwest), passive vents in your skirting often aren’t enough to dry out the soil. By 2026, we are seeing more homeowners install active ventilation systems. These are small, 12V or solar-powered fans mounted directly into the skirting vents. They are controlled by a humidistat. When the humidity under the home exceeds 60%, the fans turn on and pull fresh air through the crawlspace. This is a game-changer for preventing that “stale water” smell inside the home.
Dealing with Pier Settlement
If your home has been sitting in water for months, your piers have likely settled. Concrete blocks sit on ABS plastic pads. When the soil turns to mud, these pads sink unevenly. Before you dry the home out completely, you should have a professional (or yourself, if you’re handy with a 20-ton bottle jack) check the level of the steel I-beams. If you dry the soil while the home is unlevel, the home will “set” in that crooked position as the soil hardens. Always level the home after the water is gone but before the soil fully compacts.
Summary
Water under your home is not a “later” problem. It is a “now” emergency. By following first-principles logic—identifying the source, extracting the volume, and sealing the earth—you protect your home’s structural integrity. I have seen 100-year-old homes ruined in two years by simple drainage neglect. Do not let that be your story. Invest in a high-quality vapor barrier and ensure your lot grade is working for you, not against you. Your home is likely your largest asset; treat its foundation with the respect it deserves.
Bio: Chuck O’Dell
Chuck O’Dell is the founder of MobileHomeFriend.com and a veteran real estate investor with over 20 years of hands-on experience in the manufactured housing sector. Having flipped more than 100 properties, Chuck specializes in technical remediation and structural longevity. He is dedicated to providing homeowners with direct, fluff-free advice based on two decades of trial, error, and success in the field. He believes that every mobile home can last 100 years if you keep the roof tight and the bottom dry.
