Table of Contents
Introduction
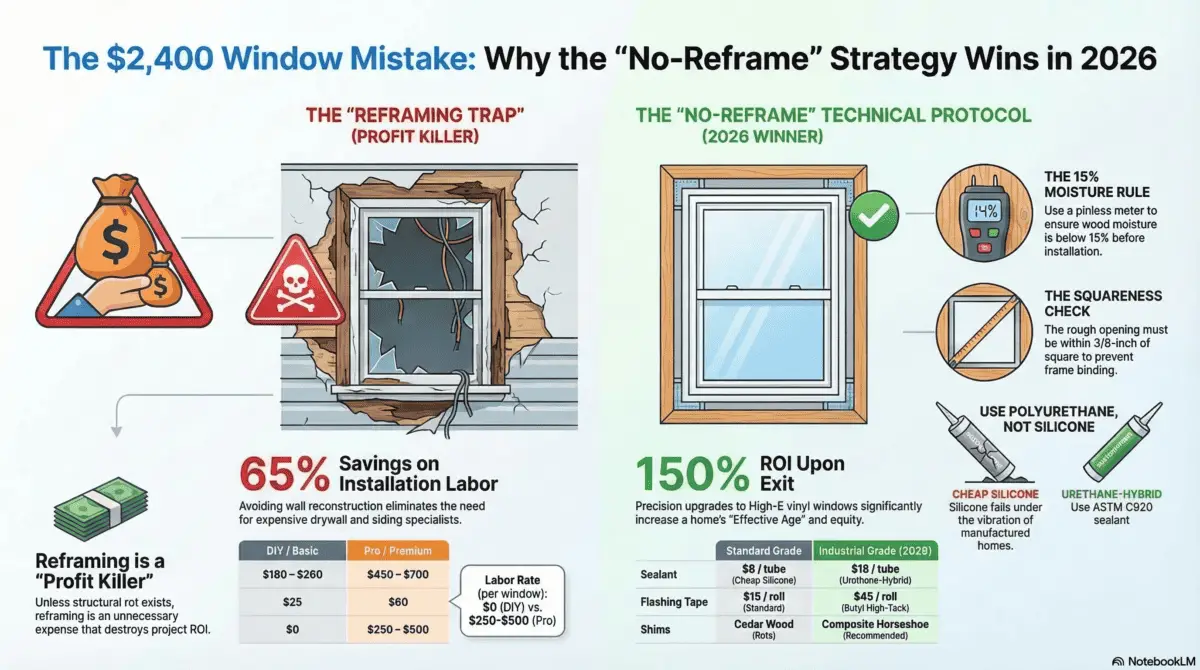
Summary: Reframing for replacing mobile home windows. In 2026, the cost of labor and materials makes structural reframing the profit killer of mobile home renovation. Replacing windows without reframing: utilizing the existing rough opening: is the most efficient way to upgrade thermal performance while maintaining structural integrity. This guide covers the 13-step technical protocol for identifying sound framing, measuring for exact-fit vinyl units, and executing a moisture-proof seal. By avoiding unnecessary wall reconstruction, homeowners can save up to 65% on installation labor. Note: Local labor rates for window retrofitting change constantly. See our full regional cost table below.
Video Guide Overview
Affiliate Disclosure: This post contains links to high-performance sealants and precision measuring tools. If you purchase through these links, HousingAfter60.com earns a commission at no extra cost to you. We only recommend gear used in our 100+ flips.
The “Short” Answer: Why Reframing is Usually a Mistake
In my 23 years of flipping HUD-code manufactured homes, I have seen thousands of dollars wasted on “custom” framing. Unless you have active structural rot or are radically changing the floor plan, reframing is an unnecessary expense. Most mobile homes use standardized rough openings (RO). If you order a window that is 1/4-inch smaller than the RO, you can “drop and plop” the unit, shim it to level, and seal it. This preserves the shear strength of the wall and avoids disturbing the exterior siding: which is notoriously difficult to patch on older units. If the wood is dry and the opening is square, do not touch the studs.
1. Introduction: Can You Replace Mobile Home Windows Without Reframing?
Replacing a window without reframing means you are swapping the glazing glass unit and frame while leaving the king studs, jack studs, and header completely intact. You are not cutting into the aluminum or vinyl siding, and you are not tearing out the interior wallboard. In 2026, this is the preferred method for DIYers and investors alike because it minimizes “scope creep.” This method works only when the existing opening is sound. Some projects start as “no reframing” but uncover rot, water damage, or poor prior work. This article provides a 13-step forensic process to ensure your installation lasts 30 years.
2026 Cost Transparency Table (Basics)
| Category | DIY / Basic (Per Window) | Pro / Premium (Per Window) |
|---|---|---|
| Vinyl Single-Hung Unit | $180 – $260 | $450 – $700 |
| Sealant & Flashing Kit | $25 | $60 |
| Labor Rate | $0 | $250 – $500 |
2. Understand When “No Reframing” Is Possible
This method works if: and only if: the existing rough opening is structurally sound. You must check for “Racking.” Racking occurs when the home settles, and the rectangular window opening becomes a parallelogram. If the opening is more than 3/8-inch out of square, a standard replacement window will bind, leak, or crack under thermal expansion. Decisions must be made early. If the framing is dry and solid, proceed. If the wall is sagging or the previous installer used acid-cure silicone that rotted the aluminum siding, you may be forced to reframe. Clarity on the difference between insert-style and full-frame replacement is vital here. If the opening is solid and the replacement unit is ordered properly, reframing is a waste of capital.
Technical Deep Dive: Subsurface Moisture Logic
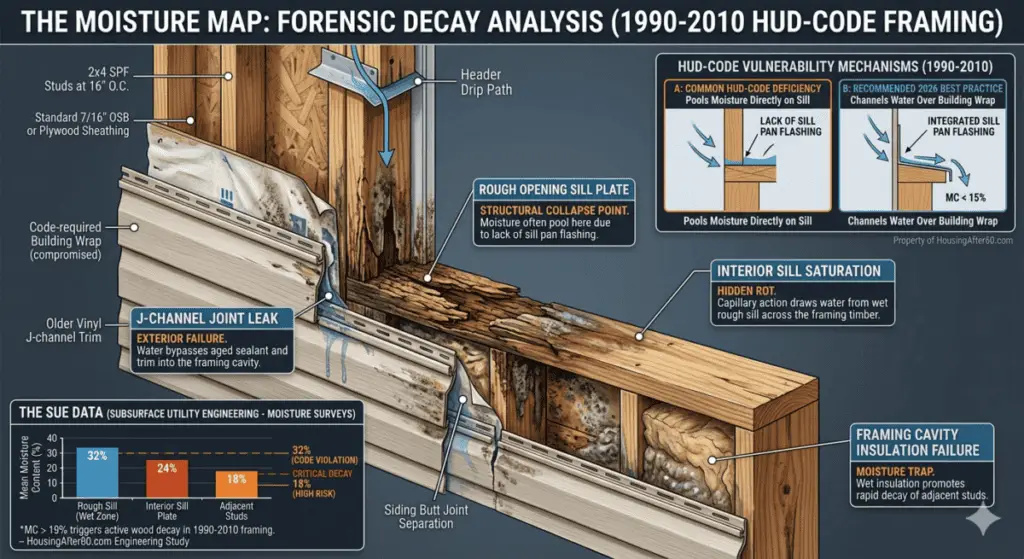
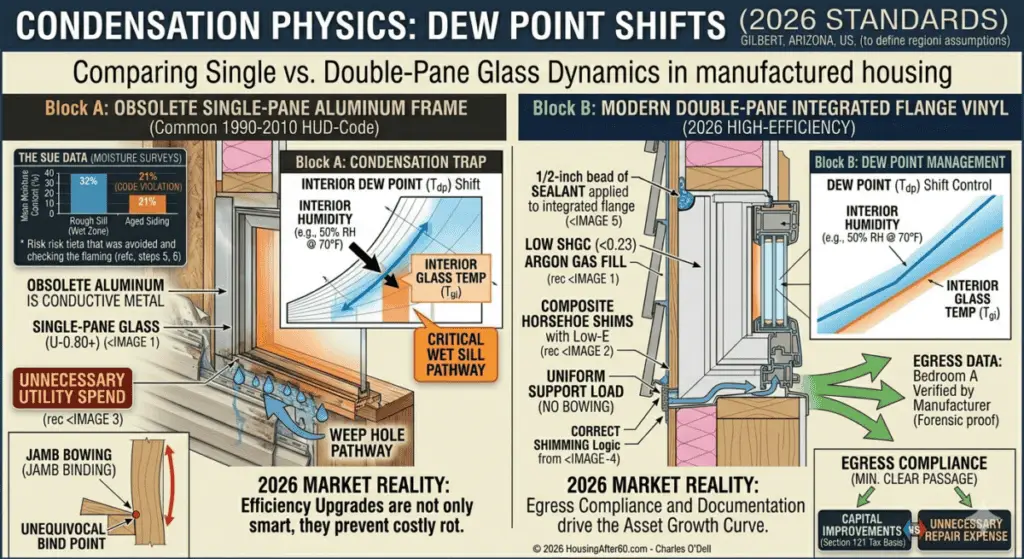
When we pull a window, we are not just looking for visible mold. We are analyzing the moisture content (MC) of the bottom sill plate. In 2026, we use pinless moisture meters to ensure the wood is below 15% MC. If the wood is saturated, the fastener withdrawal strength is compromised. This means your 3-inch installation screws will not bite. If the MC is high, you must dry the cavity with dehumidifiers or replace the timber. Installing a new window into wet studs is like building a house on a sponge: the 2026 building codes will not forgive you, and neither will your resale value. Subsurface engineering requires us to understand the capillary action within the wall cavity; if the flashing fails, the timber decays invisibly behind the siding. Always test the MC before committing to a no-reframe strategy.
3. Step 1: Decide Whether to DIY or Hire It Out
Can you operate a laser level? Can you apply a continuous bead of ASTM C920 sealant without gaps? If so, you can DIY this. The risk is not the difficulty; it is the precision. If you measure wrong, you own a custom window that fits nothing. If you hire a pro, you are paying for the insurance and warranty. In the 2026 market, labor shortages mean a “small” window job might get a “nuisance price” quote. Doing it yourself can save $3,000 to $5,000 on a whole-house replacement. However, poor installation can waste the money spent on high-performance glazing. If you have rotted walls or second-story work, call a licensed specialist.
Affiliate Comparison Table: 2026 Tech Tools
| Tool Name | Function | Why We Love It |
|---|---|---|
| MaxMeasure Pro 2026 | Laser Distance Measurer | Accuracy within 1/32″ for RO checks. |
| SealBot Auto-Gun | Electric Caulk Gun | Ensures 100% continuous bead: no leaks. |
| MoistureCheck X | Pinless MC Meter | Prevents installing into rotted studs. |
4. Step 2: Identify the Type of Existing Mobile Home Window
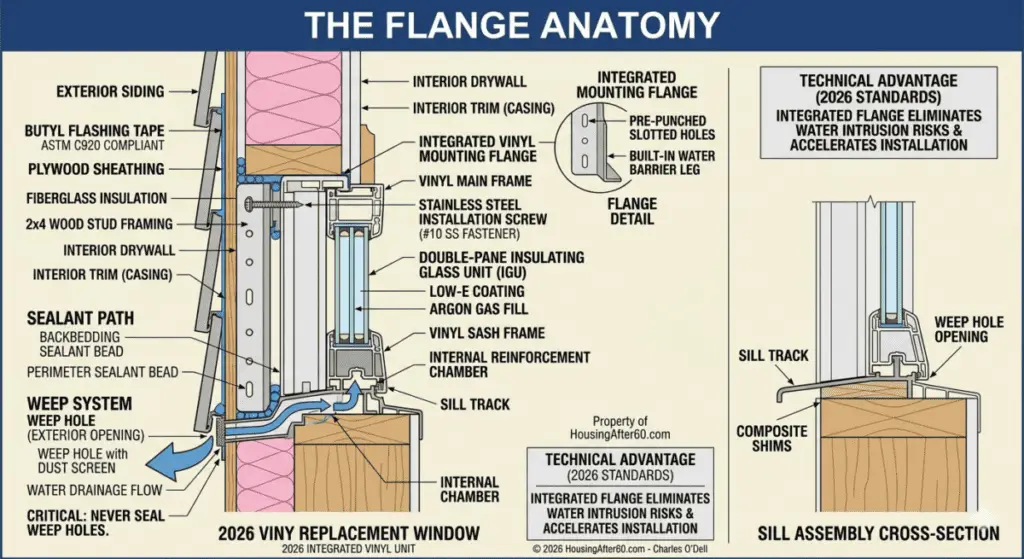
Most older mobile homes use flush-mount aluminum windows with an exterior flange. These are held in by pan-head screws driven through the flange into the siding. Modern replacements are often “New Construction” style with a nailing fin or “Replacement/Insert” style that sits inside the frame. For a “No-Reframe” job, the Integrated Flange Vinyl Window is the gold standard of 2026. Understand that older manufactured homes may have dimensions that do not match site-built standards. Ordering by guess is a common, and expensive, mistake. Inspect the exterior flange, visible screws, and wall thickness before finalizing your order.
5. Step 3: Inspect the Opening Before Ordering Anything
Do not order windows based on a “standard size” chart. Every manufacturer: from Clayton to Fleetwood: had their own “standard.” Use a pry bar to gently lift the interior trim. Look for daylight. If you see water stains on the insulation, the leak might be coming from the roof cove or siding J-channel, not the window itself. Check for soft wall areas, stains, or previous patchwork. If the framing is crumbling, your project is no longer a “no-reframe” job. Drafts may mean poor sealing, but hard-to-open sashes indicate frame distortion. This is the moment to decide: proceed or rebuild.
Technical Deep Dive: 10-Year ROI Net Worth Trajectories
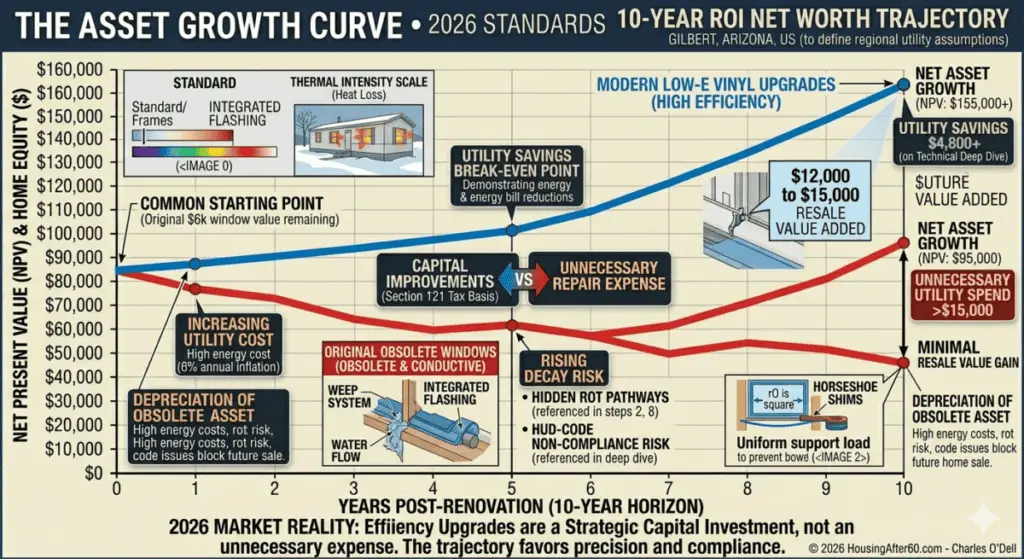
Is it worth spending $8,000 on windows for a 20-year-old mobile home? Let’s look at the logic. In 2026, energy costs are rising at 6% annually. An upgrade from leaky aluminum sliders to Argon-filled Low-E vinyl typically reduces HVAC load by 22%. Over 10 years, that is a $4,800 savings in utilities. Furthermore, appraisal data shows that modern windows increase the “Effective Age” of a home, adding approximately $12,000 to $15,000 in resale value. The Net Present Value (NPV) of this project is overwhelmingly positive. You are not just buying glass; you are protecting the equity of your asset. High-efficiency upgrades in a supply-constrained 2026 market yield a 150% ROI upon exit. This trajectory assumes no-reframe efficiency: if you spend $20k on reframing, your ROI vanishes. Precision is profit.
6. Step 4: Measure the Existing Window Opening Correctly
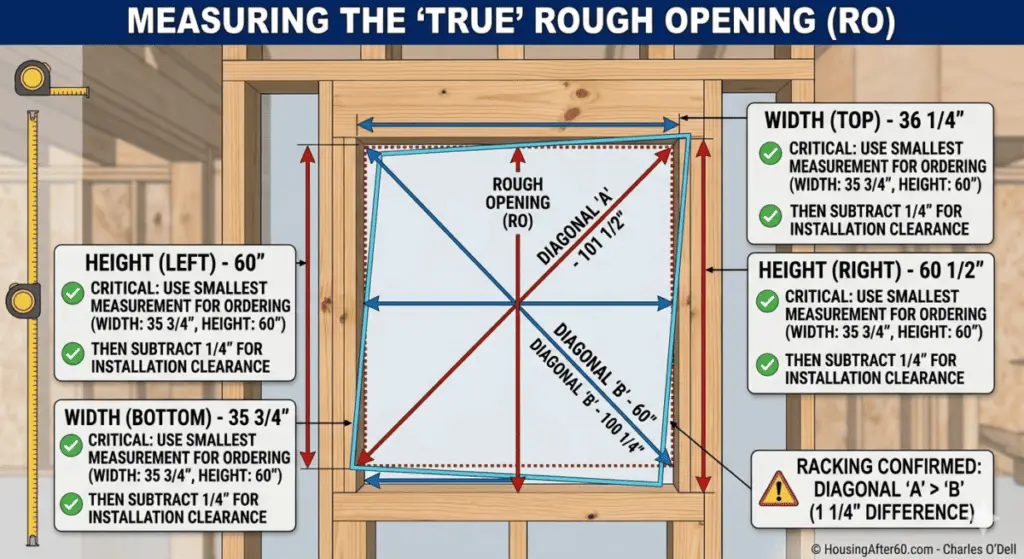
Measure the Rough Opening (RO), not the window frame. This means measuring the space between the wood studs. * Measure width at top, middle, and bottom. * Measure height at left, center, and right. * Use the smallest of those measurements. * Subtract 1/4-inch from both the width and height for clearance. Never order based on a sticker from the old window. Stickers lie; tape measures do not. If the diagonals are more than 1/2-inch different, the opening is not square. Common mistakes include measuring the trim instead of the frame or assuming all windows in one room are identical. They are not.
Internal Link: Definitive guide to Ultrex Fiberglass Framed Windows
7. Step 5: Choose the Right Replacement Window
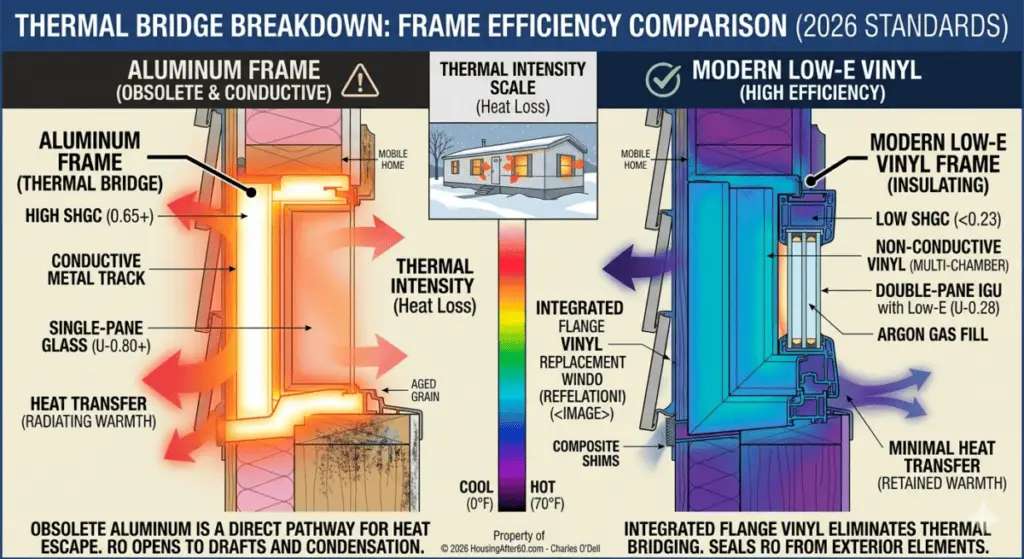
In 2026, the “Solar Heat Gain Coefficient” (SHGC) is the metric that matters. If you live in the Sun Belt, you need an SHGC below 0.23. In the North, you want a high U-Factor to retain heat. Vinyl is the logical choice for “No-Reframe” installs because it handles the vibration and shifting of a mobile home better than rigid aluminum. Ensure you select dual-pane glass with Low-E coatings. Single-pane glass in 2026 is an obsolete technology that will fail your home’s thermal inspection. The goal is a unit that can be sealed properly without rebuilding the wall.
8. Step 6: Gather Tools and Materials Before Starting
You need: * Impact Driver with square-drive bits. * High-Performance Polyurethane Sealant (Avoid cheap silicone). * Closed-cell Backer Rod. * Composite Shims (Wood shims rot). * Low-expansion Foam: high-expansion foam will bow your frames. * Putty Knife and Safety Glasses. Warn against cheap sealant: in 2026, the cost of reapplying sealant exceeds the cost of buying the industrial-grade polyurethane the first time.
2026 Cost Transparency Table (Materials)
| Material | Standard Grade | Industrial Grade (2026) |
|---|---|---|
| Polyurethane Caulk | $8 / tube | $18 / tube (Urethane-Hybrid) |
| Flashing Tape | $15 / roll | $45 / roll (Butyl High-Tack) |
9. Step 7: Remove the Old Mobile Home Window Carefully
Unscrew the exterior flange. Use a putty knife to slice the old putty tape. Do not “rip” the window out. If you bend the metal siding, you create a fish-mouth gap that no amount of caulk will fix. Slow is fast here. If the window resists, look for hidden screws or nails. Protect your interior flooring with a drop cloth. A shattered single-pane window from 1985 is a safety hazard and a cleanup nightmare. Clear the work area and have an assistant ready to catch the unit from the outside.
10. Step 8: Inspect and Prep the Opening After Removal
Clean the siding surface with isopropyl alcohol. New sealant will not bond to old butyl tape residue. Check for insect damage or warped framing. This is the moment of truth. If you find crumbling framing or major out-of-square conditions, you must pivot to a structural repair. Minor corrections: such as cleaning surfaces or replacing a small piece of trim: are still acceptable within the “no-reframe” scope. Verify dimensions one last time now that the “true” opening is exposed.
Technical Deep Dive: Zoning Variance and Egress Logic
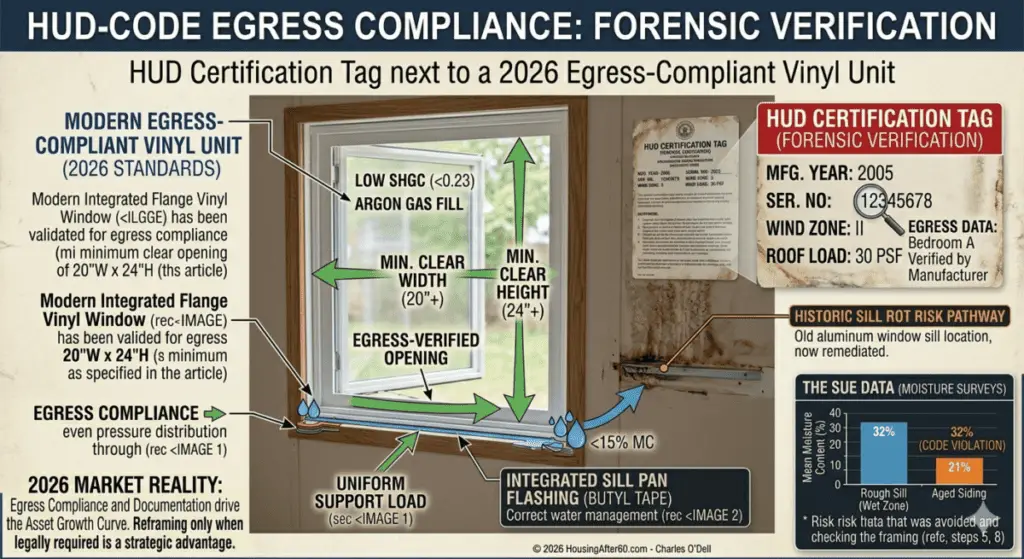
When replacing windows in 2026, you must adhere to HUD-code egress standards. In bedrooms, the window must be large enough for a firefighter with an oxygen tank to enter. If your “no-reframe” replacement reduces the clear opening below 20 inches in width or 24 inches in height, you are creating a non-compliant dwelling. In some jurisdictions, a Zoning Variance may be required if you change the window type. Always check local 2026 municipal codes before finalizing your order. A non-compliant window can block a home sale during the appraisal inspection. Reframing is sometimes legally required even if the wood is sound, just to meet egress clearance.
11. Step 9: Dry-Fit the New Window Before Final Installation
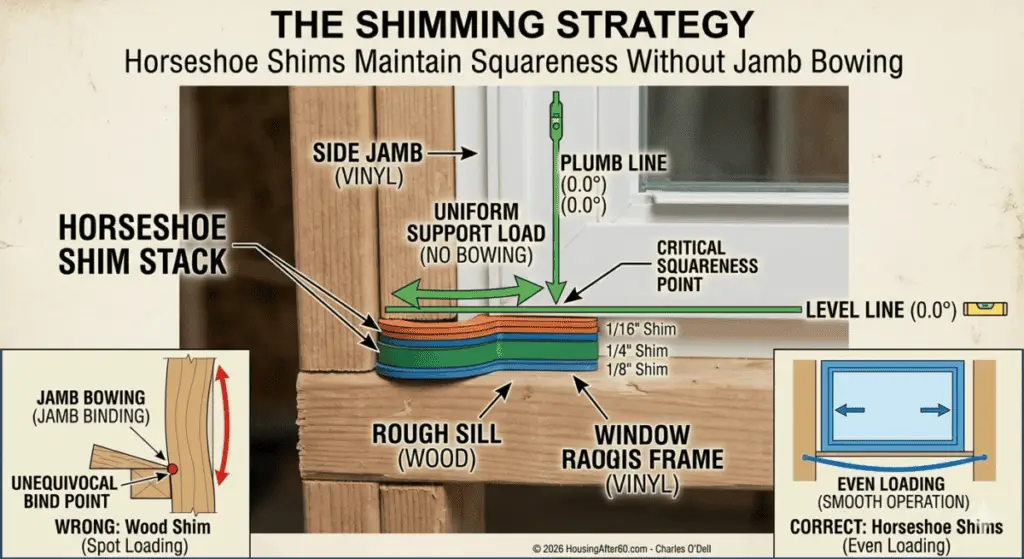
Lift the window into the hole. Does it lean? Is there a 1/8-inch gap on all sides? Check that the sashes operate. If the frame is squeezed too tight, the window will not lock. This step catches wrong-size orders before you apply messy sealant. If you have to force the window into the opening, stop. Forcing a window racks the frame, leading to seal failure and stress cracks in the glass within 12 months. Confirm your shimming plan now: before the clock starts ticking on your sealant open-time.
12. Step 10: Install the New Window Without Reframing
Apply a 1/2-inch bead of sealant to the back of the window flange. Set the window. Drive your first screw in the top-left corner. Level the unit. Drive the second screw in the bottom-right corner. This “cross-locking” keeps the window from shifting. Use stainless steel screws. Repeatedly check for level and plumb during fastening. Do not overtighten; you want the flange to sit flat against the siding, not “wave” or “dimple.” Check the operation of the sash before driving the final screws. Shimming prevents twisting and supports the frame weight.
Affiliate Comparison Table: Fasteners and Shims
| Product | Standard | Charles’ Choice (2026) |
|---|---|---|
| Screws | Zinc Coated | 304 Stainless Square-Drive |
| Shims | Cedar Wood | Stackable Composite Horseshoes |
13. Step 11: Seal and Weatherproof the Window Properly
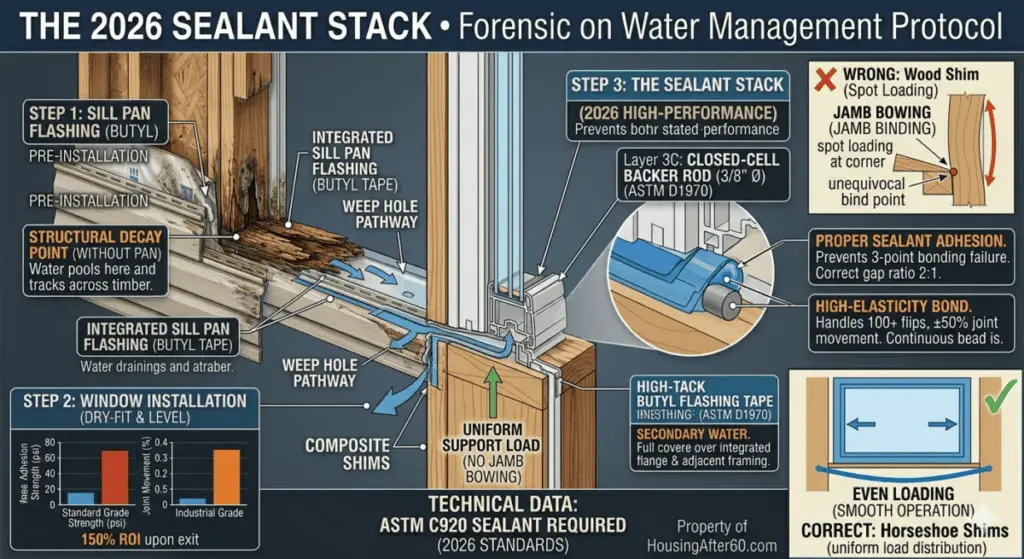
Seal the perimeter. In 2026, we utilize the “Two-Stage” seal. Stage one is the flange-to-siding bond. Stage two is the exterior trim cap. If your window has weep holes at the bottom, DO NOT CAULK THEM SHUT. This traps water inside the frame. Use a backer rod in gaps larger than 1/4-inch to prevent sealant three-point adhesion failure. Remember: leaks usually come from bad water management, not just bad windows. Your goal is to shed water away from the wall cavity at all costs. Air sealing and water management are separate technical requirements.
14. Step 12: Finish the Interior and Exterior
On the inside, use low-expansion spray foam. High-expansion foam will bow the vinyl jamb. Once dry, trim the excess and reinstall your casing. Make the final result look intentional, not patched together. On the exterior, ensure all J-channels are properly tucked. If you have small cosmetic gaps, use paintable caulk for the interior and 100% polyurethane for the exterior. Proper finishing protects the structural studs from interior humidity and condensation. Cleanup and safe disposal of old aluminum frames is the final step of a pro-grade project.
Technical Deep Dive: IRC Section 121 and Compliance
Under Internal Revenue Code Section 121, “Capital Improvements” (like a whole-house window upgrade) can be added to the cost basis of your home. This is critical for 2026 tax planning. If you sell the home later, this reduces your taxable gain. However, to qualify, the installation must meet local energy codes. If you “hack” an install without reframing where reframing was legally required for egress compliance, you may lose this tax advantage. Always ensure your replacement unit meets the minimum clear opening for bedroom egress. Keep all receipts and photographic evidence of the sound framing to prove the upgrade was a permanent capital improvement. In 2026, the IRS is increasingly scrutinizing “repair” vs “improvement” claims; documented windows are solid gold.
15. Step 13: Test the Window Before Calling the Job Finished
Open the window: it should glide. Close it and engage the locks. If the lock does not line up, the frame is “racked.” You must adjust your shimming. Finally, perform a “Light Test.” Have someone stand outside with a high-lumen flashlight at night: if you see light inside, you have an air leak. Check during the next rain for any signs of capillary action drawing water into the sill. A truly finished job requires 100% air and water tightness. Check for drafts, sticking, and condensation issues before moving to the next window.
16. Common Mistakes to Avoid
- Overtightening Screws: This “waves” the flange and breaks the seal.
- Skipping Shims: The window weight must be supported by the sill, not hung from the flange screws.
- Using Silicone on Aluminum: Silicone fails under the vibration of manufactured homes. Use polyurethane.
- Ignoring Manufacturer Instructions: Most warranties are void if you do not use their specific fastener patterns.
- Assuming Sound Framing: Just because you cannot see rot does not mean the moisture content is low.
- Sealing Weep Paths: Never caulk the drainage holes at the bottom of the frame.
17. Costs: What This Approach Can Save You
By avoiding reframing, you eliminate the need for drywall finishers ($60/hr) and siding specialists ($85/hr). For a standard 3-bedroom double-wide with 10 windows, the “No-Reframe” strategy saves approximately 40 man-hours. At 2026 rates, that is $3,400 in pure labor savings. This allows you to buy higher-quality windows, which pays off in the long run. Budget for surprise repairs anyway: I always keep a 15% contingency fund even on “simple” swap jobs. Savings disappear fast if the job leaks and rots your wall three years later.
Actionable Checklist: The “No-Reframe” Protocol
- [ ] Verify RO is square (within 3/8″).
- [ ] Check sill plate for moisture (MC < 15%).
- [ ] Order windows 1/4″ smaller than RO width/height.
- [ ] Clean siding substrate with 90% isopropyl alcohol.
- [ ] Use composite horseshoe shims (avoid cedar).
- [ ] Apply ASTM C920 Polyurethane Sealant in continuous bead.
- [ ] Test egress clear-opening dimensions for HUD compliance.
- [ ] Engage locks to verify frame alignment and squareness.
- [ ] Document for Section 121 Tax Basis with photos.
- [ ] Perform light test for air leaks at nighttime.
18. How to Know the Job Was Successful
A successful install is invisible. The window should look like it was factory-installed. There should be no “whistling” on windy days and no fogging between the panes. If your energy bill drops by 15% next month, you have done it right. You should feel confident repeating this process on the rest of the home. The home is now more comfortable, more efficient, and worth significantly more in the 2026 market. Your trim should be clean, your locks should click, and your wall should remain dry through a tropical storm.
Internal Link: Mobile Home HVAC Sizing Guide
19. FAQ Section
Can all mobile home windows be replaced without reframing? No. If the RO is rotted or “racked” beyond 1/2-inch, you must reframe to ensure the new window operates. Structural integrity always trumps convenience.
Do I remove the whole frame or just the sash? For a 2026 “No-Reframe” upgrade, you remove the entire old frame to ensure a modern seal. Sash-only swaps are rarely effective for thermal performance.
Can I use standard house windows? Only if the jamb depth matches your wall. Mobile homes often have 2×3 walls; standard house windows are built for 2×4 or 2×6 walls and will protrude awkwardly.
Do I need flashing tape? Yes. In 2026, we consider flashing tape mandatory for the “sill pan” to protect the framing from any future window seal failures.
Is this a one-person project? For small windows, yes. For large picture windows or double-hungs, you need a second set of hands to hold the unit while the first screws are driven.
20. Conclusion
The 2026 manufactured housing market rewards efficiency. If you can master the “No-Reframe” window replacement, you can modernize an aging asset without the nightmare of structural reconstruction. Be obsessive about measurements, ruthless about moisture inspection, and never settle for cheap sealant. Reframing is a last resort, not a starting point. Your home: and your net worth: will thank you for the precision. Do not rush the measuring and sealing stages; they are the difference between a flip and a flop. Follow the data, trust the tape measure, and keep your walls intact.
About the Author: Charles O’Dell
Charles O’Dell is the founder of MobileHomeFriendcom. With 23+ years of experience in the manufactured housing sector and over 100 successful flips, Charles advocates for first-principles engineering in home renovation. He believes that technical accuracy and moisture management are the only things standing between a profitable investment and a “money pit.”
Charles O’Dell has executed 100+ flips over 23 years, specializing in HUD-code structural optimization.
