Table of Contents
Introduction
Buying and installing a new manufactured home is one of the most effective strategies to secure high-quality, affordable housing in today’s inflated real estate market. Whether you are an investor looking for a solid Return on Investment (ROI) or a homeowner seeking a custom space without the custom price tag, the math undeniably works. However, the process is not as simple as picking a house from a catalog and parking it on a grassy field. It is a massive construction project, a complex logistics puzzle, and a regulatory hurdle course all rolled into one.
In this comprehensive guide, we are going to walk through the entire process based on my direct, first-hand experience. As real estate professionals for almost 25 years, my son Scott and I have seen the market shift dramatically. In the Phoenix metro area, affordable site-built homes have effectively vanished. Good manufactured homes can help fill that void.
Our journey into new manufactured homes began with a failure. Years ago, we bought an old 1968 12′ x 60′ mobile home with a massive roof-over structure, intending to renovate it. We thought we had a diamond in the rough. It was a disaster. As we peeled back the layers of the onion, we realized the home was too far gone. The frame was compromised, the wiring was dangerous, and the insulation was non-existent. We made the hard call to demolish it and replace it with a brand new Clayton manufactured home. At the time, we thought, “How hard can this be?” We were wrong. It was complicated, time-consuming, and filled with expensive surprises we did not anticipate.

Years and many experiences later, we decided to double down and install two new manufactured homes simultaneously. We are documented every step and mistake so you do not have to pay the “tuition” we paid. This article combines our insights on finding the right location, installing utilities, and managing the build. By the end of this deep dive, you will have a clear roadmap to go from bare dirt to a certificate of occupancy without losing your shirt.
Video Guide Overview
Affiliate Disclosure
This article contains affiliate links. If you purchase products through these links, Mobile Home Friend LLC may earn a commission at no additional cost to you. We only recommend products we have used or researched thoroughly.
The “Short” Answer
If you want the bottom line upfront, here it is: Buying a new manufactured home is less about the house and more about the land and infrastructure. The house is a factory-controlled variable with a fixed price. The land is the wild card that can destroy your budget.
- Location is everything: You cannot just put a mobile home anywhere. Zoning classifications, deed restrictions, and physical access determine if a lot is buildable. Never buy land without a feasibility study.
- Utilities drive the budget: If you do not have public water and sewer available at the street, you are looking at $20,000 to $50,000 just for a well and septic system before you even pour a foundation. This is the hidden cost that shocks most buyers.
- The “Base Price” is a myth: The price of the home on the dealership flyer is often only 60% of your total project cost. Site prep, permits, impact fees, taxes, and utility hookups make up the rest.
- Timeframes are long: This is not a two-week process. Expect 6 to 8 months from the day you order the home until the day you move in.
If you are prepared for the site work and the bureaucracy, the value proposition is unbeatable. You can still get a brand new, energy-efficient 3-bedroom home on your own land for significantly less than a comparable site-built house. The key is to manage the process yourself rather than paying a General Contractor a 20% markup to do it for you.
Phase 1: Finding the Right Location
The most critical step in this entire process is not choosing your cabinet colors or floor plan. It is choosing the dirt. If you buy the wrong piece of land, you do not have a homesite. You have an expensive camping spot. We have seen people lose tens of thousands of dollars on land they could not build on.

Zoning and Restrictions
Before you even walk a property or get out of your truck, you need to look at the paperwork. You must verify the Zoning Classification. In many counties, specific zones exclude manufactured housing entirely. You are generally looking for “General Rural,” “Agricultural,” or specific “Manufactured Home” overlay zones. Do not take the realtor’s word for it. Call the county planning and zoning department yourself. Give them the Assessor’s Parcel Number (APN) and ask specifically: “Is a manufactured home allowed on this parcel by right?”
Beyond the county zoning, you must check for Deed Restrictions or HOAs. I have seen beautiful lots sold at a discount because a deed restriction from 1985 says “No trailers or manufactured homes allowed.” That restriction runs with the land forever unless you can get every neighbor to agree to remove it, which is impossible. It does not matter if the county allows it. If the private deed restriction bans it, you are dead in the water. We always pull a preliminary title report during our due diligence period to check for these restrictions.
Physical Access and Logistics
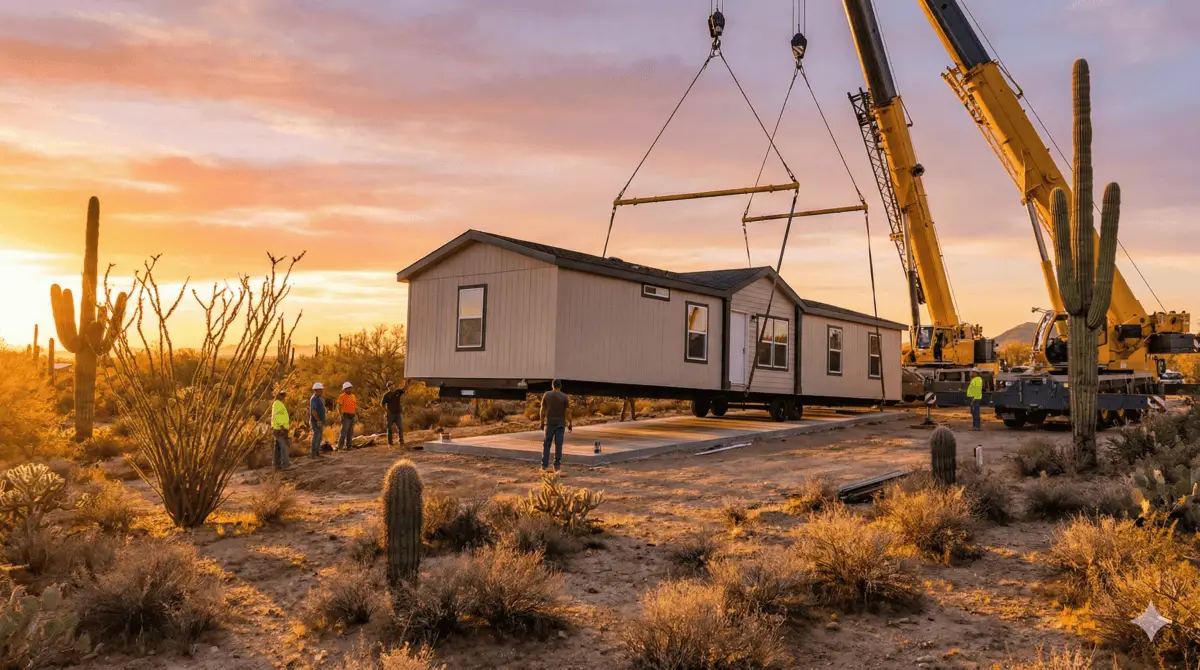
Manufactured homes are delivered in massive sections. A single-wide is one section. A double-wide is two sections. These sections are typically 14 to 16 feet wide and up to 76 feet long. The truck pulling them is a specialized “toter” that adds another 15 feet to the length. You need to drive the route to the property as if you were driving that truck.
- Road Width: Is the road to the property wide enough for a toter truck to make the turns? Narrow country lanes with sharp 90-degree turns are often impassable for a 90-foot long rig.
- Overhead Clearance: Are there low-hanging trees or power lines? You need at least 14 feet of vertical clearance. If there are power lines draped across the road, you may have to pay the utility company to raise them temporarily.
- The “Final Mile”: If your driveway is a steep, winding dirt trail, the delivery driver might refuse to attempt it. We had to bring in a bulldozer to widen a turn and reduce the grade on one of our recent projects just to get the home on site. If the truck gets stuck, the tow bill is on you, and it is not cheap.
Topography and Soil Quality
Flat land is cheap to build on. Sloped land is expensive. If your lot has a significant grade, you will need to pay for heavy earthwork.
- Grading: You will need heavy equipment like a bulldozer or road grader to cut a flat pad.
- Retaining Walls: If you cut into a hill, you must build a wall to hold back the earth. Engineered retaining walls can cost $50 per square foot or more.
- Compaction Testing: To prove the moved dirt is solid enough to hold a 50,000-pound house, you need a soils engineer to test the compaction.
First-Principles Logic: If a lot is $20,000 cheaper than the one next door but requires $25,000 in grading and retaining walls, it is not a deal. It is a liability. Always buy the flattest land possible for a manufactured home.

Phase 2: The Utilities (The Big Three)
Once you have the land secured, you need to make it livable. This is where budgets often die. You need Power, Water, and Waste disposal. In a city lot, these are right at the curb. In a rural lot, you have to create them from scratch.

1. Electrical: The Grid Connection
Connecting to the grid is not as simple as plugging in an extension cord. You are dealing with the power company, and they operate on their own timeline which is usually slow.
Distance Matters: The further your home site is from the nearest transformer or pole, the more you pay. Most power companies give you a certain allowance (e.g., 200 feet) for free or a low base cost. After that, you pay by the foot for the line extension. I have seen line extension quotes exceed $10,000 because a new pole had to be set. Always identify exactly where the nearest power source is before buying the land.
The Setup:
- Meter Pedestal: For a manufactured home, you typically install a standalone meter pedestal. This is a box on a post with your meter and a main breaker disconnect. The standard used to be 100 amps, but today we install 200 Amp service on everything to handle modern appliances and A/C loads.
- The Feeder: From the pedestal, you run a 4-wire mobile home feeder cable (two hots, a neutral, and a ground) underground to the home’s internal panel.
- Conduit: This wire must be in Schedule 40 PVC conduit (or Schedule 80 if exposed to physical damage), buried 18 to 24 inches deep depending on local code.
Cost Reality: A typical new service installation, including the pedestal, conduit, wire, and electrician labor, can range from $2,500 to $6,000, assuming power is already at the property line. If you have to bring power a quarter-mile down the road, the cost can easily jump to $20,000.
2. Water: Well vs. Public
Water is life. Without it, your home is uninhabitable. If you can connect to public water, do it. The tap fee might be $3,000 to $8,000, but it is a known fixed cost and you will never have to worry about a pump failing.

Drilling a Well: If you are rural, you are likely drilling a well. This is gambling. You pay by the foot, and you do not know when you will hit water.
- Cost: In our area of Arizona, drilling is running $40 to $60 per foot. A 300-foot well is $15,000 just for the hole in the ground.
- Pump System: Once the hole is drilled and cased, you need the pump, pressure tank, and electronic controls. Add another $3,000 to $5,000.
- Storage Tanks: If the well is “low production” (less than 3 gallons per minute), you will need a 2,500-gallon storage tank and a booster pump to provide adequate pressure to the house. This adds another $4,000.
- Risk: You might drill 500 feet and get a “dry hole.” You still pay the driller for the attempt. Talk to neighbors about their well depths before you drill.
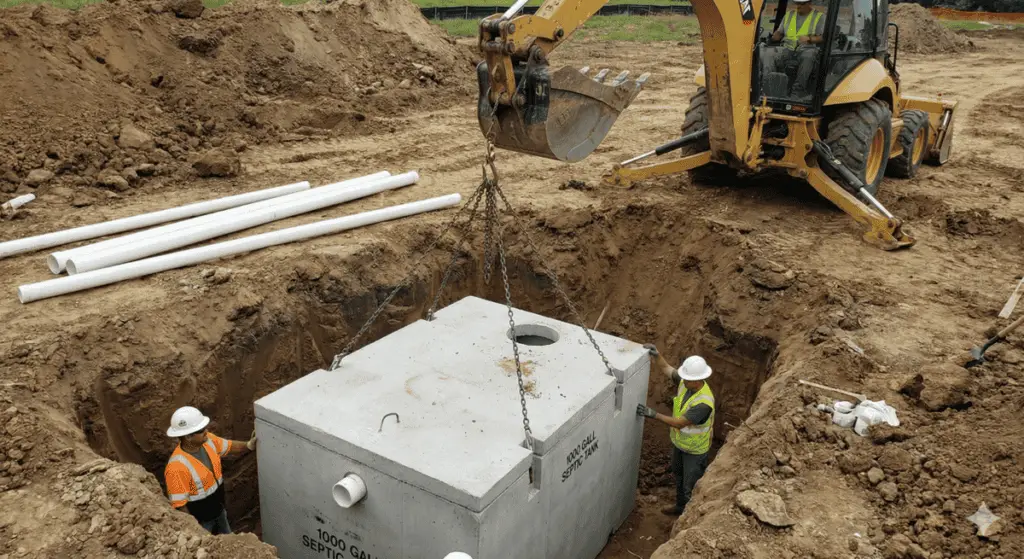
3. Waste: Septic Systems
Unless you have a sewer tap (rare in rural areas), you need a septic system. This system processes your waste on-site.
- Perc Test: Before you buy the land, make your offer contingent on a passing percolation (perc) test. An engineer digs a hole, fills it with water, and measures how fast it drains. This tells you if the soil can absorb the wastewater.
- Standard System: If the soil is good (sandy or loamy), you can install a standard gravity-fed system. This consists of a 1,000-gallon concrete tank and leach lines. The cost is typically $6,000 to $10,000.
- Alternative System: If you have clay, rock, or a high water table, you will fail the standard perc test. You are then forced to install an “Alternative” or “Aerobic” system. These are basically mini-sewage treatment plants with aerators and chlorine tablets. They cost $20,000 to $35,000 and require annual maintenance contracts mandated by the county.
Actionable Tip: Never close on land without a clear understanding of the septic requirements. The difference between a standard system and an alternative system is $20,000 of pure profit loss.
Phase 3: The Home Selection and Purchase
While you are sorting out the dirt and utilities, you need to buy the house. We chose Clayton Homes for our recent projects, but the principles apply to any manufacturer like Cavco, Champion, or Fleetwood.
The Dealership Game
Treat this process like buying a car, but with higher stakes. The “Base Price” you see on the flyer often excludes the things you actually need to live.
- Delivery: Sometimes included within a 50-mile radius, but verify this.
- Setup/Installation: Ask if the price includes the “set.” This means blocking, leveling, and tying down the home.
- AC Unit: The air conditioner condenser is almost never included in the base price.
- Skirting: The material that covers the crawlspace is usually extra.
- Steps: Front and back steps are usually extra.
Upgrades That Matter (And Those That Don’t)
When you order a new home, you can customize it. Do not spend money on cosmetic upgrades you can do yourself later, like fancy backsplashes or cabinet knobs. Spend your money on structural items you cannot change later.
- 2×6 Exterior Walls: Standard construction is often 2×4 walls. The 2×6 upgrade gives you a stronger structure and allows for thicker insulation (R-19 or R-21 vs R-11). This pays for itself in energy savings.
- Overhead Ducts: Standard mobile homes have floor vents. Floor vents fill with dirt, dog hair, and crayons. Furniture placement also blocks them. Pay extra to have the vents moved to the ceiling. This mimics a traditional home and improves airflow.
- OSB Wrap: Many base models have vinyl siding attached directly to the studs with a thin foam backer. Pay for the OSB (plywood) sheathing under the siding. It makes the house rigid, quieter, and much more weather-resistant.
- Energy Star Package: This usually includes better windows (Low-E dual pane), upgraded insulation in the roof (R-30 or R-40), and a programmable thermostat.
Financing the Project
If you are paying cash, you have leverage. If you are financing, you have two main paths:
- Chattel Loan: This is a loan for the home only (personal property). Rates are higher, terms are shorter (15-20 years), and you do not need to own the land.
- Land/Home Package (FHA/VA/Conventional): This rolls the land and the home into one mortgage. The rates are better, but the requirements are stricter. You will need a permanent foundation and an Affidavit of Affixture (more on this later).
Phase 4: Site Preparation and Foundation
You have the building permit, the land is cleared, and the home is ordered. Now you need a place to put it. You cannot just park it on the grass.
Grading and Pad Construction
You need a “pad”–a flat area slightly larger than the footprint of the home. The ground must be compacted to a specific density (usually 90% to 95%) so the home does not settle unevenly. We bring in water trucks to wet the dirt and heavy vibratory rollers to pack it down.
Drainage is King: The pad must be elevated so water flows away from the home in all directions. If water pools under your home, it will cause the piers to shift, the frame to rust, and mold to grow in the vapor barrier. We usually build the pad up 6 to 12 inches above the surrounding natural grade.
Foundation Types
There are three main ways to support the home:
- Dirt Pad with Piers: This is the cheapest method. Concrete pads (usually 24″ x 24″) are set directly on the compacted dirt, and concrete blocks are stacked on top to support the frame. This requires extensive tie-downs (steel anchors screwed into the earth) to prevent the home from blowing over.
- Concrete Runners: We prefer this method. Two parallel strips of concrete (24 to 36 inches wide) run the entire length of the home. The blocks sit on the concrete runners, not the dirt. It is much more stable than dirt pads and provides a clean surface for the setup crew.
- Full Slab: This is the most expensive option. You pour a solid slab of concrete under the entire house. This is overkill for most mobile homes unless required by specific financing types or very poor soil conditions.
For our recent projects, we utilized concrete runners. They offer the best balance of cost and stability. We also installed a plastic vapor barrier on the ground between the runners to prevent ground moisture from rising up into the floor of the home.
Phase 5: Delivery, Setup, and Finish Work
This is the most exciting and stressful part of the project. Seeing the house roll down the road is a thrill, but the work is just beginning.
Delivery Day
The home arrives in sections. The drivers are incredibly skilled, but they need room to maneuver. Once the sections are positioned on the pad, the delivery trucks unhook, and the “set crew” takes over. They use a specialized machine called a “plat” or a “crawler” to position the home precisely.
The Setup (The “Marriage”)
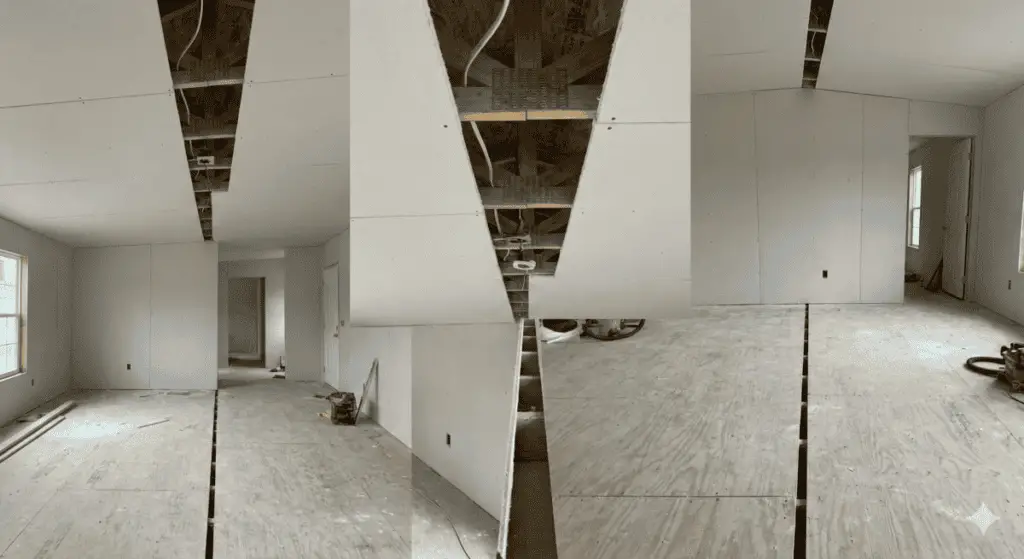
For a double-wide, the two halves must be joined at the marriage line. This is a critical process.
- Leveling: They level the home using a water level (a giant tube of fluid that is incredibly accurate across long distances). If the home is not level, doors won’t close and windows will crack.
- Winching: They winch the two halves together until they touch.
- Bolting: They bolt the floors and roofs together using large lag bolts.
- Sealing: Crucial Step: Check the marriage line seal. A heavy foam gasket is placed between the sections. If this isn’t sealed perfectly, you will have air leaks and roof leaks down the center of your house forever.
The Trim Out
Once the house is physically together, the interior crew moves in.
- Drywall: They finish the drywall cracks at the marriage line so it looks like one seamless ceiling and wall.
- Flooring: They join the carpet and vinyl flooring at the seam.
- Crossovers: They connect the electrical wires, water pipes, and drain lines that run between the two sections.
- Ductwork: They install the crossover duct, a large flexible tube under the home that sends air from the furnace to the other half of the house.
The AC Unit:
The factory does not install the AC condenser. You must hire a local HVAC pro to set the unit outside and braze the lines to the A-coil inside the furnace. Do not cut corners here. Improperly charged AC units are the #1 cause of high electric bills in manufactured homes. Make sure they pull a proper vacuum on the lines before releasing the refrigerant.

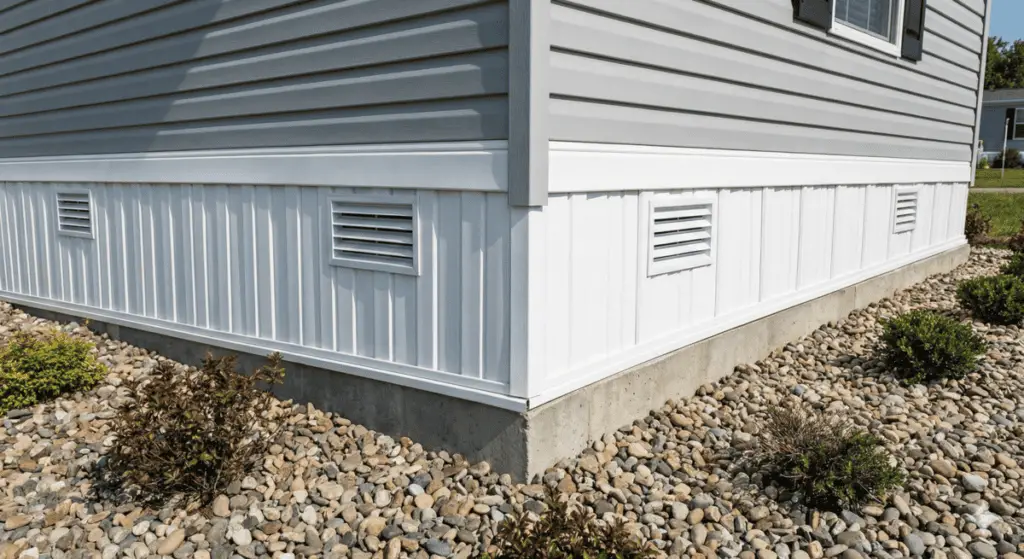
Skirting and Venting
Skirting is the material that covers the opening between the bottom of the home and the ground. It is not just aesthetic; it keeps critters out and protects the plumbing from freezing.
- Vinyl: Cheap, easy to work with, but gets brittle and cracks when hit with weed eaters.
- Hardie/Concrete Board: Looks like a real foundation, is very durable, but is expensive and heavy to install.
- Metal: Good durability, but can dent.
We typically use a high-quality vinyl for our flip projects, or Hardie panel for higher-end rentals to reduce long-term maintenance. You must install automatic vents in the skirting. These vents open in summer to let heat out and close in winter to keep heat in.
Technical Deep Dive: The Paperwork (Permits & Taxes)
You cannot ignore the bureaucracy. If you build without permits, you will not get power, and you will not be able to sell the home later.
Permits
You need a building permit from the county. To get this, you usually need:
- Plot Plan: A drawing showing where the house goes, distances to property lines, and location of septic/well.
- Septic Permit: Approval from the environmental health department.
- Zoning Clearance: Proof that the land is zoned for this use.
- Floor Plan: The engineered drawings from the manufacturer (HUD packet).
Affidavit of Affixture
In many states (like Arizona), a mobile home starts its life as a vehicle with a VIN and a title (just like a car). If you own the land, you want to “retire” the title and affix the home to the land. This changes the classification from Personal Property (chattel) to Real Property.
- Why do it? You get better financing rates (conventional mortgages), and the value of the home appreciates along with the land rather than depreciating like a car.
- How? You file an Affidavit of Affixture with the county recorder and surrender the titles to the DMV. Do this immediately upon installation.
Cost Transparency Table (2026 Estimates)
Here is a realistic breakdown of costs for a 1,500 sq. ft. new double-wide project on land you already own. These numbers assume you are managing the project (Owner-Builder).
| Item | Low End Estimate | High End Estimate | Notes |
|---|---|---|---|
| New Double Wide Home | $110,000 | $160,000 | Includes tax & delivery |
| Septic System | $6,000 | $30,000 | Conventional vs. Aerobic |
| Well / Water Hookup | $3,000 | $25,000 | Public tap vs. Deep Well |
| Electric Pedestal & Hookup | $2,500 | $6,000 | Assumes power at pole |
| Grading & Pad | $2,000 | $8,000 | Depends on slope/dirt |
| Concrete Runners | $4,000 | $8,000 | Optional but recommended |
| Skirting & Steps | $3,000 | $6,000 | Vinyl vs. Hardie |
| AC Installation | $4,500 | $6,500 | 3-4 Ton Unit |
| Permits & Impact Fees | $1,500 | $10,000 | Varies wildly by county |
| Utility Connection Fees | $500 | $2,500 | Deposits/Meter set fees |
| TOTAL PROJECT COST | $137,000 | $262,000 | Land cost NOT included |
Affiliate Products That Help
Here are products we use during our renovations and setups that can save you headaches.
| Product | Why We Use It | Link |
|---|---|---|
| Kwikset SmartKey Deadbolts | During construction, contractors lose keys constantly. SmartKey allows us to re-key the lock ourselves in 10 seconds without a locksmith. It is essential for site security. | Check Price on Amazon |
| Valterra ABS Gate Valves (Septic) | If you are hooking up your own sewer lines or doing repairs, these valves are the industry standard. They are reliable and easy to operate. | Check Price on Amazon |
| Square D 200 Amp Outdoor Panel | This is the gold standard for meter pedestals. We always buy the one with extra spaces (circuits) for future expansion, like adding a shop, a garage, or an RV hookup later. | Check Price on Amazon |
Actionable Checklist: The “Go” Sequence
Do not start Step 2 until Step 1 is 100% complete. This order of operations protects your wallet.
- Land Identification: Locate land, but DO NOT BUY yet.
- Feasibility Study:
- [ ] Call Zoning (Is a manufactured home allowed?)
- [ ] Check Deed Restrictions (Are trailers banned?)
- [ ] Perc Test (Can I install a standard septic system?)
- [ ] Utility Check (How much to get power/water to the site?)
- Purchase Land: Only execute the purchase contract after Feasibility passes.
- Order Home: Lock in your price and floor plan with the dealer. Get the floor plan prints.
- Permitting: Submit floor plan and plot plan to the county building department.
- Site Prep: Grade the pad, install the septic tank, drill the well, and run the electric conduit.
- Delivery: The home arrives on site.
- Setup: The crew blocks, levels, and ties down the home.
- Utilities: Electrician and Plumber make final connections to the home.
- Inspections: The county inspector signs off on the setup and utilities. You get the “Green Tag.”
- Move In: Pop the champagne.
Internal Resources
For more details on specific renovation tasks mentioned here, check out these articles on our site:
- Mobile Home Whole-House Repiping Cost (PEX Guide): If you are buying a used home or need to understand plumbing best practices for your new install.
- Mobile Home Flooring Replacement Cost: Should you upgrade the carpet from the factory or do it yourself later? We break down the ROI.
- Mobile Home Remodel Tips: Ideas for customization after you move in to make the house truly yours.
Summary
Buying and installing a new manufactured home is a journey through logistics, engineering, and red tape, but the destination is absolutely worth it. You get a modern, safe, energy-efficient home for a fraction of the cost of traditional construction. We have proven this model works for profit, and it can work for your personal residence too.
The key takeaways are:
- Audit the land before you buy it. The dirt dictates the budget more than the house does.
- Invest in infrastructure. Do not skimp on the pad, the drainage, or the utilities. These are the veins and arteries of your property.
- Stay involved. This is your project. No one cares about your money or your home as much as you do.
By following this roadmap, you can avoid the pitfalls that trapped us on our first project–the “1968 Disaster”–and enjoy the profitability and comfort of a well-executed manufactured home installation.
Related Questions
Q: Can I put a manufactured home on any piece of land?
A: No. Zoning laws and deed restrictions frequently ban them. You must check the county zoning map for your specific parcel and read the Title Report for private deed restrictions (CC&Rs) before purchasing.
Q: Is a manufactured home a good investment?
A: Yes, providing you own the land. When a manufactured home is affixed to real property (land you own) and titled as real estate, it can appreciate similarly to site-built homes. Homes in parks (on leased land) generally depreciate like vehicles.
Q: How long does the process take?
A: From ordering the home to move-in, expect 4 to 6 months. The factory backlog usually takes 2 to 4 months, and site work/permitting takes 1 to 2 months. Weather and inspector availability can add delays.
Q: What is the difference between a mobile home and a manufactured home?
A: It is strictly a date. Homes built before June 15, 1976, are “Mobile Homes.” Homes built after that date are “Manufactured Homes” and are built to the HUD Code.
About the Author
Chuck O’Dell
Chuck has been renovating and flipping properties since 2003. At this point, he has over 100 properties under his belt. Chuck says that rehabbing homes is the most fun part of his real estate career. He helps clients get their homes ready to sell and helps his buyers with after-purchase remodeling, often including substantial renovations like full kitchens and bathrooms. Chuck specializes in investing in, buying, renovating, selling, and flipping manufactured homes both in parks and on their own fee-simple lots. He says that one of the most satisfying parts of renovating mobile homes is creating beautiful, affordable housing that people are proud to own and call home!
Chuck O’Dell, a veteran real estate investor with over 20 years of experience and 100+ property flips, details his exact process for installing new manufactured homes for profit.
