If you’ve ever crawled underneath a mobile home, you may find it organized, neat and dry underneath. But, likely if the home is older, you may find a location that fits into a horror movie that is damp and smelly with pieces of plastic and insulation hanging down impeding your movement.
Table of Contents
The Short Answer
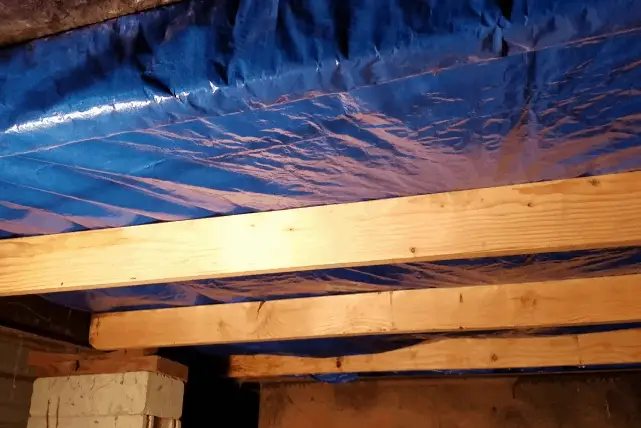
When a manufactured home leaves the factory, there is what appears to be a plastic wrap that seals off the underside of the home. It attaches to each side of the home, most likely the steel I-beams and probably looks like it sags a bit between the I-beams.
This is commonly called “belly-wrap”, “belly board” or “bottom board”. The manufactured home industry and well as HUD refer to it as “bottom board”. It serves a much greater purpose than just making the underside of the home appear clean and neat. For the purposes of this post, we’ll refer to its common name of “belly wrap”.
Belly wrap keeps out moisture, insects and rodents. It is the home’s first line of defense against the dangers of ground moisture to the home.
Inspecting The Belly Wrap
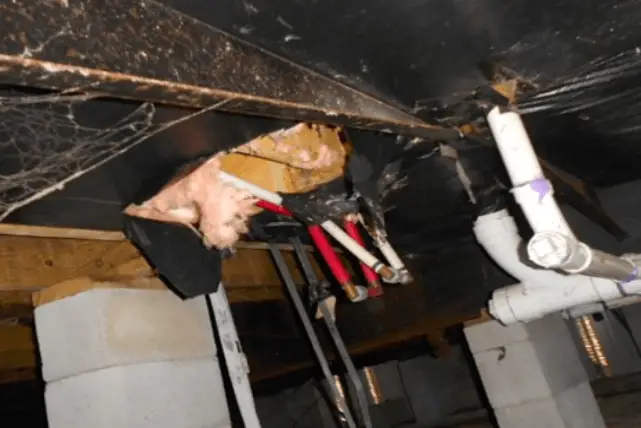
In an older home, it is common to find pieces of the belly wrap hanging down that looks like it was shredded. You’ll also find insulation that might be hanging as well. Why does this happen?
Plumbing leaks, could be toilets, showers, bathtubs, sinks, water heaters, may develop leaks in the plumbing. When this happens, the leaking water will pool at the lowest point the water can find in the belly wrap. The water will just sit there and likely develop mold and mildew that accumulates in the cavity between the belly wrap and the floor joists of the home. See our post “How Can I Get Rid Of Dampness And Mold In My Mobile Home?”
To do an inspection, get a flashlight and carefully crawl through the space underneath the home. If you find some low points in the belly wrap, there very well could be trapped water, signifying a plumbing leak. If you find hanging pieces of the belly wrap, or insulation, it probably means that there were leaks in the past and even though the leaks might have been repaired, the belly wrap was not.
So What If My Belly Wrap Is Damaged?
It isn’t uncommon to have to fix a plumbing leak from time to time. In order to make the repair, the belly wrap must be cut to gain access to repair the plumbing or any other repair in the area under the home. Often, the person making the repair simply tapes up the belly wrap with common duct tape. This might work for a couple of days, but it will easily come loose and the hole in the belly wrap is exposed again.
So why is it a big deal to keep the belly wrap sealed? Insects and rodents love to “play” underneath a manufactured home if they can gain access. First line of defense agains them? The skirting. Second line of defense is the belly wrap. If they get underneath the home through the skirting and they find holes in the belly wrap, they will often pull down the insulation to make nests, or just to have a good time.
As mentioned, the belly wrap keeps out ground moisture from the home. This is super important if you want to keep mold from developing. Also, belly wrap keeps the insulation up in the floor of the home. Also important if you want the home to be energy efficient.
Let’s look at the best ways to repair damaged belly wrap.
Making Repairs To Damaged Belly Wrap
The old method of using duct tape to make repairs needs to be abandoned. It simply doesn’t last. After a few days, the duct tape comes lose and the opening in the belly wrap is exposed.
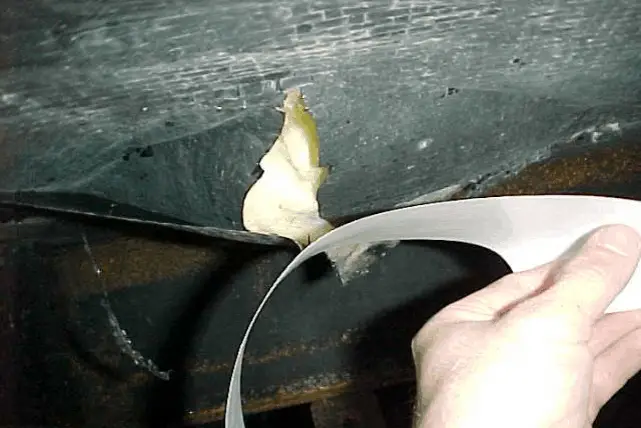
BEST WAY TO MAKE AN OPENING IN THE BELLY WRAP
From time to time, it will become necessary to open the belly wrap to be able to make repairs, especially to plumbing, underneath the home. When it becomes necessary, the best way to cut into the belly wrap is to cut an “X” directly below where you need access. This will leave four flaps hanging down. The reason for this is it is far simpler to repair once the repair is finished.
MATERIALS NEEDED TO MAKE A REPAIR
The plastic sheeting that is used under mobile homes since the 1980s is called Polyethylene. This is a thin, flexible, and durable material. If you own a manufactured home, you should always keep some polyethylene sheeting on hand in order to make needed repairs. If you have difficulty sourcing the polyethylene sheeting, you can also use Tyvek home wrap which is easily purchased at your favorite big box home store. So, the items needed to make repairs can include the following:
- Polyethylene sheeting or Tyvek
Flex Mend tape (Flex Mend is a brand and the best we’ve found)- Spray adhesive
- Scissors
- Paperbacked insulation
- Blow dryer
- Staple Gun (Optional)
- Hammer and nails (Optional)
- 1 x 2 inch furring strips (For larger hole repairs)
Steps To Repairing The Belly Wrap For A Smaller Hole
- Fix Any Problems – With the plumbing or wiring.
- Make sure that the holes through the subfloor are securely sealed using caulk or expandable spray foam.
- Cut Off – Any torn, or degraded part of the belly wrap polyethylene.
- Insulation – Put some paperbacked insulation into the area being repaired if the original insulation is no longer intact around the repair.
- Clean Old Polyethylene – Make sure the underside of the old polyethylene all around the repair area is cleaned. This makes it so that the adhesives and tape will stick to it.
- Cut New Polyethylene – Cut a piece of the new polyethylene sheeting that is a foot longer and wider than the hole being repaired.
- Spray Adhesive – Spray some of the spray adhesive on one side of the new cut piece of polyethylene sheet.
- Press Into Place – Press the new polyethylene piece into place (of course with the spray adhesive side facing up toward the home.
- Flex-Mend Tape – Tape the edges of the repair all around the edges with the Flex mend tape.
- The Flex-Mend tape has a solid coating of specifically formulated adhesive and a simple paper release liner; it makes permanent repairs.
- Once the tape is applied you should use a blow dryer to heat the tape for better adhesion.
- CAUTION – Do not overheat the tape and damage the new piece of polyethylene sheeting.
Steps To Repairing The Belly Wrap For A LARGER Hole
The steps up to cutting the new polyethylene of Tyvek will be the same as making repairs to a small hole. See those steps above.
- Cut New Polyethylene – Cut a piece of the new polyethylene sheeting that is a foot longer and wider than the hole being repaired.
- For a larger hole fix, this new piece may be several feet in both directions.
- Cut 1 x 2 Furring Strips – The rectangular new belly wrap patch will be attached to the house using furring strips. Cut the furring strips to fit each side of the longer sides of the rectangle. If a square, it will still be just 2 furring strips.
- Wrap First 1 x 2 Furring Strip
- Lay the polyethylene sheet out on the ground.
- Take one furring strip, lay it on one of the longer sides of the polyethylene sheet.
- Scoot the furring strip in a couple of inches and wrap the polyethylene sheet up and over the furring strip. If you’ve ever wrapped a present, this is very similar.
- Staple the polyethylene sheet to the top of the furring strip about every 2 inches. The polyethylene sheet should now wrap around and to the outside of the furring strip, then continue underneath and out the other side.
- Wrap Second 1 x 2 Furring Strip
- Now go to the opposite side of the polyethylene sheet, parallel to the first furring strip and repeat the same steps as with the first furring strip above.
- When you are finished, you should have to parallel sides attached to the furring strips.
- Turn It Upside Down – Turn the entire polyethylene sheet and the furring strips upside down from their current position. Your goal here is to have a flat piece of polyethylene sheet showing on the top side, with the two furring strips now on the ground. This is the way that the patch will be under the home. The flat polyethylene sheet will be attached to the old belly wrap under the house.
- Attache To The old belly wrap
- The furring strip will run perpendicular to the floor joists of the home. Hold the first furring strip up to the repair area and screw the furring strip to the floor joist. make sure to use at least one screw per joist for however many floor joists the furring strip covers.
- Once the first furring strip is attached, then stretch the repair patch tightly against the old belly wrap and attached the second furring strip the same as the first.
- The new patch should now be in place and firmly attached at the furring strips to the floor joists.
- Flex-Mend Tape – Tape the edges of the repair all around the edges with the Flex mend tape. The two sides without a furring strip are taped the same way as they are with a small hole. The two sides with furring strips should first be caulked and then the tape placed in the crevice. Part of the tape will be on the old belly wrap. The other part of the tape will then wrap around the furring strip.
- The Flex-Mend tape has a solid coating of specifically formulated adhesive and a simple paper release liner; it makes permanent repairs.
- Once the tape is applied you should use a blow dryer to heat the tape for better adhesion.
- CAUTION – Do not overheat the tape and damage the new piece of polyethylene sheeting.
Related Questions
WHAT IS THE LIFE EXPECTANCY OF A MOBILE HOME?
This is a great question and one that should be considered carefully before making a purchase of a mobile home. What are your plans for the home?
- Will you be living in it full time?
- Will it be a vacation home?
- Will it be an investment property to rent out?
- Are you buying an older home or a newer one?
Carefully consider your answers to these questions in making a decision about what type of mobile home you may want to purchase.
The U.S. Department of Housing and urban Development (HUD) tells us that the manufactured homes built today have a life expectancy of 30 to 55 years; of course depending on how well they are maintained. We feel this is a good estimate for the middle ground. In our experience we have seen some homes even older than 55 years that are in amazing condition. We’ve also seen others that are less than 15 years old that seem ready to be scrapped.
This HUD estimate is a great starting point, but there are a number of other variables that affect the lifespan of the home other than just maintenance.
For more information check our blog “What Is The Life Expectancy Of A Mobile Home?”
THE 12 MOST COMMON PROBLEMS WITH OLDER MOBILE HOMES
Older manufactured homes can be a great investment or a very reasonably priced place to make a home. If taken care of and maintained well, these homes can appreciate in value over time. Like any site-built home, a manufactured home can and will deteriorate over time if left to the elements or faulty maintenance.
The most common problems we find with mobile homes can be summed up as:
- Foundations – Piers sinking, tilting and pulling away from the mobile home frame. Tie-down straps also becoming loose.
- Doors and Windows Out Of Alignment – When foundation settling occurs, it is common for mobile home doors and windows to get out of alignment where they will not close or latch properly.
- Roof – Roofs often develop leaks. This is especially true of older mobile homes that have metal rooftops.
- Leaks – Mobile homes are especially susceptible to water damage from leaks. Leaks can often occur around the perimeter of the roof, windows, and plumbing. This is especially true around sinks, toilets and tub showers. Subfloor damage can and often occurs.
- Ceilings – Mobile homes with acoustical panels instead of drywall can be especially problematic if there have been leaks. It is often extremely difficult to find matching acoustical panels. Installing them can also be problematic.
- Plumbing – Many older homes used polybutylene pipes which have been notorious for degrading from the inside out, and then bursting.
- Wiring – Wiring can be problematic if the home has had owner added additions and features where the wiring has been tapped into the original electrical panel.
- Homeowner Built Additions – Very common for a DIY type of owner to have built on a room, porch or shed. If not built properly, these can cause damage to the homes’ roof, foundation, walls, and electrical systems.
- HVAC – Over time, previous owners often ad window a/c units because the original HVAC system was not cooling and heating properly. Sorting out the original system can be expensive, but is not difficult to tackle.
- Insulation – The most problematic for insulation in mobile homes is under the floor. The home has a “belly wrap” that holds the floor insulation in place. This can often become damage and cause problems.
- Washer Drains and Dryer Vents – Often you might see these two items draining and venting directly below the home. These can be especially problematic for the foundation of the home.
- Damaged Skirting – Skirting is designed to keep the area below the home dry and critter free. Often skirting may have holes or panels missing. This allows quite a bit of havoc to occur which can damage many mobile home systems.
For more information, see our post “The 12 Most Common Problems With Older Mobile Homes!.